Packet tracer: packet switching simulation
Packet Tracer is a fun, take-home, flexible software program that allows you to experiment with network behavior, build network models, and ask ‘what if’ questions. In this activity, you will explore how Packet Tracer serves as a modeling tool for network representations. While doing so, you will explore a simulation of how packets are created and sent across the network traveling from source device to destination device.
August 19, 2017
Design IoT Projects with Packet Tracer 7.1
January 6, 2010
Exploring Windows 7
Windows Management.
By now, you’ve probably seen that Windows 7 does a lot to make window management easier: you can “dock” a window to the left or right half of the screen by simply dragging it to the edge; similarly, you can drag the window to the top of the screen to maximize it, and double-click the window top / bottom border to maximize it vertically with the same horizontal width. What you might not know is that all these actions are also available with keyboard shortcuts:
-
Win+Left Arrow and Win+Right Arrow dock;
-
Win+Up Arrow and Win+Down Arrow maximizes and restores / minimizes;
-
Win+Shift+Up Arrow and Win+Shift+Down Arrow maximizes and restores the vertical size.
This side-by-side docking feature is particularly invaluable on widescreen monitors – it makes the old Windows way of shift-clicking on two items in the taskbar and then using the context menu to arrange them feel really painful.
Display Projection.
Had enough of messing around with weird and wonderful OEM display driver utilities to get your notebook display onto an external projector? In that case, you’ll be pleased to know that projection is really quick and simple with Windows 7. Just hit Win+P, and you’ll be rewarded by the following pop-up window:
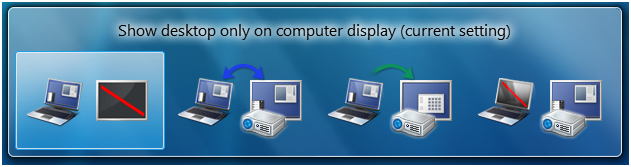
Use the arrow keys (or keep hitting Win+P) to switch to “clone”, “extend” or “external only” display settings. You can also access the application as displayswitch.exe.
If you want broader control over presentation settings, you can also press Win+X to open the Windows Mobility Center, which allows you to turn on a presentation “mode” that switches IM clients to do not disturb, disables screensavers, sets a neutral wallpaper etc. (Note that this feature is also available in Windows Vista.)
Cut Out The Clutter.
Working on a document in a window and want to get rid of all the extraneous background noise? Simply hit Win+Home to minimize all the non-active background windows, keeping the window you’re using in its current position. When you’re ready, simply press Win+Home again to restore the background windows to their original locations.
Multi-Monitor Windows Management.
The earlier tip on window management showed how you can dock windows within a monitor. One refinement of those shortcuts is that you can use Win+Shift+Left Arrow and Win+Shift+Right
Arrow to move windows from one monitor to another – keeping them in the same relative location to the monitor’s top-left origin.
Command Junkies Only.
One of the most popular power toys in Windows XP was “Open Command Prompt Here”, which enabled you to use the graphical shell to browse around the file system and then use the context menu to open a command prompt at the current working directory. In Windows 7 (and in Windows Vista, incidentally – although not many folk knew about it), you can simply hold the Shift key down while selecting the context menu to get exactly the same effect. If the current working directory is a network location, it will automatically map a drive letter for you.
It’s a Global Village. If you’ve tried to change your desktop wallpaper, you’ve probably noticed that there’s a set of wallpapers there that match the locale you selected when you installed Windows. (If you picked US, you’ll see beautiful views of Crater Lake in Oregon, the Arches National Park, a beach in Hawai’i, etc.) In fact, there are several sets of themed wallpapers installed based on the language you choose, but the others are in a hidden directory. If you’re feeling in an international mood, simply browse to C:\Windows\Globalization\MCT and you’ll see a series of pictures under the Wallpaper directory for each country. Just double-click on the theme file in the Theme directory to display a rotation through all the pictures for that country. (Note that some countries contain a generic set of placeholder art for now.)
The Black Box Recorder.
Every developer wishes there was a way that an end-users could quickly and simply record a repro for the problem that they’re running into that is unique to their machine. Windows 7 comes to the rescue! Part of the in-built diagnostic tools that we use internally to send feedback on the product, the Problem Steps Recorder provides a simple screen capture tool that enables you to record a series of actions. Once you hit “record”, it tracks your mouse and keyboard and captures screenshots with any comments you choose to associate alongside them. Once you stop recording, it saves the whole thing to a ZIP file, containing an HTML-based “slide show” of the steps. It’s a really neat little tool and I can’t wait for it to become ubiquitous on every desktop! The program is called psr.exe; you can also search for it from Control Panel under “Record steps to reproduce a problem”.

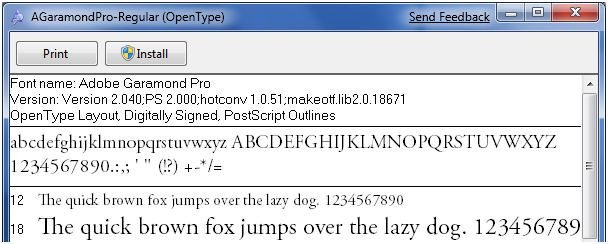
The Font of All Knowledge. Now font installation is really easy – there is an “Install” button to the font viewer applet that takes care of the installation process:
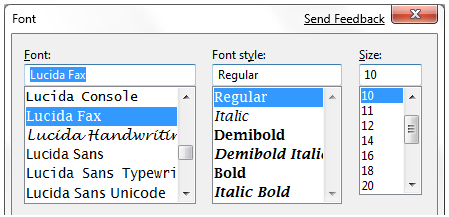
There are lots of other new features built into Windows 7 that will satisfy those of a typographic bent, incidentally – grouping multiple weights together, the ability to hide fonts based on regional settings, a new text rendering engine built into the DirectWrite API, and support in the Font common file dialog for more than the four “standard” weights. For example:
Gabriola.
As well as the other typographic features mentioned above, Windows 7 includes Gabriola, an elaborate display type from the Tiro Typeworks foundry that takes advantage of OpenType Layout to provide a variety of stylistic sets, flourishes and ornamentation ligatures:

Who Stole My Browser? If you feel like Internet Explorer is taking a long time to load your page, it’s worth taking a look at the add-ons you have installed. One of the more helpful little additions in Internet Explorer 8 is instrumentation for add-on initialization, allowing you to quickly see whether you’re sitting around waiting for plug-ins to load. Just click Tools / Manage Add-ons, and then scroll right in the list view to see the load time. On my machine, I noticed that the Research add-on that Office 2007 installs was a particular culprit, and since I never use it, it was simple to disable it from the same dialog box.
Rearranging the Furniture.
Unless you’ve seen it demonstrated, you may not know that the icons in the new taskbar aren’t fixed in-place. You can reorder them to suit your needs, whether they’re pinned shortcuts or running applications. What’s particularly nice is that once they’re reordered, you can start a new instance of any of the first five icons by pressing Win+1, Win+2, Win+3 etc. I love that I can quickly fire up a Notepad2 instance on my machine with a simple Win+5 keystroke, for instance.
What’s less well-known is that you can similarly drag the system tray icons around to rearrange their order, or move them in and out of the hidden icon list. It’s an easy way to customize your system to show the things you want, where you want them.
Installing from a USB Memory Stick.
To install Windows 7 Beta on this machine to replace the pre-installed Windows XP environment. Like most netbook-class devices, this machine has no built-in media drive, and nor did I have an external USB DVD drive available to boot off. The solution: I took a spare 4GB USB 2.0 thumbdrive, reformatted it as FAT32, and simply copied the contents of the Windows 7 Beta ISO image to the memory stick using xcopy e:\ f:\ /e /f (where e: was the DVD drive and f: was the removable drive location). Not only was it easy to boot and install from the thumbdrive, it was also blindingly fast: quicker than the corresponding DVD install on my desktop machine.
It’s also worth noting in passing that Windows 7 is far better suited to a netbook than any previous operating system: it has a much lighter hard drive and memory footprint than Windows Vista, while also being able to optimize for solid state drives (for example, it switches off disk defragmentation since random read access is as fast as sequential read access, and it handles file deletions differently to minimize wear on the solid state drive).
I Want My Quick Launch Toolbar Back!
You might have noticed that the old faithful Quick Launch toolbar is not only disabled by default in Windows 7, it’s actually missing from the list of toolbars. As is probably obvious, the concept of having a set of pinned shortcut icons is now integrated directly into the new taskbar. Based on early user interface testing, we think that the vast majority of users out there (i.e. not the kind of folk who read this blog, with the exception of my mother) will be quite happy with the new model, but if you’re after the retro behavior, you’ll be pleased to know that the old shortcuts are all still there. To re-enable it, do the following:
-
Right-click the taskbar, choose Toolbars / New Toolbar
-
In the folder selection dialog, enter the following string and hit OK:
%userprofile%\AppData\Roaming\Microsoft\Internet Explorer\Quick Launch
-
Turn off the “lock the taskbar” setting, and right-click on the divider. Make sure that “Show text” and “Show title” are disabled and the view is set to “small icons”.
-
Use the dividers to rearrange the toolbar ordering to choice, and then lock the taskbar again.
If it’s not obvious by the semi-tortuous steps above, it’s worth noting that this isn’t something we’re exactly desperate for folks to re-enable, but it’s there if you really need it for some reason. Incidentally, we’d love you to really try the new model first and give us feedback on why you felt the new taskbar didn’t suit your needs.
It’s a Drag.
Much play has been made of the Jump Lists feature in Windows 7, allowing applications like Windows Live Messenger to offer an easy task-based entry point. Jump lists replace the default right-click context menu in the new taskbar; another way to access them (particularly useful if you’re running Windows 7 on a one-button MacBook) is by left-clicking and dragging up in a kind of “swooshing” motion. This was designed for touch-enabled devices like the beautiful HP TouchSmart all-in-one PC, where the same gesture applies.
Another place where you can “swoosh” (not an official Microsoft term) is the IE 8 address bar, where the downward drag gesture brings up an expanded list containing the browser history, favorites and similar entries. The slower you drag, the cooler the animation!
Standards Support. Every review of Windows 7 that I’ve seen has noted the revamped WordPad and Paint applets that add an Office-like ribbon to expose their functionality. Few, however, have noticed one small but hopefully appreciated feature: WordPad can now read and write both the Word 2007-compatible Office Open XML file format but also the OpenDocument specification that IBM and Sun have been advocating:
Windows Vista-Style Taskbar. I wasn’t initially a fan of the Windows 7 taskbar when it was first introduced in early Windows 7 builds, but as the design was refined in the run up to the beta, I was converted and now actively prefer the new look, particularly when I’ve got lots of windows open simultaneously. For those who really would prefer a look more reminiscent of Windows Vista, the good news is that it’s easy to customize the look of the taskbar to more closely mirror the old version:
To achieve this look, right-click on the taskbar and choose the properties dialog. Select the “small icons” checkbox and under the “taskbar buttons” setting, choose “combine when taskbar is full”. It’s not pixel-perfect in accuracy, but it’s close from a functionality point of view.
Peeking at the Desktop. While we’re on the taskbar, it’s worth noting a few subtleties. You’ve probably seen the small rectangle in the bottom right hand corner: this is the feature we call “Aero Peek”, which enables you to see any gadgets or icons you’ve got on your desktop. I wanted to note that there’s a keyboard shortcut that does the same thing – just press Win+Space.
Running with Elevated Rights. Want to quickly launch a taskbar-docked application as an administrator? It’s easy – hold down Ctrl+Shift while you click on the icon, and you’ll immediately launch it with full administrative rights (assuming your account has the necessary permissions, of course!)
One More of the Same, Please.
I’ve seen a few folk caught out by this one. If you’ve already got an application open on your desktop (for example, a command prompt window), and you want to open a second instance of the same application, you don’t have to go back to the start menu. You can simply hold down the Shift key while clicking on the taskbar icon, and it will open a new instance of the application rather than switching to the existing application. For a keyboard-free shortcut, you can middle-click with the third mouse button to do the same thing. (This trick assumes that your application supports multiple running instances, naturally.)
Specialized Windows Switching.
Another feature that power users will love is the ability to do a kind of “Alt+Tab” switching across windows that belong to just one application. For example, if you’ve got five Outlook message windows open along with ten other windows, you can quickly tab through just the Outlook windows by holding down the Ctrl key while you repeatedly click on the single Outlook icon. This will toggle through each of the five Outlook windows in order, and is way faster than opening Alt+Tab and trying to figure out which of the tiny thumbnail images relates to the specific message you’re trying to find.
Walking Through the Taskbar.
Another “secret” Windows shortcut: press Win+T to move the focus to the taskbar. Once you’re there, you can use the arrow keys to select a particular window or group and then hit Enter to launch or activate it. As ever, you can cancel out of this mode by hitting the Esc key. I don’t know for sure, but I presume this shortcut was introduced for those with accessibility needs. However, it’s equally valuable to power users – another good reason for all developers to care about ensuring their code is accessible.
Pin Your Favorite Folders.
If you’re always working in the same four or five folders, you can quickly pin them with the Explorer icon on the taskbar. Hold the right-click button down and drag the folder to the taskbar, and it will be automatically pinned in the Explorer Jump List.
Starting Explorer from “My Computer”. If you spend more time manipulating files outside of the documents folders than inside, you might want to change the default starting directory for Windows Explorer so that it opens at the Computer node:
To do this, navigate to Windows Explorer in the Start Menu (it’s in the Accessories folder). Then edit the properties and change the target to read:
%SystemRoot%\explorer.exe /root,::{20D04FE0-3AEA-1069-A2D8-08002B30309D}
If you want the change to affect the icon on the taskbar, you’ll need to unpin and repin it to the taskbar so that the new shortcut takes affect. It’s worth noting that Win+E will continue to display the documents library as the default view: I’ve not found a way to change this from the shell at this time.
ClearType Text Tuning and Display Color Calibration. If you want to tune up your display for image or text display, we have the tools included out of the box. It’s amazing what a difference this makes: by slightly darkening the color of the text and adjusting the gamma back a little, my laptop display looks much crisper than it did before. You’d adjust the brightness and contrast settings on that fancy 42″ HDTV you’ve just bought: why wouldn’t you do the same for the computer displays that you stare at every day?

Check out cttune.exe and dccw.exe respectively, or run the applets from Control Panel.
ISO Burning. Easy to miss if you’re not looking for it: you can double-click on any DVD or CD .ISO image and you’ll see a helpful little applet that will enable you to burn the image to a blank disc. No more grappling for shareware utilities of questionable parentage!
Windows Movie Maker.
Windows 7 doesn’t include a movie editing tool – it’s been moved to the Windows Live Essentials package, along with Photo Gallery, Mail and Messenger. Unfortunately, Windows Live Movie Maker is currently still in an early beta that is missing most of the old feature set (we’re reworking the application), and so you might be feeling a little bereft of options. It goes without saying that we intend to have a better solution by the time we ship Windows 7, but in the meantime the best solution for us early adopters is to use Windows Movie Maker 2.6 (which is essentially the same as the most recent update to the Windows XP version). It’s missing the full set of effects and transitions from the Windows Vista version, and doesn’t support HD editing, but it’s pretty functional for the typical usage scenario of home movie editing.
Download Windows Movie Maker 2.6 from here:
http://microsoft.com/downloads/details.aspx?FamilyID=d6ba5972-328e-4df7-8f9d-068fc0f80cfc
Hiding the Windows Live Messenger Icon.
Hopefully your first act after Windows 7 setup completed was to download and install the Windows Live Essentials suite of applications (if not, then you’re missing out on a significant part of the Windows experience). If you’re a heavy user of IM, you may love the way that Windows Live Messenger is front and central on the taskbar, where you can easily change status and quickly send an IM to someone:

On the other hand, you may prefer to keep Windows Live Messenger in the system tray where it’s been for previous releases. If so, you can fool the application into the old style of behavior. To do this, close Windows Live Messenger, edit the shortcut properties and set the application to run in Windows Vista compatibility mode. Bingo!
Enjoy The Fish. I’m surprised that not many people seem to have caught the subtle joke with the Siamese fighting fish that is part of the default background, so I’ll do my part at keeping the secret hidden. Check out wikipedia for a clue.
When All Else Fails…
There are always those times when you’re in a really bad spot – you can’t boot up properly, and what you really want is something you can quickly use to get at a command prompt so you can properly troubleshoot. Windows 7 now includes the ability to create a system repair disc, which is essentially a CD-bootable version of Windows that just includes the command prompt and a suite of system tools. Just type “system repair disc” in the Start Menu search box, and you’ll be led to the utility.
The following table contains a selection of the cmdlets that ship with PowerShell noting the most similar commands in other well known command line interpreters.
| Windows PowerShell (Cmdlet) |
Windows PowerShell |
cmd.exe / COMMAND.COM |
Bash |
Description |
| Get-Location |
gl, pwd |
Display the current directory/present working directory. |
||
| Set-Location |
sl, cd, chdir |
cd |
Change the current directory |
|
| Clear-Host |
cls, clear |
Clear the screen |
||
| Copy-Item |
cpi, copy, cp |
Copy one or several files / a whole directory tree |
||
| Get-Help |
help, man |
Help on commands |
||
| Remove-Item |
ri, del, erase, rmdir, rd, rm |
rm, rmdir |
Delete a file / a directory |
|
| Rename-Item |
rni, ren |
Rename a file / a directory |
||
| Move-Item |
mi, move, mv |
Move a file / a directory to a new location |
||
| Get-ChildItem |
gci, dir, ls |
List all files / directories in the (current) directory |
||
| Write-Output |
echo, write |
echo |
Print strings, variables etc. to standard output |
|
| Pop-Location |
popd |
popd |
Change the current directory to the directory most recently pushed onto the stack |
|
| Push-Location |
pushd |
pushd |
Push the current directory onto the stack |
|
| Set-Variable |
sv, set |
set |
Set the value of a variable / create a variable |
|
| Get-Content |
gc, type, cat |
Get the content of a file |
||
| Select-String |
Print lines matching a pattern |
|||
| Get-Process |
gps, ps |
tlist, tasklist |
List all currently running processes |
|
| Stop-Process |
spps, kill |
kill, taskkill |
kill |
Stop a running process |
| Tee-Object |
tee |
n/a |
Pipe input to a file or variable, then pass the input along the pipeline |
Examples
Examples are provided first using the long-form canonical syntax and then using more terse UNIX-like and DOS-like aliases that are set up in the default configuration. Examples that could harm a system include the -whatif parameter to prevent them from actually executing
- Stop all processes that begin with the letter “p”:
PS> get-process p* | stop-process -whatif
PS> ps p* | kill -whatif
- Find the processes that use more than 1000 MB of memory and kill them:
PS> get-process | where-object { $_.WS -gt 1000MB } | stop-process -whatif
PS> ps | ? { $_.WS -gt 1000MB } | kill -whatif
- Calculate the number of bytes in the files in a directory:
PS> get-childitem | measure-object -property length -sum
PS> ls | measure-object -p length -s
PS> dir | measure-object -p length -s
- Determine whether a specific process is no longer running:
PS> $processToWatch = get-process notepad
PS> $processToWatch.WaitForExit()
PS> $p = ps notepad
PS> $p.WaitForExit()
- Change the case of a string from lower to upper:
PS> “hello, world!”.ToUpper()
- Insert the string “ABC” after the first character in the word “string” to have the result “sABCtring”:
PS> “string”.Insert(1, “ABC”)
- Download a specific RSS feed and show the titles of the 8 most recent entries:
PS> $rssUrl = “http://blogs.msdn.com/powershell/rss.aspx”
PS> $blog = [xml](new-object System.Net.WebClient).DownloadString($rssUrl)
PS> $blog.rss.channel.item | select title -first 8
- Sets $UserProfile to the value of the UserProfile environment variable
PS> $UserProfile = $env:UserProfile
- Cast a .Net Namespace, and call a method exposed by the cast
PS> [System.Windows.Forms.MessageBox]::Show(“Hello, World!”)
File extensions
- PS1 – Windows PowerShell shell script
- PS1XML – Windows PowerShell format and type definitions
- PSC1 – Windows PowerShell console file
- PSD1 – Windows PowerShell data file (for Version 2)
- PSM1 – Windows PowerShell module file (for Version 2)
Few more tips and tricks.
- Windows key + Left: docks current window to the left side of the screen.
- Windows key + Right: docks current window to the right side of the screen.
- Windows key + Up: maximizes and/or restores foreground window.
- Windows key + Down: minimizes active window.
- If you want a more Vista-esque taskbar rather than the superbar (why anyone would revert is beyond me), right-click the Taskbar, go to Properties, check the ‘Use small icons’ option, then change the “Taskbar Buttons” option to ‘Never combine.’
- Windows 7 now burns ISO files themselves instead of making users grapple with third-party applications.
- For those lucky people with a multi-monitor setup, Windows + SHIFT + Left (or Right) will shift a window from monitor to monitor.
- Gone is the “Add Font” dialog. It’s been replaced with a much nicer system. Download a font and double-click it (you’ll be greeted with the familar font window, but you should notice it now has a ‘Install’ button).
- Windows 7 now includes Gabriola. This is an elaborate display typeface that takes advantage of OpenType layout to create a variety of stylistic sets.
- If you press Windows + 1, it will create a new instance of the first icon in the task bar. This is handy if you do a lot of coding and need to open several instances of a program.
- If you right-click on a Taskbar icon, it brings up the much talked about Jump List. However, the same can be done by clicking with the left mouse button and dragging the icon “out” (so to speak). This was specifically designed for touch-enabled computers, such as your lovely HP TouchSmart PC.
- To run a program as an Administrator, it’s now as easy as holding CTRL + SHIFT when you open the application.
- With Windows 7, you can now create a ‘System Repair Disc.’ This is a CD bootable version of Windows 7 that includes the command prompt and a suite of system tools. Very handy for those really tough spots (which, with this still in beta, could be just around the corner). To get to this, simply open the Start Menu and type: “system repair disc” in the search field.
November 7, 2009
Windows 7 Launch Party
We had a party on 29th October,2009 at my place which was “Windows 7 Launch party” in kolkata. The collegues of ISB&M and my friends were there and we had gathered to celebrate the Windows7 Launch Party in our place.


April 27, 2009
Using Group Policy in Windows (type gpedit.msc from run)

The Windows Operating Systems provide a centralized management and configuration solution called Group Policy. Group Policy is supported on Windows 2000, Windows XP Professional, Windows Vista, Windows Server 2003 and Windows Server 2008. Windows XP Media Center Edition and Windows XP Professional computers not joined to a domain can also use the Group Policy Object Editor to change the group policy for the individual computer. This local group policy however is much more limited than GPOs for Active Directory. Windows Home does not support Group Policy since it has no functionality to connect to a domain.
Usually Group Policy is used in an Enterprise type environment but it can be used in schools, small businesses, and other organizations as well. Group Policy can control a systems registry, NTFS security, audit and security policy, software installation, logon/logoff scripts, folder redirection, and Internet Explorer settings. For example, you can use it to restrict certain actions that pose a security risk like blocking the Task Manager, restricting access to certain folders, disabling downloaded executable files, etc.
Group Policy has both Active Directory and Local Computer Policy feasibility. Local Group Policy (LGP) using GPEDIT is a more basic version of the group policy used by Active Directory. In versions of Windows before Vista, LGP can configure the group policy for a single local computer, but unlike Active Directory group policy, can not make policies for individual users or groups. Windows Vista supports Multiple Local Group Policy Objects which allows setting local group policy for individual users. Windows Vista provides this ability with three layers of Local Group Policy objects: Local Group Policy, Administrator and Non-Administrators Group Policy, and user specific Local Group Policy. These layers of Local Group Policy objects are processed in order, starting with Local Group Policy, continuing with Administrators and Non-Administrators Group Policy, and finishing with user-specific Local Group Policy.
Primarily you see Group Policy used in an Active Directory solutions. Policy settings are actually stored in what are called Group Policy Objects (GPOs) and is internally referenced by a Globally Unique Identifier (GUID) which may be linked to multiple domains or organizational units. In this way, potentially thousands of machines or users can be updated via a simple change to a single GPO which can reduce administrative burden and costs associated with managing these resources.
Group Policies are analyzed and applied at startup for computers and during logon for users. The client machine refreshes most of the Group Policy settings periodically, the period ranging from 60-120 minutes and controlled by a configurable parameter of the Group Policy settings.
-
Configuring Group Policy Settings
-
Using Local Policy to Turn Off Windows Features
Group Policy Object Editor (GPEDIT) is the main application that is used to administer Group Policies. GPEDIT consists of two main sections: User Configuration and Computer Configuration. The User Configuration holds settings that are applied to users (at logon and periodic background refresh) while the Computer Configuration holds settings that are applied to computers (at startup and periodic background refresh). These sections are further divided into the different types of policies that can be set, such as Administrative Templates, Security, or Folder Redirection.
Group Policy settings are configured by navigating to the appropriate location in each section. For example, you can set an Administrative Templates policy setting in a GPO to prevent users from seeing the Run command. To do this you would enable the policy setting Remove Run Menu from Start Menu. This setting is located under User Configuration, Administrative Templates, Start Menu, and Task Bar. You edit most policy settings by double-clicking the title of the policy setting, which opens a dialog box that provides specific options. In Administrative Templates policy settings, for example, you can choose to enable or disable the policy setting or leave it as not configured. In other areas, such as Security Settings, you can select a check box to define a policy setting and then set available parameters.
The Group Policy Object Editor (GPEDIT) provides different ways of learning about the function or definition of specific policy settings. In most cases, when you can double click the title of a policy setting, the dialog box contains any relevant defining information about the policy setting. For Administrative Templates policy settings, the Group Policy Object Editor provides explanation text directly in the Web view of the console. You also can find this explanation text by double-clicking the policy setting and then clicking the Explain text tab. In either case, this text shows operating system requirements, defines the policy setting, and includes any specific details about the effect of enabling or disabling the policy setting.
Windows has a lot of features but you may not want all the features to be enable for all users. For example, the "Auto play" feature on the CD-ROM drives might be a setting you like to have turned off. Starting the policy edit is quite simple.
1. Click start and then run.
2. Type gpedit.msc and press enter.
3. The policy editor will start.
It should say in the top left corner "local computer policy". Make sure you take plenty of time to familiarize yourself with GPEDIT before you attempt any changes and be careful when you are setting options. You should read the help and understand each setting before you change it. Take the time to browse through all the main sections: "Computer Configuration" and "User Configuration". In both sections you will find the same subsections, some of which you do not need to touch. The one you will be most interested in for both User and Computer configuration is the section marked "Administrative Templates".
There are usually three settings for each policy:
1. Not configured – This is the default setting that means the policy is not over riding any configuration changes that have been made on the machine by the user. If you do not want to specify a certain setting, then the setting should be left with this option enabled.
2. Enabled – This means that the particular setting or option is set. For example "Enabled" against "Auto Play is disabled" means that Auto Play is disabled.
3. Disabled – This is the opposite of enabled and usually means you have turned off access to a feature that would normally be accessible.
There will be exceptions to some settings, where you are asked to actually enter text or choose from a list. Sometimes after you enable a setting there will be additional options you need to select.
For Windows 2000, you can see the policy explanation of what each change will do by right clicking the setting and choosing properties. The "explain" tab will give you the information. For Windows XP, select the "Extended" tab at the bottom of the Policy Editor window. It is also available from properties as per Windows 2000.
-
Policy Changes In Action
Many of the changes you make will take affect immediately after your computer applies the setting and the desktop can refresh. Other changes might not take complete effect until after your system has been completely restarted. You may want to always reboot your system after making the changes. No matter what make sure the change is what you want to happen otherwise you could accidently lock yourself out of something.
Policy Highlights –
Here are a couple of changes to the policy that you might want to consider making.
A) Set Internet Explorer Homepage. Stop your home page being changed. It is changed back each time you login. Will affect all users of your machine.
—- User Configuration: Windows Settings: Internet Explorer Maintenance: URLs: Home Page
B) Disable Auto Play. Turn off auto play of new CD-ROMs and music CDs:
—- User Configuration: Administrative Templates: System: Disable Auto Play
—- Computer Configuration: Administrative Templates: System: Disable Auto Play
C) Turn Off Personalised Menus. Does the start menu annoy you by not showing everything? Turn off personalised menus for all users by enabling this setting.
—- User Configuration: Administrative Templates: Windows Components: Start Menu and Task Bar: Disable Personalised Menus
April 21, 2009
Configuring Linux FTP Server
How To Download And Install VSFTPD:
Most RedHat and Fedora Linux software products are available in the RPM format. Downloading and installing RPMs isn’t hard. If you need a refresher, Chapter 6, on RPMs, covers how to do this in detail. It is best to use the latest version of VSFTPD.
When searching for the file, remember that the VSFTPD RPM’s filename usually starts with the word vsftpd followed by a version number, as in: vsftpd-1.2.1-5.i386.rpm.
How To Get VSFTPD Started:
You can start, stop, or restart VSFTPD after booting by using these commands:
[root@bigboy tmp]# service vsftpd start
[root@bigboy tmp]# service vsftpd stop
[root@bigboy tmp]# service vsftpd restart
To configure VSFTPD to start at boot you can use the chkconfig command.
[root@bigboy tmp]# chkconfig vsftpd on
Note: In RedHat Linux version 8.0 and earlier, VSFTPD operation is controlled by the xinetd process, which is covered in Chapter 16, "TELNET, TFTP, and XINETD." You can find a full description of how to configure these versions of Linux for VSFTPD in Appendix III, "Fedora Version Differences."
Testing the Status of VSFTPD:
You can always test whether the VSFTPD process is running by using the netstat -a command which lists all the TCP and UDP ports on which the server is listening for traffic. This example shows the expected output.
[root@bigboy root]# netstat -a | grep ftp
tcp 0 0 *:ftp *:* LISTEN
[root@bigboy root]#
If VSFTPD wasn’t running, there would be no output at all.
The vsftpd.conf File:
VSFTPD only reads the contents of its vsftpd.conf configuration file only when it starts, so you’ll have to restart VSFTPD each time you edit the file in order for the changes to take effect.
This file uses a number of default settings you need to know about.
> VSFTPD runs as an anonymous FTP server. Unless you want any remote user to log into to your default FTP directory using a username of anonymous and a password that’s the same as their email address, I would suggest turning this off. The configuration file’s anonymous_enable directive can be set to no to disable this feature. You’ll also need to simultaneously enable local users to be able to log in by removing the comment symbol (#) before the local_enable instruction.
> VSFTPD allows only anonymous FTP downloads to remote users, not uploads from them. This can be changed by modifying the anon_upload_enable directive shown later.
> VSFTPD doesn’t allow anonymous users to create directories on your FTP server. You can change this by modifying the anon_mkdir_write_enable directive.
> VSFTPD logs FTP access to the /var/log/vsftpd.log log file. You can change this by modifying the xferlog_file directive.
> By default VSFTPD expects files for anonymous FTP to be placed in the /var/ftp directory. You can change this by modifying the anon_root directive. There is always the risk with anonymous FTP that users will discover a way to write files to your anonymous FTP directory. You run the risk of filling up your /var partition if you use the default setting. It is best to make the anonymous FTP directory reside in its own dedicated partition.
The configuration file is fairly straight forward as you can see in the snippet below.
# Allow anonymous FTP?
anonymous_enable=YES
…
# Uncomment this to allow local users to log in.
local_enable=YES
…
# Uncomment this to enable any form of FTP write command.
# (Needed even if you want local users to be able to upload files)
write_enable=YES
…
# Uncomment to allow the anonymous FTP user to upload files. This only
# has an effect if global write enable is activated. Also, you will
# obviously need to create a directory writable by the FTP user.
#anon_upload_enable=YES
…
# Uncomment this if you want the anonymous FTP user to be able to create
# new directories.
#anon_mkdir_write_enable=YES
…
# Activate logging of uploads/downloads.
xferlog_enable=YES
…
# You may override where the log file goes if you like.
# The default is shown# below.
#xferlog_file=/var/log/vsftpd.log
…
# The directory which vsftpd will try to change
# into after an anonymous login. (Default = /var/ftp)
#anon_root=/data/directory
To activate or deactivate a feature, remove or add the # at the beginning of the appropriate line.
Other vsftpd.conf Options
There are many other options you can add to this file:
o Limiting the maximum number of client connections (max_clients)
o Limiting the number of connections by source IP address (max_per_ip)
o The maximum rate of data transfer per anonymous login. (anon_max_rate)
o The maximum rate of data transfer per non-anonymous login. (local_max_rate)
Descriptions on this and more can be found in the vsftpd.conf man pages.
FTP Security Issues:
FTP has a number of security drawbacks, but you can overcome them in some cases. You can restrict an individual Linux user’s access to non-anonymous FTP, and you can change the configuration to not display the FTP server’s software version information, but unfortunately, though very convenient, FTP logins and data transfers are not encrypted.
The /etc/vsftpd.ftpusers File
For added security, you may restrict FTP access to certain users by adding them to the list of users in the /etc/vsftpd.ftpusers file. The VSFTPD package creates this file with a number of entries for privileged users that normally shouldn’t have FTP access. As FTP doesn’t encrypt passwords, thereby increasing the risk of data or passwords being compromised, it is a good idea to let these entries remain and add new entries for additional security.
Anonymous Upload
If you want remote users to write data to your FTP server, then you should create a write-only directory within /var/ftp/pub. This will allow your users to upload but not access other files uploaded by other users. The commands you need are:
[root@bigboy tmp]# mkdir /var/ftp/pub/upload
[root@bigboy tmp]# chmod 722 /var/ftp/pub/upload
FTP Greeting Banner
Change the default greeting banner in the vsftpd.conf file to make it harder for malicious users to determine the type of system you have. The directive in this file is.
ftpd_banner= New Banner Here
Using SCP As Secure Alternative To FTP
One of the disadvantages of FTP is that it does not encrypt your username and password. This could make your user account vulnerable to an unauthorized attack from a person eavesdropping on the network connection. Secure Copy (SCP) and Secure FTP (SFTP) provide encryption and could be considered as an alternative to FTP for trusted users. SCP does not support anonymous services, however, a feature that FTP does support.
Tutorial:
FTP has many uses, one of which is allowing numerous unknown users to download files. You have to be careful, because you run the risk of accidentally allowing unknown persons to upload files to your server. This sort of unintended activity can quickly fill up your hard drive with illegal software, images, and music for the world to download, which in turn can clog your server’s Internet access and drive up your bandwidth charges.
FTP Users with Only Read Access to a Shared Directory
In this example, anonymous FTP is not desired, but a group of trusted users need to have read only access to a directory for downloading files. Here are the steps:
1. Disable anonymous FTP. Comment out the anonymous_enable line in the vsftpd.conf file like this:
# Allow anonymous FTP?
# anonymous_enable=YES
2. Enable individual logins by making sure you have the local_enable line uncommented in the vsftpd.conf file like this:
# Uncomment this to allow local users to log in.
local_enable=YES
3. Start VSFTP.
[root@bigboy tmp]# service vsftpd start
4. Create a user group and shared directory. In this case, use /home/ftp-users and a user group name of ftp-users for the remote users
[root@bigboy tmp]# groupadd ftp-users
[root@bigboy tmp]# mkdir /home/ftp-docs
5. Make the directory accessible to the ftp-users group.
[root@bigboy tmp]# chmod 750 /home/ftp-docs
[root@bigboy tmp]# chown root:ftp-users /home/ftp-docs
6. Add users, and make their default directory /home/ftp-docs
[root@bigboy tmp]# useradd -g ftp-users -d /home/ftp-docs user1
[root@bigboy tmp]# useradd -g ftp-users -d /home/ftp-docs user2
[root@bigboy tmp]# useradd -g ftp-users -d /home/ftp-docs user3
[root@bigboy tmp]# useradd -g ftp-users -d /home/ftp-docs user4
[root@bigboy tmp]# passwd user1
[root@bigboy tmp]# passwd user2
[root@bigboy tmp]# passwd user3
[root@bigboy tmp]# passwd user4
7. Copy files to be downloaded by your users into the /home/ftp-docs directory
8. Change the permissions of the files in the /home/ftp-docs directory for read only access by the group
[root@bigboy tmp]# chown root:ftp-users /home/ftp-docs/*
[root@bigboy tmp]# chmod 740 /home/ftp-docs/*
Users should now be able to log in via FTP to the server using their new usernames and passwords. If you absolutely don’t want any FTP users to be able to write to any directory, then you should set the write_enable line in your vsftpd.conf file to no:
write_enable = NO
Remember, you must restart VSFTPD for the configuration file changes to take effect.
10. Connect to bigboy via FTP
[root@smallfry tmp]# ftp 192.168.1.100 (ip address of bigboy)
you will get a prompt like
ftp>
FTP commands and files:
/etc/ftpaccess : General configuration file: classes of users, access definitions, logging, etc.
Example:
class all real,guest,anonymous *
limit all 10 Any /etc/msgs/msg.dead
readme README* login
readme README* cwd=*
message /welcome.msg login
message .message cwd=*
compress yes all
tar yes all
log commands real
log transfers anonymous,real inbound,outbound
shutdown /etc/shutmsg
email user@hostname
/etc/ftphosts : Individual user host access to allow / deny a given username from an address.
# Example host access file
# Everything after a '#' is treated as comment,
# empty lines are ignored
allow bartm somehost.domain
deny fred otherhost.domain 131.211.32.*
/etc/ftpgroups : It allow us to set up groups of users.
/etc/ftpusers : Users who are not allowed to log in.
/etc/ftpconversions : Allows users to request specific on-the-fly conversions.
-
chroot – Run with a special root directory
-
ftpcount – Show number of concurrent users.
-
ftpshut – close down the ftp servers at a given time
-
ftprestart – Restart previously shutdown ftp servers
-
ftpwho – show current process information for each ftp user
Configuring Linux Mail Server
Email is an important part of any Web site you create. In a home environment, a free web based email service may be sufficient, but if you are running a business, then a dedicated mail server will probably be required.
This chapter will show you how to use sendmail to create a mail server that will relay your mail to a remote user’s mailbox or incoming mail to a local mailbox. You’ll also learn how to retrieve and send mail via your mail server using a with mail client such as Outlook Express or Evolution.
Configuring Sendmail
One of the tasks in setting up DNS for your domain (my-site.com) is to use the MX record in the configuration zone file to state the hostname of the server that will handle the mail for the domain. The most popular Unix mail transport agent is sendmail, but others, such as postfix and qmail, are also gaining popularity with Linux. The steps used to convert a Linux box into a sendmail mail server will be explained here.
How Sendmail Works
As stated before, sendmail can handle both incoming and outgoing mail for your domain. Take a closer look.
Usually each user in your home has a regular Linux account on your mail server. Mail sent to each of these users (username@my-site.com) eventually arrives at your mail server and sendmail then processes it and deposits it in the mailbox file of the user’s Linux account.
Mail isn’t actually sent directly to the user’s PC. Users retrieve their mail from the mail server using client software, such as Microsoft’s Outlook or Outlook Express that supports either the POP or IMAP mail retrieval protocols.
Linux users logged into the mail server can read their mail directly using a text-based client, such as mail, or a GUI client, such as Evolution. Linux workstation users can use the same programs to access their mail remotely.
The process is different when sending mail via the mail server. PC and Linux workstation users configure their e-mail software to make the mail server their outbound SMTP mail server.
If the mail is destined for a local user in the mysite.com domain, then sendmail places the message in that person’s mailbox so that they can retrieve it using one of the methods above.
If the mail is being sent to another domain, sendmail first uses DNS to get the MX record for the other domain. It then attempts to relay the mail to the appropriate destination mail server using the Simple Mail Transport Protocol (SMTP). One of the main advantages of mail relaying is that when a PC user A sends mail to user B on the Internet, the PC of user A can delegate the SMTP processing to the mail server.
Note: If mail relaying is not configured properly, then your mail server could be commandeered to relay spam. Simple sendmail security will be covered later.
Sendmail Macros
When mail passes through a sendmail server the mail routing information in its header is analyzed, and sometimes modified, according to the desires of the systems administrator. Using a series of highly complicated regular expressions listed in the /etc/mail/sendmail.cf file, sendmail inspects this header and then acts accordingly.
In recognition of the complexity of the /etc/mail/sendmail.cf file, a much simpler file named /etc/sendmail.mc was created, and it contains more understandable instructions for systems administrators to use. These are then interpreted by a number of macro routines to create the sendmail.cf file. After editing sendmail.mc, you must always run the macros and restart sendmail for the changes to take effect.
Each sendmail.mc directive starts with a keyword, such as DOMAIN, FEATURE, or OSTYPE, followed by a subdirective and in some cases arguments. A typical example is.
FEATURE(`virtusertable’,`hash -o /etc/mail/virtusertable.db’)dnl
The keywords usually define a subdirectory in the /usr/share/sendmail-cf file in which the macro may be found and the subdirective is usually the name of the macro file itself. So in the example, the macro name is /usr/share/sendmail-cf/feature/virtusertable.m4, and the instruction ` hash -o /etc/mail/virtusertable.db’ is being passed to it.
Notice that sendmail is sensitive to the quotation marks used in the m4 macro directives. They open with a grave mark and end with a single quote.
FEATURE(`masquerade_envelope‘)dnl
Some keywords, such as define for the definition of certain sendmail variables and MASQUERADE_DOMAIN, have no corresponding directories with matching macro files. The macros in the /usr/share/sendmail-cf/m4 directory deal with these.
Once you finish editing the sendmail.mc file, you can then execute the make command while in the /etc/mail directory to regenerate the new sendmail.cf file.
[root@bigboy tmp]# cd /etc/mail
[root@bigboy mail]# make
If there have been no changes to the files in /etc/mail since the last time make was run, then you’ll get an error like this:
[root@bigboy mail]# make
make: Nothing to be done for `all’.
[root@bigboy mail]#
The make command actually generates the sendmail.cf file using the m4 command. The m4 usage is simple, you just specify the name of the macro file as the argument, in this case sendmail.mc, and redirect the output, which would normally go to the screen, to the sendmail.cf file with the ">" redirector symbol.
# m4 /etc/mail/sendmail.mc > /etc/mail/sendmail.cf
I’ll discuss many of the features of the sendmail.mc file later in the chapter.
Most RedHat and Fedora Linux software products are available in the RPM format. You will need to make sure that the sendmail, sendmail-cf, and m4 software RPMs are installed. (Chapter 6, "Installing RPM Software" will tell you how.) When searching for the RPMs, remember that the filename usually starts with the software package name by a version number, as in sendmail-8.12.10-1.1.1.i386.rpm.
You can use the chkconfig command to get sendmail configured to start at boot:
[root@bigboy tmp]# chkconfig sendmail on
To start, stop, and restart sendmail after booting, use
[root@bigboy tmp]# service sendmail start
[root@bigboy tmp]# service sendmail stop
[root@bigboy tmp]# service sendmail restart
Remember to restart the sendmail process every time you make a change to the configuration files for the changes to take effect on the running process. You can also test whether the sendmail process is running with the pgrep command:
[root@bigboy tmp]# pgrep sendmail
You should get a response of plain old process ID numbers:
How to Restart Sendmail after Editing Your Configuration Files
In this chapter, you’ll see that sendmail uses a variety of configuration files that require different treatments for their commands to take effect. This little script encapsulates all the required post configuration steps.
#!/bin/bash
cd /etc/mail
make
newaliases
/etc/init.d/sendmail restart
It first runs the make command, which creates a new sendmail.cf file from the sendmail.mc file and compiles supporting configuration files in the /etc/mail directory according to the instructions in the file /etc/mail/Makefile. It then generates new e-mail aliases with the newaliases command, (this will be covered later), and then restarts sendmail.
Use this command to make the script executable.
chmod 700 filename
You’ll need to run the script each time you change any of the sendmail configuration files described in the sections to follow.
The line in the script that restarts sendmail is only needed if you have made changes to the /etc/mail/sendmail.mc file, but I included it so that you don’t forget. This may not be a good idea in a production system. Delete the appropriate m4 line depending on your version of Linux.
Note: When sendmail starts, it reads the file sendmail.cf for its configuration. sendmail.mc is a more user friendly configuration file and really is much easier to fool around with without getting burned. The sendmail.cf file is located in different directories depending on the version of RedHat you use. The /etc/sendmail.cf file is used for versions up to 7.3, and /etc/mail/sendmail.cf is used for versions 8.0 and higher and Fedora Core.
The /etc/mail/sendmail.mc File
You can define most of sendmail’s configuration parameters in the /etc/mail/sendmail.mc file, which is then used by the m4 macros to create the /etc/mail/sendmail.cf file. Configuration of the sendmail.mc file is much simpler than configuration of sendmail.cf, but it is still often viewed as an intimidating task with its series of structured directive statements that get the job done. Fortunately, in most cases you won’t have to edit this file very often.
How to Put Comments in sendmal.mc
In most Linux configuration files a # symbol is used at the beginning of a line convert it into a comment line or to deactivate any commands that may reside on that line.
The sendmail.mc file doesn’t use this character for commenting, but instead uses the string "dnl". Here are some valid examples of comments used with the sendmail.mc configuration file:
These statements are disabled by dnl commenting.
dnl DAEMON_OPTIONS(`Port=smtp,Addr=127.0.0.1, Name=MTA’)
dnl # DAEMON_OPTIONS(`Port=smtp,Addr=127.0.0.1, Name=MTA’)
This statement is incorrectly disabled:
# DAEMON_OPTIONS(`Port=smtp,Addr=127.0.0.1, Name=MTA’)
This statement is active:
DAEMON_OPTIONS(`Port=smtp,Addr=127.0.0.1, Name=MTA’)
Remember that you will never receive mail unless you have configured DNS for your domain to make your new Linux box mail server the target of the DNS domain’s MX record.
Configure Your Mail Server’s Name In DNS
You first need to make sure that your mail server’s name resolves in DNS correctly. For example, if your mail server’s name is bigboy and it you intend for it to mostly handle mail for the domain my-site.com, then bigboy.my-site.com must correctly resolve to the IP address of one of the mail server’s interfaces. You can test this using the host command:
[root@smallfry tmp]# host bigboy.my-site.com
bigboy.my-site.com has address 172.16.1.100
[root@smallfry tmp]#
You will need to fix your DNS server’s entries if the resolution isn’t correct.
Configure The /etc/resolv.conf File
The sendmail program expects DNS to be configured correctly on the DNS server. The MX record for your domain must point to the IP address of the mail server.
The program also expects the files used by the mail server’s DNS client to be configured correctly. The first one is the /etc/resolv.conf file in which there must be a domain directive that matches one of the domains the mail server is expected to handle mail for.
Finally, sendmail expects a nameserver directive that points to the IP address of the DNS server the mail server should use to get its DNS information.
For example, if the mail server is handling mail for my-site.com and the IP address of the DNS server is 192.168.1.100, there must be directives that look like this:
domain my-site.com
nameserver 192.168.1.100
An incorrectly configured resolv.conf file can lead to errors when running the m4 command to process the information in your sendmail.mc file.
WARNING: local host name (smallfry) is not qualified; fix $j in config file
The /etc/hosts file also is used by DNS clients and also needs to be correctly configured. Here is a brief example of the first line you should expect to see in it:
127.0.0.1 bigboy.my-site.com localhost.localdomain localhost bigboy
The entry for 127.0.0.1 must always be followed by the fully qualified domain name (FQDN) of the server. In the case above it would be bigboy.my-site.com. Then you must have an entry for localhost and localhost.localdomain. Linux does not function properly if the 127.0.0.1 entry in /etc/hosts doesn’t also include localhost and localhost.localdomain. Finally you can add any other aliases your host may have to the end of the line.
How To Configure Linux Sendmail Clients
All Linux mail clients in your home or company need to know which server is the mail server. This is configured in the sendmail.mc file by setting the SMART_HOST statement to include the mail server. In the example below, the mail server has been set to mail.my-site.com, the mail server for the my-site.com domain.
define(`SMART_HOST’,`mail.my-site.com’)
If you don’t have a mail server on your network, you can either create one, or use the one offered by your ISP.
Once this is done, you need to process the sendmail.mc file and restart sendmail. To do this, run the restarting script we from earlier in the chapter.
If the sendmail server is a Linux server, then the /etc/hosts file will also have to be correctly configured too.
Converting From a Mail Client to a Mail Server
All Linux systems have a virtual loopback interface that lives only in memory with an IP address of 127.0.0.1. As mail must be sent to a target IP address even when there is no NIC in the box, sendmail therefore uses the loopback address to send mail between users on the same Linux server. To become a mail server, and not a mail client, sendmail needs to be configured to listen for messages on NIC interfaces as well.
1. Determine which NICs sendmail is running on. You can see the interfaces on which sendmail is listening with the netstat command. Because sendmail listens on TCP port 25, you use netstat and grep for 25 to see a default configuration listening only on IP address 127.0.0.1 (loopback):
[root@bigboy tmp]# netstat -an | grep :25 | grep tcp
tcp 0 0 127.0.0.1:25 0.0.0.0:* LISTEN
[root@bigboy tmp]#
2. Edit sendmail.mc to make sendmail listen on all interfaces. If sendmail is listening on the loopback interface only, you should comment out the daemon_options line in the /etc/mail/sendmail.mc file with dnl statements. It is also good practice to take precautions against spam by not accepting mail from domains that don’t exist by commenting out the accept_unresolvable_domains feature too. See the fourth and next to last lines in the example.
dnl This changes sendmail to only listen on the loopback device 127.0.0.1
dnl and not on any other network devices. Comment this out if you want
dnl to accept email over the network.
dnl DAEMON_OPTIONS(`Port=smtp,Addr=127.0.0.1, Name=MTA’)
dnl NOTE: binding both IPv4 and IPv6 daemon to the same port requires
dnl a kernel patch
dnl DAEMON_OPTIONS(`port=smtp,Addr=::1, Name=MTA-v6, Family=inet6′)
dnl We strongly recommend to comment this one out if you want to protect
dnl yourself from spam. However, the laptop and users on computers that do
dnl not have 24×7 DNS do need this.
dnl FEATURE(`accept_unresolvable_domains’)dnl
dnl FEATURE(`relay_based_on_MX’)dnl
Note: You need to be careful with the accept_unresolvable_names feature. In the sample network, bigboy the mail server does not accept e-mail relayed from any of the other PCs on your network if they are not in DNS.
Note: If your server has multiple NICs and you want it to listen to one of them, then you can uncomment the localhost DAEMON_OPTIONS entry and add another one for the IP address of the NIC on which to wish to accept SMTP traffic.
3. Comment out the SMART_HOST Entry in sendmal.mc. The mail server doesn’t need a SMART_HOST entry in its sendmail.mc file. Comment this out with a dnl at the beginning.
dnl define(`SMART_HOST’,`mail.my-site.com’)
4. Regenerate the sendmail.cf file, and restart sendmail. Again, you can do this with the restart script from the beginning of the chapter.
5. Make sure sendmail is listening on all interfaces (0.0.0.0).
[root@bigboy tmp]# netstat -an | grep :25 | grep tcp
tcp 0 0 0.0.0.0:25 0.0.0.0:* LISTEN
You have now completed the first phase of converting your Linux server into a sendmail server by enabling it to listen to SMTP traffic on its interfaces. The following sections will show you how to define what type of mail it should handle and the various ways this mail can be processed.
A General Guide To Using The sendmail.mc File
The sendmail.mc file can seem jumbled. To make it less cluttered I usually create two easily identifiable sections in it with all the custom commands I’ve ever added.
The first section is near the top where the FEATURE statements usually are, and the second section is at the very bottom.
Sometimes sendmail will archive this file when you do a version upgrade. Having easily identifiable modifications in the file will make post upgrade reconfiguration much easier. Here is a sample:
dnl ***** Customised section 1 start *****
dnl
FEATURE(delay_checks)dnl
FEATURE(masquerade_envelope)dnl
FEATURE(allmasquerade)dnl
FEATURE(masquerade_entire_domain)dnl
dnl
dnl ***** Customised section 1 end *****
The /etc/mail/relay-domains File
The /etc/mail/relay-domains file is used to determine domains from which it will relay mail. The contents of the relay-domains file should be limited to those domains that can be trusted not to originate spam. By default, this file does not exist in a standard RedHat / Fedora install. In this case, all mail sent from my-super-duper-site.com and not destined for this mail server will be forwarded:
my-super-duper-site.com
One disadvantage of this file is that controls mail based on the source domain only, and source domains can be spoofed by spam e-mail servers. The /etc/mail/access file has more capabilities, such as restricting relaying by IP address or network range and is more commonly used. If you delete /etc/mail/relay-domains, then relay access is fully determined by the /etc/mail/access file.
Be sure to run the restart sendmail script from the beginning of the chapter for these changes to take effect.
You can make sure that only trusted PCs on your network have the ability to relay mail via your mail server by using the /etc/mail/access file. That is to say, the mail server will relay mail only for those PCs on your network that have their e-mail clients configured to use the mail server as their outgoing SMTP mail server. (In Outlook Express, you set this using: Tools>Accounts>Properties>Servers)
If you don’t take the precaution of using this feature, you may find your server being used to relay mail for spam e-mail sites. Configuring the /etc/mail/access file will not stop spam coming to you, only spam flowing through you.
The /etc/mail/access file has two columns. The first lists IP addresses and domains from which the mail is coming or going. The second lists the type of action to be taken when mail from these sources or destinations is received. Keywords include RELAY, REJECT, OK (not ACCEPT), and DISCARD. There is no third column to state whether the IP address or domain is the source or destination of the mail, sendmail assumes it could be either and tries to match both. All other attempted relayed mail that doesn’t match any of the entries in the /etc/mail/access file, sendmail will reject. Despite this, my experience has been that control on a per e-mail address basis is much more intuitive via the /etc/mail/virtusertable file.
The sample file that follows allows relaying for only the server itself (127.0.0.1, localhost), two client PCs on your home 192.168.1.X network, everyone on your 192.168.2.X network, and everyone passing e-mail through the mail server from servers belonging to my-site.com. Remember that a server will be considered a part of my-site.com only if its IP address can be found in a DNS reverse zone file:
localhost.localdomain RELAY
localhost RELAY
127.0.0.1 RELAY
192.168.1.16 RELAY
192.168.1.17 RELAY
192.168.2 RELAY
my-site.com RELAY
You’ll then have to convert this text file into a sendmail readable database file named /etc/mail/access.db. Here are the commands you need:
[root@bigboy tmp]# cd /etc/mail
[root@bigboy mail]# make
The sendmail restart script we configured at the beginning of the chapter does this for you too.
Remember that the relay security features of this file may not work if you don’t have a correctly configured /etc/hosts file.
The /etc/mail/local-host-names File
When sendmail receives mail, it needs a way of determining whether it is responsible for the mail it receives. It uses the /etc/mail/local-host-names file to do this. This file has a list of hostnames and domains for which sendmail accepts responsibility. For example, if this mail server was to accept mail for the domains my-site.com and another-site then the file would look like this:
my-site.com
another-site.com
In this case, remember to modify the MX record of the another-site.com DNS zonefile point to my-site.com. Here is an example (Remember each "." is important):
another-site.com. MX 10 mail.my-site.com. ; Primary Mail Exchanger
; for another-site.com
Which User Should Really Receive The Mail?
After checking the contents of the virtusertable, sendmail checks the aliases files to determine the ultimate recipient of mail.
The /etc/mail/virtusertable file
The /etc/mail/virtusertable file contains a set of simple instructions on what to do with received mail. The first column lists the target email address and the second column lists the local user’s mail box, a remote email address, or a mailing list entry in the /etc/aliases file to which the email should be forwarded.
If there is no match in the virtusertable file, sendmail checks for the full email address in the /etc/aliases file.
webmaster@another-site.com webmasters
@another-site.com marc
sales@my-site.com sales@another-site.com
paul@my-site.com paul
finance@my-site.com paul
@my-site.com error:nouser User unknown
In this example, mail sent to:
> webmaster@another-site.com will go to local user (or mailing list) webmasters, all other mail to another-site.com will go to local user marc.
> sales at my-site.com will go to the sales department at my-othersite.com.
> paul and finance at my-site.com goes to local user (or mailing list) paul
All other users at my-site.com receive a bounce back message stating "User unknown".
After editing the /etc/mail/virtusertable file, you have to convert it into a sendmail-readable database file named /etc/mail/virtusertable.db with two commands:
[root@bigboy tmp]# cd /etc/mail
[root@bigboy mail]# make
If these lines look like you’ve seen them before, you have: They’re in your all-purpose sendmail restart script.
You can think of the /etc/aliases file as a mailing list file. The first column has the mailing list name (sometimes called a virtual mailbox), and the second column has the members of the mailing list separated by commas.
To start, sendmail searches the first column of the file for a match. If there is no match, then sendmail assumes the recipient is a regular user on the local server and deposits the mail in their mailbox.
If it finds a match in the first column, sendmail notes the nickname entry in the second column. It then searches for the nickname again in the first column to see if the recipient isn’t on yet another mailing list.
If sendmail doesn’t find a duplicate, it assumes the recipient is a regular user on the local server and deposits the mail in their mailbox.
If the recipient is a mailing list, then sendmail goes through the process all over again to determine if any of the members is on yet another list, and when it is all finished, they all get a copy of the e-mail message.
In the example that follows, you can see that mail sent to users bin, daemon, lp, shutdown, apache, named, and so on by system processes will all be sent to user (or mailing list) root. In this case, root is actually an alias for a mailing list consisting of user marc and webmaster@my-site.com.
Note: The default /etc/aliases file installed with RedHat / Fedora has the last line of this sample commented out with a #, you may want to delete the comment and change user marc to another user. Also after editing this file, you’ll have to convert it into a sendmail readable database file named /etc/aliases.db. Here is the command to do that:
[root@bigboy tmp]# newaliases
# Basic system aliases — these MUST be present.
mailer-daemon: postmaster
postmaster: root
# General redirections for pseudo accounts.
bin: root
daemon: root
…
abuse: root
# trap decode to catch security attacks
decode: root
# Person who should get root’s mail
root: marc,webmaster@my-site.com
Notice that there are no spaces between the mailing list entries for root: You will get errors if you add spaces.
In this simple mailing list example, mail sent to root actually goes to user account marc and webmaster@my-site.com. Because aliases can be very useful, here are a few more list examples for your /etc/aliases file.
> Mail to "directors@my-site.com" goes to users "peter", "paul" and "mary".
# Directors of my SOHO company
directors: peter,paul,mary
> Mail sent to "family@my-site.com" goes to users "grandma", "brother" and "sister"
# My family
family: grandma,brother,sister
> Mail sent to admin-list gets sent to all the users listed in the file /home/mailings/admin-list.
# My mailing list file
admin-list: ":include:/home/mailings/admin-list"
The advantage of using mailing list files is that the admin-list file can be a file that trusted users can edit, user root is only needed to update the aliases file. Despite this, there are some problems with mail reflectors. One is that bounce messages from failed attempts to broadcast go to all users. Another is that all subscriptions and unsubscriptions have to be done manually by the mailing list administrator. If either of these are a problem for you, then consider using a mailing list manager, such as majordomo.
One important note about the /etc/aliases file: By default your system uses sendmail to mail system messages to local user root. When sendmail sends e-mail to a local user, the mail has no To: in the e-mail header. If you then use a mail client with a spam mail filtering rule to reject mail with no To: in the header, such as Outlook Express or Evolution, you may find yourself dumping legitimate mail.
To get around this, try making root have an alias for a user with a fully qualified domain name, this forces sendmail to insert the correct fields in the header; for example:
# Person who should get root’s mail
root: webmaster@my-site.com
Sendmail Masquerading Explained
If you want your mail to appear to come from user@mysite.com and not user@bigboy.mysite.com, then you have two choices:
o Configure your email client, such as Outlook Express, to set your email address to user@mysite.com. (I’ll explain this in the "Configuring Your POP Mail Server" section.).
o Set up masquerading to modify the domain name of all traffic originating from and passing trough your mail server.
In the DNS configuration, you made bigboy the mail server for the domain my-site.com. You now have to tell bigboy in the sendmail configuration file sendmail.mc that all outgoing mail originating on bigboy should appear to be coming from my-site.com; if not, based on our settings in the /etc/hosts file, mail will appear to come from mail.my-site.com. This isn’t terrible, but you may not want your Web site to be remembered with the word "mail" in front of it. In other words you may want your mail server to handle all email by assigning a consistent return address to all outgoing mail, no matter which server originated the email.
You can solve this by editing your sendmail.mc configuration file and adding some masquerading commands and directives:
FEATURE(always_add_domain)dnl
FEATURE(`masquerade_entire_domain’)dnl
FEATURE(`masquerade_envelope’)dnl
FEATURE(`allmasquerade’)dnl
MASQUERADE_AS(`my-site.com’)dnl
MASQUERADE_DOMAIN(`my-site.com.’)dnl
MASQUERADE_DOMAIN(localhost)dnl
MASQUERADE_DOMAIN(localhost.localdomain)dnl
The result is that:
The MASQUERADE_AS directive makes all mail originating on bigboy appear to come from a server within the domain my-site.com by rewriting the email header.
The MASQUERADE_DOMAIN directive makes mail relayed via bigboy from all machines in the another-site.com and localdomain domains appear to come from the MASQUERADE_AS domain of my-site.com. Using DNS, sendmail checks the domain name associated with the IP address of the mail relay client sending the mail to help it determine whether it should do masquerading or not.
FEATURE masquerade_entire_domain makes sendmail masquerade servers named *my-site.com, and *another-site.com as my-site.com. In other words, mail from sales.my-site.com would be masqueraded as my-site.com. If this wasn’t selected, then only servers named my-site.com and my-othersite.com would be masqueraded. Use this with caution when you are sure you have the necessary authority to do this.
FEATURE allmasquerade makes sendmail rewrite both recipient addresses and sender addresses relative to the local machine. If you cc: yourself on an outgoing mail, the other recipient sees a cc: to an address he knows instead of one on localhost.localdomain.
Note: Use FEATURE allmasquerade with caution if your mail server handles email for many different domains and the mailboxes for the users in these domains reside on the mail server. The allmasquerade statement causes all mail destined for these mailboxes to appear to be destined for users in the domain defined in the MASQUERADE_AS statement. In other words, if MASQUERADE_AS is my-site.com and you use allmasquerade, then mail for peter@another-site.com enters the correct mailbox but sendmail rewrites the To:, making the e-mail appear to be sent to peter@my-ste.com originally.
FEATURE always_add_domain always masquerades email addresses, even if the mail is sent from a user on the mail server to another user on the same mail server.
FEATURE masquerade_envelope rewrites the email envelope just as MASQUERADE_AS rewrote the header.
Masquerading is an important part of any mail server configuration as it enables systems administrators to use multiple outbound mail servers, each providing only the global domain name for a company and not the fully qualified domain name of the server itself. All email correspondence then has a uniform email address format that complies with the company’s brand marketing policies.
Note: E-mail clients, such as Outlook Express, consider the To: and From: statements as the e-mail header. When you choose Reply or Reply All in Outlook Express, the program automatically uses the To: and From: in the header. It is easy to fake the header, as spammers often do; it is detrimental to e-mail delivery, however, to fake the envelope.
The e-mail envelope contains the To: and From: used by mailservers for protocol negotiation. It is the envelope’s From: that is used when e-mail rejection messages are sent between mail servers.
The best way of testing masquerading from the Linux command line is to use the "mail -v username" command. I have noticed that "sendmail -v username" ignores masquerading altogether. You should also tail the /var/log/maillog file to verify that the masquerading is operating correctly and check the envelope and header of test email received by test email accounts.
By default, user "root" will not be masqueraded. To remove this restriction use:
EXPOSED_USER(`root’)dnl
command in /etc/mail/sendmail.mc. You can comment this out if you like with a "dnl" at the beginning of the line and running the sendmail start script.
Using Sendmail to Change the Sender’s Email Address
Sometimes masquerading isn’t enough. At times you may need to change not only the domain of the sender but also the username portion of the sender’s e-mail address. For example, perhaps you bought a program for your SOHO office that sends out notifications to your staff, but the program inserts its own address as sender’s address, not that of the IT person.
Web-based CGI scripts tend to run as user apache and, therefore, send mail as user apache too. Often you won’t want this, not only because apache’s e-mail address may not be a suitable, but also because some anti-spam programs check to ensure that the From:, or source e-mail address, actually exists as a real user. If your virtusertable file allows e-mail to only predefined users, then queries about the apache user will fail, and your valid e-mail may be classified as being spam.
With sendmail, you can change both the domain and username on a case-by-case basis using the genericstable feature:
6. Add these statements to your /etc/mail/sendmail.mc file to activate the feature:
FEATURE(`genericstable’,`hash -o /etc/mail/genericstable.db’)dnl
GENERICS_DOMAIN_FILE(`/etc/mail/generics-domains’)dnl
7. Create a /etc/mail/generics-domains file that is just a list of all the domains that should be inspected. Make sure the file includes your server’s canonical domain name, which you can obtain using the command:
sendmail -bt -d0.1 </dev/null
Here is a sample /etc/mail/generics-domains file:
my-site.com
another-site.com
bigboy.my-site.com
8. Create your /etc/mail/genericstable file. First sendmail searches the /etc/mail/generics-domains file for a list of domains to reverse map. It then looks at the /etc/mail/genericstable file for an individual email address from a matching domain. The format of the file is
linux-username username@new-domain.com
Here is an example:
alert security-alert@my-site.com
peter urgent-message@my-site.com
apache mailer@my-site.com
9. Run the sendmail restart script from the beginning of the chapter and then test.
Your e-mails from linux-username should now appear to come from username@new-domain.com.
There are a number of ways to test sendmail when it doesn’t appear to work correctly. Here are a few methods you can use to fix some of the most common problems.
The very first step is to determine whether your mail server is accessible on the sendmail SMTP TCP port 25. Lack of connectivity could be caused by a firewall with incorrect permit, NAT, or port forwarding rules to your mail server. Failure could also be caused by the sendmail process being stopped. It is best to test this from both inside your network and from the Internet.
Testing TCP connectivity
You can also mimic a full mail session using TELNET to make sure everything is working correctly. If you get a "500 Command not recognized" error message along the way, the cause is probably a typographical error. Follow these steps carefully.
2. Telnet to the mail server on port 25. You should get a response with a 220 status code.
[root@bigboy tmp]# telnet mail.my-site.com 25
Trying mail.my-site.com…
Connected to mail.my-site.com.
Escape character is ‘^]’.
220 mail.my-site.com ESMTP server ready
3. Use the hello command to tell the mail server the domain you belong to. You should receive a message with a successful status 250 code at the beginning of the response.
helo anothersite.com
250 mail.my-site.com Hello c-24-4-97-110.client.comcast.net [24.4.97.110], pleased to meet you.
4. Inform the mail server from which the test message is coming with the MAIL FROM: statement.
MAIL FROM:sender@anothersite.com
250 2.1.0 sender@anothersite.com… Sender ok
5. Tell the mail server to whom the test message is going with the " RCPT TO:" statement.
RCPT TO: user@my-site.com
250 2.1.5 user@my-site.com… Recipient ok
6. Prepare the mail server to receive data with the DATA statement
DATA
354 Enter mail, end with "." on a line by itself
7. Type the string "subject:" then type a subject. Type in your text message, ending it with a single period on the last line. For example.
Subject: Test Message
Testing sendmail interactively
250 2.0.0 iA75r9si017840 Message accepted for delivery
8. Use the QUIT command to end the session.
QUIT
221 2.0.0 mail.my-site.com closing connection
Connection closed by foreign host.
[root@bigboy tmp]#
Now verify that the intended recipient received the message, and check the system logs for any mail application errors.
Because sendmail writes all its status messages in the /var/log/maillog file, always monitor this file whenever you are doing changes. Open two TELNET, SSH, or console windows. Work in one of them and monitor the sendmail status output in the other using the command
Incorrectly Configured /etc/hosts Files
By default, Fedora inserts the hostname of the server between the 127.0.0.1 and the localhost entries in /etc/hosts like this:
127.0.0.1 bigboy localhost.localdomain localhost
Unfortunately in this configuration, sendmail will think that the server’s FQDN is bigboy, which it will identify as being invalid because there is no extension at the end, such as .com or .net. It will then default to sending e-mails in which the domain is localhost.localdomain.
The /etc/hosts file is also important for configuring mail relay. You can create problems if you fail to place the server name in the FDQN for 127.0.0.1 entry. Here sendmail thinks that the server’s FDQN was my-site and that the domain was all of .com.
127.0.0.1 my-site.com localhost.localdomain localhost (Wrong!!!)
The server would therefore be open to relay all mail from any .com domain and would ignore the security features of the access and relay-domains files I’ll describe later.
As mentioned, a poorly configured /etc/hosts file can make mail sent from your server to the outside world appear as if it came from users at localhost.localdomain and not bigboy.my-site.com.
Use the sendmail program to send a sample e-mail to someone in verbose mode. Enter some text after issuing the command and end your message with a single period all by itself on the last line, for example:
[root@bigboy tmp]# sendmail -v example@another-site.com
test text
test text
.
example@another-site.com… Connecting to mail.another-site.com. via esmtp…
220 ltmail.another-site.com LiteMail v3.02(BFLITEMAIL4A); Sat, 05 Oct 2002 06:48:44 -0400
>>> EHLO localhost.localdomain
250-mx.another-site.com Hello [67.120.221.106], pleased to meet you
250 HELP
>>> MAIL From:<root@localhost.localdomain>
250 <root@localhost.localdomain>… Sender Ok
>>> RCPT To:<example@another-site.com>
250 <example@another-site.com>… Recipient Ok
>>> DATA
354 Enter mail, end with "." on a line by itself
>>> .
250 Message accepted for delivery
example@another-site.com… Sent (Message accepted for delivery)
Closing connection to mail.another-site.com.
>>> QUIT
[root@bigboy tmp]#
localhost.localdomain is the domain that all computers use to refer to themselves, it is therefore an illegal Internet domain. Consider an example: Mail sent from computer PC1 to PC2 appears to come from a user at localhost.localdomain on PC1 and is rejected. The rejected e-mail is returned to localhost.localdomain. PC2 sees that the mail originated from localhost.localdomain and thinks that the rejected e-mail should be sent to a user on PC2 that may not exist.
Configuring Your POP Mail Server
Each user on your Linux box will get mail sent to their account’s mail folder, but sendmail just handles mail sent to your my-site.com domain. If you want to retrieve the mail from your Linux box’s user account using a mail client such as Evolution, Microsoft Outlook or Outlook Express, then you have a few more steps. You’ll also have to make your Linux box a POP mail server.
Fedora Linux comes with its Cyrus IMAP/POP server RPM package, but I have found that the IMAP-2002 RPMs found on rpmfind.net and featured in this section much more intuitive to use for the SOHO environment.
Installing Your POP Mail Server
You need to install the imap RPM that contains the POP server software. It isn’t yet a part of the Fedora RPM set, and you will probably have to download it from rpmfind.net. Remember that the filename is probably similar to imap-2002d-3.i386.rpm.
POP mail is started by xinetd. To configure POP mail to start at boot, therefore, you have to use the chkconfig command to make sure xinetd starts up on booting. As with all xinetd-controlled programs, the chkconfig command also immediately activates application.
[root@bigboy tmp]# chkconfig pop3 on
To stop POP mail after booting, once again use chkconfig::
[root@bigboy tmp]# chkconfig pop3 off
Remember to restart the POP mail process every time you make a change to the configuration files to ensure the changes to take effect on the running process.
How To Configure Your Windows Mail Programs
All your POP e-mail accounts are really only regular Linux user accounts in which sendmail has deposited mail. You can now configure your e-mail client such as Outlook Express to use your use your new POP/SMTP mail server quite easily. To configure POP Mail, set your POP mail server to be the IP address of your Linux mail server. Use your Linux user username and password when prompted.
Next, set your SMTP mail server to be the IP address/domain name of your Linux mail server.
If you need to access your e-mail from the mail server via the Internet or some other insecure location, you may want to configure POP to work over an encrypted data channel. For this, use /etc/xinetd.d/pop3s file instead of /etc/xinetd.d/ipop3. Encrypted POP runs on TCP port 995, so firewall rules may need to be altered as well.
Most POP clients support secure POP. For example, Windows configures it in the Advanced menu of the Outlook Express Account Configuration window.
How to handle overlapping email addresses.
If you have user overlap, such as John Smith (john@my-site.com) and John Brown (john@another-site.com), both users will get sent to the Linux user account john by default. You have two options for a solution:
o Make the user part of the email address different, john1@my-site.com and
john2@another-site.com for example, and create Linux accounts john1 and john2. If the
users insist on overlapping names, then you may need to modify your virtusertable file.
o Create the user accounts john1 and john2 and point virtusertable entries for john@my-site.com to account john1 and point john@another-site.com entries to account john2. The POP configuration in Outlook Express for each user should retrieve their mail via POP using john1 and john2, respectively.
With this trick you’ll be able to handle many users belonging to multiple domains without many address overlap problems.
The very first troubleshooting step is to determine whether your POP server is accessible on the POP TCP port 110 or the secure POP port of 995. Lack of connectivity could be caused by a firewall with incorrect permit, NAT, or port forwarding rules to your server. Failure could also be caused by the xinetd process being stopped or the configuration files being disabled. Test this from both inside your network and from the Internet. (Troubleshooting TCP with TELNET is covered in Chapter 4.)
Linux status messages are logged to the file /var/log/messages. Use it to make sure all your files are loaded when you start xinetd. Check your configuration files if it fails to do so. This example starts xinetd and makes a successful secure POP query from a remote POP client: (Linux logging is covered in Chapter 5, "Troubleshooting with syslog.").
Aug 11 23:20:33 bigboy xinetd[18690]: START: pop3s pid=18693 from=172.16.1.103
Aug 11 23:20:33 bigboy ipop3d[18693]: pop3s SSL service init from 172.16.1.103
Aug 11 23:20:40 bigboy ipop3d[18693]: Login user=labmanager host=172-16-1-103.my-site.com [172.16.1.103] nmsgs=0/0
Aug 11 23:20:40 bigboy ipop3d[18693]: Logout user=labmanager host=172-16-1-103.my-site.com [172.16.1.103] nmsgs=0 ndele=0
Aug 11 23:20:40 bigboy xinetd[18690]: EXIT: pop3s pid=18693 duration=7(sec)
Aug 11 23:20:52 bigboy xinetd[18690]: START: pop3s pid=18694 from=172.16.1.103
Aug 11 23:20:52 bigboy ipop3d[18694]: pop3s SSL service init from 172.16.1.103
Aug 11 23:20:52 bigboy ipop3d[18694]: Login user=labmanager host=172-16-1-103.my-site.com [172.16.1.103] nmsgs=0/0
Aug 11 23:20:52 bigboy ipop3d[18694]: Logout user=labmanager host=172-16-1-103.my-site.com [172.16.1.103] nmsgs=0 ndele=0
Aug 11 23:20:52 bigboy xinetd[18690]: EXIT: pop3s pid=18694 duration=0(sec)
April 20, 2009
Look and feel SQL Server 2008
Using SQL Server 2008
After the installation you can check running services.msc in any windows Operating System to see that Microsoft SQL Server works as a service to the operating system, in order to use it, you must make sure that its service has started. To check it (on Microsoft Windows XP Professional, Windows Vista, Windows Server 2003, or Windows Server 3008) you can open Control Panel and the Administrative Tools. In the Administrative Tools window, you can open the Services. In the Services window, check the status of the SQL Server (MSSQLSERVER) item:

If the MSSQLSERVER service is stopped, you must start it. To do this, you can right-click it and click Start. If it fails to start, check the account with which you logged in:
-
If you are using Microsoft Windows XP Professional and you logged in as Administrator but did not provide a password, you should open Control Panel, access User Accounts, open the Administrator account, and create a password for it
-
If you are using a server (Microsoft Windows Server 2003 or Microsoft Windows Server 2008), make sure you logged in with an account that can start a service
To launch Microsoft SQL Server, click Start -> (All) Programs -> Microsoft SQL Server 2008 -> SQL Server Management Studio. A splash screen will appear:

The top section of the SQL Server Management Studio displays the classic title bar of a regular window, with an icon on the left, followed by the title of the application, and the system buttons on the right side.

|
The Main Menu |
Under the title bar, the menu bar displays categories of menus that you will use to perform the various necessary operations.
|
The Standard Toolbar |
The Standard toolbar displays under the main menu:
![]()
The Standard toolbar is just one of the available ones. Eventually, when you perform an action that would benefit from another toolbar, the Microsoft SQL Server Management Studio would display that toolbar. Still, if you want to show any toolbar, you can right-click any menu item on the main menu or any button on a toolbar. A menu would come up:

|
The Object Explorer |
The left side of the interface displays the Object Explorer window, with its title bar labeled Object Explorer. This window is dockable, meaning you can move it from the left side to another side on the interface. To do this, you can click and drag its title bar to a location of your choice. When you start dragging, small boxes that represent the possible placeholders would come up:

You can drag and drop to one of those placeholders.
The Object Explorer is also floatable, which means you can place it somewhere in the middle of the interface:

To place the window back to its previous position, you can double-click its title bar. The window can also be tabbed. This means that the window can be positioned either vertically or horizontally.
At any time, if you do not want the Object Explorer, you can close or hide it. To close the Object Explorer, click its close button.
On the right side of the Object Explorer title, there are three buttons. If you click the first button that points down, a menu would appear:

The menu allows you to specify whether you want the window to be floated, docked, or tabbed.
The right side of the window is made of an empty window. This area will be used to display either the contents of what is selected in the Object Explorer, or to show a result of some operation. As you will see later on, many other windows will occupy the right section but they will share the same area. To make each known it will be represented with a tab and the tab shows the name (or caption) of a window.
|
Connection to a Server |
|
Using Connect to Server |
In order to do anything significant in Microsoft SQL Server, you will have to log in to a server. If you start Microsoft SQL Server Management Studio from the Start button, the Connect To Server dialog box would come up. If you had started from the Start button but clicked Cancel, to connect to a server:
-
On the main menu, click File -> Connect Object Explorer
-
On the Standard toolbar, you can click the New Query button

-
On the Object Explorer, you can click the arrow of the Connect button and click one of the options, such as Database Engine…


After using Microsoft SQL Server Management Studio, you can close it. To do this:
-
Click the icon on the left side of Microsoft SQL Server Management Studio and click Close
-
On the right side of the title bar, click the system Close button

-
On the main menu, click File -> Exit
-
Press Alt, F, X
|
Introduction to Code |
Although you will perform many of your database operations visually, some other operations will require that you write code. To assist with with this, Microsoft SQL Server provides a code editor and various code templates.
To open the editor:
-
On the main menu, you can click File -> New -> Query With Current Connection
-
On the Standard toolbar, click the New Query button
![clip_image012[1]](https://subhrendu.files.wordpress.com/2009/04/clip-image0121-thumb.gif?w=84&h=26 "clip_image012[1]")
-
In the Object Explorer, right-click the name of the server and click New Query
This would create a new window and position it on the right side of the interface. Whether you have already written code or not, you can save the document of the code editor at any time. To save it:
-
You can press Ctrl + S
-
On the main menu, you can click File -> Save SQLQueryX.sql…
-
On the Standard toolbar, you can click the Save button

You will be required to provide a name for the file. After saving the file, its name would appear on the tab of the document.
|
The Structured Query Language |
|
Introduction |
After establishing a connection, you can take actions, such as creating a database and/or manipulating data.
The Structured Query Language, known as SQL, is a universal language used on various computer systems to create and manage databases.
|
|
SQL can be pronounced Sequel or S. Q. L. In our lessons, we will consider the Sequel pronunciation. For this reason, the abbreviation will always be considered as a word, which would result in “A SQL statement” instead of "An SQL statement". Also, we will regularly write, “The SQL” instead of “The SQL language, as the L already represents Language. |
Like other non-platform specific languages such as C/C++, Pascal, or Java, the SQL you learn can be applied to various database systems. To adapt the SQL to Microsoft SQL Server, the company developed Transact-SQL as Microsoft’s implementation of SQL. Transact-SQL is the language used internally by Microsoft SQL Server and MSDE. Although SQL Server highly adheres to the SQL standards, it has some internal details that may not be applied to other database systems like MySQL, Oracle, or even Microsoft Access, etc; although they too fairly conform to the standard.
The SQL we will learn and use here is Transact-SQL. In other words, we will assume that you are using Microsoft SQL Server as your platform for learning about databases. This means that, unless specified otherwise, most of the time, on this site, the word SQL refers to Transact-SQL or the way the language is implemented in Microsoft SQL Server.
|
The SQL Interpreter |
As a computer language, the SQL is used to give instructions to an internal program called an interpreter. As we will learn in various sections, you must make sure you give precise instructions. SQL is not case-sensitive. This means that CREATE, create, and Create mean the same thing. It is a tradition to write SQL’s own words in uppercase. This helps to distinguish SQL instructions with the words you use for your database.
As we will learn in this and the other remaining lessons of this site, you use SQL by writing statements. To help you with this, Microsoft SQL Server provides a window, also referred to as the Query Window, that you can use to write your SQL code. To access it, on the left side of the window, you can right-click the name of the server and click New Query. In the same way, you can open as many instances as the New Query as you want.
When the Query window comes up, it display a blank child window in which you can write your code. The code you write is a document and it can be saved as a file. The file would have the extension .sql. Every time you open a new query, it is represented with a tab. To switch from one code part to another, you can click its tab. To dismiss an instance of the query, first access it (by clicking its tab), then, on the right side, click the close button ![]() . If you had written code in the query window, when you close it, you would be asked to save your code. If you want to preserve your code, then save it. If you had already executed the code in the window (we will learn how to write and execute SQL code), you don’t have to save the contents of the window.
. If you had written code in the query window, when you close it, you would be asked to save your code. If you want to preserve your code, then save it. If you had already executed the code in the window (we will learn how to write and execute SQL code), you don’t have to save the contents of the window.
|
Executing a Statement |
In the next sections and lessons, we will learn various techniques of creating SQL statements with code. By default, when a new query window appears, it is made of a wide white area where you write your statements:

After writing a statement, you can execute it, either to make it active or simply to test it. To execute a statement:
-
You can press F5
-
On the main menu, you can click Query -> Execute
-
On the SQL Editor toolbar, you can click the Execute button

-
You can right-click somewhere in the code editor and click Execute
When you execute code, code editor becomes divided into two horizontal sections:

Also, when you execute code, the interpreter would first analyze it. If there is an error, it would display one or more red lines of text in its bottom section. Here is an example:

If there is no error in the code, what happens when you execute a statement depends on the code and the type of statement.
|
Accessories for SQL Code Writing |
|
Comments |
A comment is text that the SQL interpreter would not consider as code. As such, a comment is written any way you like. What ever it is made of would not be read. Transact-SQL supports two types of comments. The style of comment that starts with /* and ends with */ can be used. To apply it, start a line with /*, include any kind of text you like, on as many lines as you want. To close the commented section, type */. Here is an example of a line of comment:
/* First find out if the database we want to create exists already */
A comment can also be spread on more than one line, like a paragraph. Here is an example:
/* First find out if the MotorVehicleDivision database we
want to create exists already.
If that database exists, we don’t want it anymore. So,
delete it from the system. */
Transact-SQL also supports the double-dash comment. This comment applies to only one line of text. To use it, start the line with –. Anything on the right side of — is part of a comment and would not be considered as code. Here is an example:
— =============================================
— Database: MotorVehicleDivision
— =============================================
/* First find out if the MotorVehicleDivision database we
want to create exists already.
If that database exists, we don’t want it anymore. So,
delete it from the system. */
— Now that the database is not in the system, create it
|
The End of a Statement |
In SQL, after writing a statement, you can end it with a semi-colon. In fact, if you plan to use many statements in one block, you should end each with a semi-colon. When many statements are used, some of them must come after others.
|
Time to GO |
To separate statements, that is, to indicate when a statement ends, you can use the GOkeyword (in reality and based on SQL standards, it is the semi-colon that would be required, but the Microsoft SQL Server interpreter accepts GO as the end of a statement).
Configuring NFS & DNS with Firewall in Linux
NFS Server Configuration
What is NFS?
The Network File System (NFS) was developed to allow machines to mount a disk partition on a remote machine as if it were on a local hard drive. This allows for fast, seamless sharing of files across a network.
Setting up the server will be done in two steps: Setting up the configuration files for NFS, and then starting the NFS services.
Required Services
Red Hat Enterprise Linux uses a combination of kernel-level support and daemon processes to provide NFS file sharing. NFS relies on Remote Procedure Calls (RPC) to route requests between clients and servers. RPC services under Linux are controlled by the portmap service. To share or mount NFS file systems, the following services work together:
· nfs — Starts the appropriate RPC processes to service requests for shared NFS file systems.
· nfslock — An optional service that starts the appropriate RPC processes to allow NFS clients to lock files on the server.
· portmap — The RPC service for Linux; it responds to requests for RPC services and sets up connections to the requested RPC service.
The following RPC processes work together behind the scenes to facilitate NFS services:
· rpc.mountd — This process receives mount requests from NFS clients and verifies the requested file system is currently exported. This process is started automatically by the nfs service and does not require user configuration.
· rpc.nfsd — This process is the NFS server. It works with the Linux kernel to meet the dynamic demands of NFS clients, such as providing server threads each time an NFS client connects. This process corresponds to the nfs service.
· rpc.lockd — An optional process that allows NFS clients to lock files on the server. This process corresponds to the nfslock service.
· rpc.statd — This process implements the Network Status Monitor (NSM) RPC protocol which notifies NFS clients when an NFS server is restarted without being gracefully brought down. This process is started automatically by the nfslock service and does not require user configuration.
· rpc.rquotad — This process provides user quota information for remote users. This process is started automatically by the nfs service and does not require user configuration.
NFS and portmap
The portmap service under Linux maps RPC requests to the correct services. RPC processes notify portmap when they start, revealing the port number they are monitoring and the RPC program numbers they expect to serve. The client system then contacts portmap on the server with a particular RPC program number. The portmap service redirects the client to the proper port number so it can communicate with the requested service.
Because RPC-based services rely on portmap to make all connections with incoming client requests, portmap must be available before any of these services start.
The portmap service uses TCP wrappers for access control, and access control rules for portmap affect all RPC-based services. Alternatively, it is possible to specify access control rules for each of the NFS RPC daemons. The man pages for rpc.mountd and rpc.statd contain information regarding the precise syntax for these rules.
Troubleshooting NFS and portmap
The rpcinfo command shows each RPC-based service with port numbers, an RPC program number, a version and an IP protocol type (TCP or UDP).
To make sure the proper NFS RPC-based services are enabled for portmap, issue the following command as root:
rpcinfo -p
Setting up the Configuration Files
There are three main configuration files you will need to edit to set up an NFS server: /etc/exports, /etc/hosts.allow, and /etc/hosts.deny. Strictly speaking, you only need to edit /etc/exports to get NFS to work, but you would be left with an extremely insecure setup.
/etc/exports
This file contains a list of entries; each entry indicates a volume that is shared and how it is shared. Check the man pages (man exports) for a complete description of all the setup options for the file, although the description here will probably satistfy most people’s needs.
An entry in /etc/exports will typically look like this:
directory machine1(option11,option12) machine2(option21,option22)
where
directory
the directory that you want to share. It may be an entire volume though it need not be. If you share a directory, then all directories under it within the same file system will be shared as well.
machine1 and machine2
client machines that will have access to the directory. The machines may be listed by their DNS address or their IP address (e.g., machine.company.com or 192.168.0.8). Using IP addresses is more reliable and more secure.
optionxx
the option listing for each machine will describe what kind of access that machine will have. Important options are:
· ro: The directory is shared read only; the client machine will not be able to write to it. This is the default.
· rw: The client machine will have read and write access to the directory.
· no_root_squash: By default, any file request made by user root on the client machine is treated as if it is made by user nobody on the server. (Excatly which UID the request is mapped to depends on the UID of user “nobody” on the server, not the client.) If no_root_squash is selected, then root on the client machine will have the same level of access to the files on the system as root on the server. This can have serious security implications, although it may be necessary if you want to perform any administrative work on the client machine that involves the exported directories. You should not specify this option without a good reason.
· no_subtree_check: If only part of a volume is exported, a routine called subtree checking verifies that a file that is requested from the client is in the appropriate part of the volume. If the entire volume is exported, disabling this check will speed up transfers.
· sync: By default, all but the most recent version (version 1.11) of the exportfs command will use async behavior, telling a client machine that a file write is complete – that is, has been written to stable storage – when NFS has finished handing the write over to the filesysytem. This behavior may cause data corruption if the server reboots, and the sync option prevents this.
Suppose we have two client machines, slave1 and slave2, that have IP addresses 192.168.0.1 and 192.168.0.2, respectively. We wish to share our software binaries and home directories with these machines. A typical setup for /etc/exports might look like this:
/usr/local 192.168.0.1(ro) 192.168.0.2(ro)
/home 192.168.0.1(rw) 192.168.0.2(rw)
Here we are sharing /usr/local read-only to slave1 and slave2, because it probably contains our software and there may not be benefits to allowing slave1 and slave2 to write to it that outweigh security concerns. On the other hand, home directories need to be exported read-write if users are to save work on them.
If you have a large installation, you may find that you have a bunch of computers all on the same local network that require access to your server. There are a few ways of simplifying references to large numbers of machines. First, you can give access to a range of machines at once by specifying a network and a netmask. For example, if you wanted to allow access to all the machines with IP addresses between 192.168.0.0 and 192.168.0.255 then you could have the entries:
/usr/local 192.168.0.0/255.255.255.0(ro)
/home 192.168.0.0/255.255.255.0(rw)
/etc/hosts.allow and /etc/hosts.deny
These two files specify which computers on the network can use services on your machine. Each line of the file contains a single entry listing a service and a set of machines. When the server gets a request from a machine, it does the following:
· It first checks hosts.allow to see if the machine matches a description listed in there. If it does, then the machine is allowed access.
· If the machine does not match an entry in hosts.allow, the server then checks hosts.deny to see if the client matches a listing in there. If it does then the machine is denied access.
· If the client matches no listings in either file, then it is allowed access.
The first step in doing this is to add the followng entry to /etc/hosts.deny:
portmap:ALL
Starting with nfs-utils 0.2.0, you can be a bit more careful by controlling access to individual daemons. It’s a good precaution since an intruder will often be able to weasel around the portmapper. If you have a newer version of nfs-utils, add entries for each of the NFS daemons (see the next section to find out what these daemons are; for now just put entries for them in hosts.deny):
lockd:ALL
mountd:ALL
rquotad:ALL
statd:ALL
Even if you have an older version of nfs-utils, adding these entries is at worst harmless (since they will just be ignored) and at best will save you some trouble when you upgrade. Some sys admins choose to put the entry ALL:ALL in the file /etc/hosts.deny, which causes any service that looks at these files to deny access to all hosts unless it is explicitly allowed. While this is more secure behavior, it may also get you in trouble when you are installing new services, you forget you put it there, and you can’t figure out for the life of you why they won’t work.
Next, we need to add an entry to hosts.allow to give any hosts access that we want to have access. (If we just leave the above lines in hosts.deny then nobody will have access to NFS.) Entries in hosts.allow follow the format
service: host [or network/netmask] , host [or network/netmask]
Here, host is IP address of a potential client; it may be possible in some versions to use the DNS name of the host, but it is strongly discouraged.
Suppose we have the setup above and we just want to allow access to slave1.foo.com and slave2.foo.com, and suppose that the IP addresses of these machines are 192.168.0.1 and 192.168.0.2, respectively. We could add the following entry to /etc/hosts.allow:
portmap: 192.168.0.1 , 192.168.0.2
For recent nfs-utils versions, we would also add the following (again, these entries are harmless even if they are not supported):
lockd: 192.168.0.1 , 192.168.0.2
rquotad: 192.168.0.1 , 192.168.0.2
mountd: 192.168.0.1 , 192.168.0.2
statd: 192.168.0.1 , 192.168.0.2
If you intend to run NFS on a large number of machines in a local network, /etc/hosts.allow also allows for network/netmask style entries in the same manner as /etc/exports above.
Starting and Stopping NFS
To run an NFS server, the portmap service must be running. To verify that portmap is active, type the following command as root:
/sbin/service portmap status
If the portmap service is running, then the nfs service can be started. To start an NFS server, as root type:
/sbin/service nfs start
To stop the server, as root type:
/sbin/service nfs stop
The restart option is a shorthand way of stopping and then starting NFS. This is the most efficient way to make configuration changes take effect after editing the configuration file for NFS.
To restart the server, as root type:
/sbin/service nfs restart
The condrestart (conditional restart) option only starts nfs if it is currently running. This option is useful for scripts, because it does not start the daemon if it is not running.
To conditionally restart the server, as root type:
/sbin/service nfs condrestart
To reload the NFS server configuration file without restarting the service, as root type:
/sbin/service nfs reload
By default, the nfs service does not start automatically at boot time. To configure the NFS to start up at boot time, use an initscript utility, such as /sbin/chkconfig, /sbin/ntsysv, or the Services Configuration Tool program
NFS Client Configuration Files
To begin using machine as an NFS client, you will need the portmapper running on that machine, and to use NFS file locking, you will also need rpc.statd and rpc.lockd running on both the client and the server. Most recent distributions start those services by default at boot time;
With portmap, lockd, and statd running, you should now be able to mount the remote directory from your server just the way you mount a local hard drive, with the mount command. Continuing our example from the previous section, suppose our server above is called master.foo.com,and we want to mount the /home directory on slave1.foo.com. Then, all we have to do, from the root prompt on slave1.foo.com, is type:
# mount master.foo.com:/home /mnt/home
and the directory /home on master will appear as the directory /mnt/home on slave1. (Note that this assumes we have created the directory /mnt/home as an empty mount point beforehand.)
You can get rid of the file system by typing
# umount /mnt/home
just like you would for a local file system.
Getting NFS File Systems to Be Mounted at Boot Time
NFS file systems can be added to your /etc/fstab file the same way local file systems can, so that they mount when your system starts up. The only difference is that the file system type will be set to nfs and the dump and fsck order (the last two entries) will have to be set to zero. So for our example above, the entry in /etc/fstab would look like:
# device mountpoint fs-type options dump fsckorder
...
master.foo.com:/home /mnt nfs rw 0 0
...
See the man pages for fstab if you are unfamiliar with the syntax of this file. If you are using an automounter such as amd or autofs, the options in the corresponding fields of your mount listings should look very similar if not identical.
At this point you should have NFS working, though a few tweaks may still be necessary to get it to work well.
Common NFS Mount Options
Beyond mounting a file system via NFS on a remote host, a number of different options can be specified at the time of the mount that can make it easier to use. These options can be used with manual mount commands, /etc/fstab settings, and autofs.
The following are options commonly used for NFS mounts:
· hard or soft — Specifies whether the program using a file via an NFS connection should stop and wait (hard) for the server to come back online if the host serving the exported file system is unavailable, or if it should report an error (soft).
If hard is specified, the user cannot terminate the process waiting for the NFS communication to resume unless the intr option is also specified.
If soft, is specified, the user can set an additional timeo=<value> option, where <value> specifies the number of seconds to pass before the error is reported.
· intr — Allows NFS requests to be interrupted if the server goes down or cannot be reached.
· nfsvers=2 or nfsvers=3 — Specifies which version of the NFS protocol to use.
· nolock — Disables file locking. This setting is occasionally required when connecting to older NFS servers.
· noexec — Prevents execution of binaries on mounted file systems. This is useful if the system is mounting a non-Linux file system via NFS containing incompatible binaries.
· nosuid — Disables set-user-identifier or set-group-identifier bits. This prevents remote users from gaining higher privileges by running a setuid program.
· rsize=8192 and wsize=8192 — These settings speed up NFS communication for reads (rsize) and writes (wsize) by setting a larger data block size, in bytes, to be transferred at one time. Be careful when changing these values; some older Linux kernels and network cards do not work well with larger block sizes.
· tcp — Specifies for the NFS mount to use the TCP protocol instead of UDP.
Many more options are listed on the mount man page, including options for mounting non-NFS file systems.
The exportfs Command
Every file system being exported to remote users via NFS, as well as the access level for those file systems, are listed in the /etc/exports file. When the nfs service starts, the /usr/sbin/exportfs command launches and reads this file, and passes to rpc.mountd and rpc.nfsd the file systems available to remote users.
When issued manually, the /usr/sbin/exportfs command allows the root user to selectively export or unexport directories without restarting the NFS service. When passed the proper options, the /usr/sbin/exportfs command writes the exported file systems to /var/lib/nfs/xtab. Since rpc.mountd refers to the xtab file when deciding access privileges to a file system, changes to the list of exported file systems take effect immediately.
The following is a list of commonly used options available for /usr/sbin/exportfs:
· -r — Causes all directories listed in /etc/exports to be exported by constructing a new export list in /etc/lib/nfs/xtab. This option effectively refreshes the export list with any changes that have been made to /etc/exports.
· -a — Causes all directories to be exported or unexported, depending on what other options are passed to /usr/sbin/exportfs. If no other options are specified, /usr/sbin/exportfs exports all file systems specified in /etc/exports.
· -o file-systems — Specifies directories to be exported that are not listed in /etc/exports. Replace file-systems with additional file systems to be exported. These file systems must be formatted the same way they are specified in /etc/exports. This option is often used to test an exported file system before adding it permanently to the list of file systems to be exported.
· -i — Ignores /etc/exports; only options given from the command line are used to define exported file systems.
· -u — Unexports all shared directories. The command /usr/sbin/exportfs -ua suspends NFS file sharing while keeping all NFS daemons up. To reenable NFS sharing, type exportfs -r.
· -v — Verbose operation, where the file systems being exported or unexported are displayed in greater detail when the exportfs command is executed.
If no options are passed to the /usr/sbin/exportfs command, it displays a list of currently exported file systems.
For more information about the /usr/sbin/exportfs command, refer to the exportfs man page.
DNS Server configuration
Domain Name System (DNS) converts the name of a Web site (www.linuxhomenetworking.com) to an IP address (65.115.71.34). This step is important, because the IP address of a Web site’s server, not the Web site’s name, is used in routing traffic over the Internet.
Introduction to DNS
DNS Domains
Everyone in the world has a first name and a last, or family, name. The same thing is true in the DNS world: A family of Web sites can be loosely described a domain. For example, the domain linuxhomenetworking.com has a number of children, such as http://www.linuxhomenetworking.com and mail.linuxhomenetworking.com for the Web and mail servers, respectively.
BIND
BIND is an acronym for the Berkeley Internet Name Domain project, which is a group that maintains the DNS-related software suite that runs under Linux. The most well known program in BIND is named, the daemon that responds to DNS queries from remote machines.
s
A DNS client doesn’t store DNS information; it must always refer to a DNS server to get it. The only DNS configuration file for a DNS client is the /etc/resolv.conf file, which defines the IP address of the DNS server it should use. You shouldn’t need to configure any other files. You’ll become well acquainted with the /etc/resolv.conf file soon.
s
Authoritative servers provide the definitive information for your DNS domain, such as the names of servers and Web sites in it. They are the last word in information related to your domain.
There are 13 root authoritative DNS servers (super duper authorities) that all DNS servers query first. These root servers know all the authoritative DNS servers for all the main domains – .com, .net, and the rest. This layer of servers keeps track of all the DNS servers that Web site systems administrators have assigned for their sub domains.
For example, when you register your domain my-site.com, you are actually inserting a record on the .com DNS servers that point to the authoritative DNS servers you assigned for your domain.
When to Use A DNS Caching Name Server
Most servers don’t ask authoritative servers for DNS directly, they usually ask a caching DNS server to do it on their behalf. The caching DNS servers then store (or cache), the most frequently requested information to reduce the lookup overhead of subsequent queries.
If you want to advertise your Web site http://www.my-site.com to the rest of the world, then a regular DNS server is what you require. Setting up a caching DNS server is fairly straightforward and works whether or not your ISP provides you with a static or dynamic Internet IP address.
After you set up your caching DNS server, you must configure each of your home network PCs to use it as their DNS server. If your home PCs gets their IP addresses using DHCP, then you have to configure your DHCP server to make it aware of the IP address of your new DNS server, so that the DHCP server can advertise the DNS server to its PC clients. Off-the-shelf router/firewall appliances used in most home networks usually can act as both the caching DNS and DHCP server, rendering a separate DNS server is unnecessary.
You can find the configuration steps for a Linux DHCP server in Chapter 8, “Configuring the DHCP Server.”
If your ISP provides you with a fixed or static IP address, and you want to host your own Web site, then a regular authoritative DNS server would be the way to go. A caching DNS name server is used as a reference only; regular name servers are used as the authoritative source of information for your Web site’s domain.
Note: Regular name servers are also caching name servers by default.
When to Use A Dynamic DNS Server
If your ISP provides your router/firewall with its Internet IP address using DHCP then you must consider dynamic DNS covered in Chapter 19, “Dynamic DNS.” For now, I’m assuming that you are using static Internet IP addresses.
Whether or not you use static or dynamic DNS, you need to register a domain.
Dynamic DNS providers frequently offer you a subdomain of their own site, such as my-site.dnsprovider.com, in which you register your domain on their site.
If you choose to create your very own domain, such as my-site.com, you have to register with a company specializing in static DNS registration and then point your registration record to the intended authoritative DNS for your domain. Popular domain registrars include VeriSign, Register Free, and Yahoo.
If you want to use a dynamic DNS provider for your own domain, then you have to point your registration record to the DNS servers of your dynamic DNS provider. (More details on domain registration are coming later in the chapter.).
Basic DNS Testing of DNS Resolution
As you know, DNS resolution maps a fully qualified domain name (FQDN), such as http://www.linuxhomenetworking.com, to an IP address. This is also known as a forward lookup. The reverse is also true: By performing a reverse lookup, DNS can determining the fully qualified domain name associated with an IP address.
Many different Web sites can map to a single IP address, but the reverse isn’t true; an IP address can map to only one FQDN. This means that forward and reverse entries frequently don’t match. The reverse DNS entries are usually the responsibility of the ISP hosting your site, so it is quite common for the reverse lookup to resolve to the ISP’s domain. This isn’t an important factor for most small sites, but some e-commerce applications require matching entries to operate correctly. You may have to ask your ISP to make a custom DNS change to correct this.
There are a number of commands you can use do these lookups. Linux uses the host command, for example, but Windows uses nslookup.
The Host Command
The host command accepts arguments that are either the fully qualified domain name or the IP address of the server when providing results. To perform a forward lookup, use the syntax:
[root@bigboy tmp]# host http://www.linuxhomenetworking.com
http://www.linuxhomenetworking.com has address 65.115.71.34
[root@bigboy tmp]#
To perform a reverse lookup
[root@bigboy tmp]# host 65.115.71.34
34.71.115.65.in-addr.arpa domain name pointer 65-115-71-34.myisp.net.
[root@bigboy tmp]#
As you can see, the forward and reverse entries don’t match. The reverse entry matches the entry of the ISP.
The nslookup Command
The nslookup command provides the same results on Windows PCs. To perform forward lookup, use.
C:> nslookup http://www.linuxhomenetworking.com
Server: 192-168-1-200.my-site.com
Address: 192.168.1.200
Non-authoritative answer:
Name: http://www.linuxhomenetworking.com
Address: 65.115.71.34
To perform a reverse lookup
C:> nslookup 65.115.71.34
Server: 192-168-1-200.my-site.com
Address: 192.168.1.200
Name: 65-115-71-34.my-isp.com
Address: 65.115.71.34
How To Get BIND Started
You can use the chkconfig command to get BIND configured to start at boot
[root@bigboy tmp]# chkconfig named on
To start, stop, and restart BIND after booting, use:
[root@bigboy tmp]# service named start
[root@bigboy tmp]# service named stop
[root@bigboy tmp]# service named restart
Remember to restart the BIND process every time you make a change to the configuration file for the changes to take effect on the running process.
The /etc/resolv.conf File
DNS clients (servers not running BIND) use the /etc/resolv.conf file to determine both the location of their DNS server and the domains to which they belong. The file generally has two columns; the first contains a keyword, and the second contains the desired values separated by commas. See Table 18.1 for a list of keywords.
Table 18.1 Keywords In /etc/resolv.conf
| Keyword | Value |
| Nameserver | IP address of your DNS nameserver. There should be only one entry per “nameserver” keyword. If there is more than one nameserver, you’ll need to have multiple “nameserver” lines. |
| Domain | The local domain name to be used by default. If the server is bigboy.my-site.com, then the entry would just be my-site.com |
| Search | If you refer to another server just by its name without the domain added on, DNS on your client will append the server name to each domain in this list and do an DNS lookup on each to get the remote servers’ IP address. This is a handy time saving feature to have so that you can refer to servers in the same domain by only their servername without having to specify the domain. The domains in this list must separate by spaces. |
Take a look at a sample configuration in which the client server’s main domain is my-site.com, but it also is a member of domains my-site.net and my-site.org, which should be searched for shorthand references to other servers. Two name servers, 192.168.1.100 and 192.168.1.102, provide DNS name resolution:
search my-site.com my-site.net my-site.org
nameserver 192.168.1.100
nameserver 192.168.1.102
The first domain listed after the search directive must be the home domain of your network, in this case my-site.com. Placing a domain and search entry in the /etc/resolv.conf is redundant, therefore.
Configuring A Caching Nameserver
The RedHat/Fedora default installation of BIND is configured to convert your Linux box into a caching name server. The only file you have to edit is /etc/resolv.conf; you’ll have to comment out the reference to your previous DNS server (most likely your router) with a # or make it point to the server itself using the universal localhost IP address of 127.0.0.1
So, your old entry of
nameserver 192.168.1.1
would be replaced by a new entry of
# nameserver 192.168.1.1
or
The next step is to make all the other machines on your network point to the caching DNS server as their primary DNS server.
Important File Locations
RedHat/Fedora BIND normally runs as the named process owned by the unprivileged named user.
Sometimes BIND is also installed using Linux’s chroot feature to not only run named as user named, but also to limit the files named can see. When installed, named is fooled into thinking that the directory /var/named/chroot is actually the root or / directory. Therefore, named files normally found in the /etc directory are found in /var/named/chroot/etc directory instead, and those you’d expect to find in /var/named are actually located in /var/named/chroot/var/named.
The advantage of the chroot feature is that if a hacker enters your system via a BIND exploit, the hacker’s access to the rest of your system is isolated to the files under the chroot directory and nothing else. This type of security is also known as a chroot jail.
You can determine whether you have the chroot add-on RPM by using this command, which returns the name of the RPM.
[root@bigboy tmp]# rpm -q bind-chroot
bind-chroot-9.2.3-13
[root@bigboy tmp]#
There can be confusion with the locations: Regular BIND installs its files in the normal locations, and the chroot BIND add-on RPM installs its own versions in their chroot locations. Unfortunately, the chroot versions of some of the files are empty. Before starting Fedora BIND, copy the configuration files to their chroot locations:
[root@bigboy tmp]# cp -f /etc/named.conf /var/named/chroot/etc/
[root@bigboy tmp]# cp -f /etc/rndc.* /var/named/chroot/etc/
Before you go to the next step of configuring a regular name server, it is important to understand exactly where the files are located. Table 18.2 provides a map.
Table 18.2 Differences In Fedora And Redhat DNS File Locations
| File | Purpose | BIND chroot Location | Regular BIND Location |
| named.conf | Tells the names of the zone files to be used for each of your website domains. | /var/named/chroot/etc | /etc |
| rndc.key
rndc.conf |
Files used in named authentication | /var/named/chroot/etc | /etc |
| zone files | Links all the IP addresses in your domain to their corresponding server | /var/named/chroot/var/named | /var/named |
Note: Fedora Core installs BIND chroot by default. RedHat 9 and earlier don’t.
Configuring A Regular Nameserver
For the purposes of this tutorial, assume your ISP assigned you the subnet 97.158.253.24 with a subnet mask of 255.255.255.248 (/29).
Configuring resolv.conf
You’ll have to make your DNS server refer to itself for all DNS queries by configuring the /etc/resolv.conf file to reference localhost only.
nameserver 127.0.0.1
Configuring named.conf
The named.conf file contains the main DNS configuration and tells BIND where to find the configuration files for each domain you own. This file usually has two zone areas:
o Forward zone file definitions list files to map domains to IP addresses.
o Reverse zone file definitions list files to map IP addresses to domains.
In this example, you’ll set up the forward zone for http://www.my-site.com by placing entries at the bottom of the named.conf file. The zone file is named my-site.zone, and, although not explicitly stated, the file my-site.zone should be located in the default directory of /var/named/chroot/var/named in a chroot or in /var/named in a regular one. Use the code:
zone “my-site.com” {
type master;
notify no;
allow-query { any; };
file “my-site.zone”;
};
In addition, you can insert additional entries in the named.conf file to reference other Web domains you host. Here is an example for another-site.com using a zone file named another-site.zone.
zone “another-site.com” {
type master;
notify no;
allow-query { any; };
file “another-site.zone”;
};
Note: The allow-query directive defines the networks that are allowed to query your DNS server for information on any zone. For example, to limit queries to only your 192.168.1.0 network, you could modify the directive to:
allow-query { 192.168.1.0/24; };
Next, you have to format entries to handle the reverse lookups for your IP addresses. In most cases, your ISP handles the reverse zone entries for your public IP addresses, but you will have to create reverse zone entries for your SOHO/home environment using the 192.168.1.0/24 address space. This isn’t important for the Windows clients on your network, but some Linux applications require valid forward and reverse entries to operate correctly.
The forward domain lookup process for mysite.com scans the FQDN from right to left to get to get increasingly more specific information about the authoritative servers to use. Reverse lookups operate similarly by scanning an IP address from left to right to get increasingly specific information about an address.
The similarity in both methods is that increasingly specific information is sought, but the noticeable difference is that for forward lookups the scan is from right to left, and for reverse lookups the scan is from left to right. This difference can be seen in the formatting of the zone statement for a reverse zone in /etc/named.conf file where the main in-addr.arpa domain, to which all IP addresses belong, is followed by the first 3 octets of the IP address in reverse order. This order is important to remember or else the configuration will fail. This reverse zone definition for named.conf uses a reverse zone file named 192-168-1.zone for the 192.168.1.0/24 network.
zone “1.168.196.in-addr.arpa” {
type master;
notify no;
file “192-168-1.zone”;
};
Configuring the Zone Files
You need to keep a number of things in mind when configuring DNS zone files:
o In all zone files, you can place a comment at the end of any line by inserting a semi-colon character then typing in the text of your comment.
o By default, your zone files are located in the directory /var/named or /var/named/chroot/var/named.
o Each zone file contains a variety of records (SOA, NS, MX, A, and CNAME) that govern different areas of BIND.
Take a closer look at these entries in the zone file.
The very first entry in the zone file is usually the zone’s time to live (TTL) value. Caching DNS servers cache the responses to their queries from authoritative DNS servers. The authoritative servers not only provide the DNS answer but also provide the information’s time to live, which is the period for which it’s valid.
The purpose of a TTL is to reduce the number of DNS queries the authoritative DNS server has to answer. If the TTL is set to three days, then caching servers use the original stored response for three days before making the query again.
$TTL 3D
BIND recognizes several suffixes for time-related values. A D signifies days, a W signifies weeks, and an H signifies hours. In the absence of a suffix, BIND assumes the value is in seconds.
DNS Resource Records
The rest of the records in a zone file are usually BIND resource records. They define the nature of the DNS information in your zone files that’s presented to querying DNS clients. They all have the general format:
Name Class Type Data
There are different types of records for mail (MX), forward lookups (A), reverse lookups (PTR), aliases (CNAME) and overall zone definitions, Start of Authority (SOA). The data portion is formatted according to the record type and may consist of several values separated by spaces. Similarly, the name is also subject to interpretation based on this factor.
The first resource record is the Start of Authority (SOA) record, which contains general administrative and control information about the domain. It has the format:
Name Class Type Name-Server Email-Address Serial-No Refresh Retry Expiry Minimum-TTL
The record can be long, and will sometimes wrap around on your screen. For the sake of formatting, you can insert new line characters between the fields as long as you insert parenthesis at the beginning and end of the insertion to alert BIND that part of the record will straddle multiple lines. You can also add comments to the end of each new line separated by a semicolon when you do this. Here is an example:
@ IN SOA ns1.my-site.com. hostmaster.my-site.com. (
2004100801 ; serial #
4H ; refresh
1H ; retry
1W ; expiry
1D ) ; minimum
Table 18.3 explains what each field in the record means.
| Field | Description |
| Name | The root name of the zone. The “@” sign is a shorthand reference to the current origin (zone) in the /etc/named.conf file for that particular database file. |
| Class | There are a number of different DNS classes. Home/SOHO will be limited to the IN or Internet class used when defining IP address mapping information for BIND. Other classes exist for non Internet protocols and functions but are very rarely used.. |
| Type | The type of DNS resource record. In the example, this is an SOA resource record. Other types of records exist, which I’ll cover later. |
| Name-server | Fully qualified name of your primary name server. Must be followed by a period. |
| Email-address | The e-mail address of the name server administrator. The regular @ in the e-mail address must be replaced with a period instead. The e-mail address must also be followed by a period. |
| Serial-no | A serial number for the current configuration. You can use the format YYYYMMDD with single digit incremented number tagged to the end to provide an incremental value that provides some editing information. |
| Refresh | Tells the slave DNS server how often it should check the master DNS server. Slaves aren’t usually used in home / SOHO environments. |
| Retry | The slave’s retry interval to connect the master in the event of a connection failure. Slaves aren’t usually used in home / SOHO environments. |
| Expiry | Total amount of time a slave should retry to contact the master before expiring the data it contains. Future references will be directed towards the root servers. Slaves aren’t usually used in home/SOHO environments. |
| Minimum-TTL | There are times when remote clients will make queries for subdomains that don’t exist. Your DNS server will respond with a no domain or NXDOMAIN response that the remote client caches. This value defines the caching duration your DNS includes in this response. |
So in the example, the primary name server is defined as ns1.my-site.com with a contact e-mail address of hostmaster@my-site.com. The serial number is 2004100801 with refresh, retry, expiry, and minimum values of 4 hours, 1 hour, 1 week, and 1 day, respectively.
Like the SOA record, the NS, MX, A, PTR and CNAME records each occupy a single line with a very similar general format. Table 18.4 outlines the way they are laid out.
Table 18.4 NS, MX, A, PTR and CNAME Record Formats
| Record
Type |
Field Descriptions
Name Field |
Class
Field2 |
Type
Field |
Data
Field |
| NS | Usually blank1 | IN | NS | IP address or CNAME of the name server |
| MX | Domain to be used for mail. Usually the same as the domain of the zone file itself. | IN | MX | Mail server DNS name |
| A | Name of a server in the domain | IN | A | IP address of server |
| CNAME | Server name alias | IN | CNAME | “A” record name for the server |
| PTR | Last octet of server’s IP address | IN | PTR | Fully qualified server name |
1 If the search key to a DNS resource record is blank it reuses the search key from the previous record which in this case of is the SOA @ sign.
2 For most home / SOHO scenarios, the Class field will always be IN or Internet. You should also be aware that IN is the default Class, and BIND will assume a record is of this type unless otherwise stated.
If you don’t put a period at the end of a host name in a SOA, NS, A, or CNAME record, BIND will automatically tack on the zone file’s domain name to the name of the host. So, BIND assumes an A record with www refers to http://www.my-site.com. This may be acceptable in most cases, but if you forget to put the period after the domain in the MX record for my-site.com, BIND attaches the my-site.com at the end, and you will find your mail server accepting mail only for the domain my-site.com.mysite.com.
Sample Forward Zone File
Now that you know the key elements of a zone file, it’s time to examine a working example for the domain my-site.com.
; Zone file for my-site.com
; The full zone file
;
$TTL 3D
@ IN SOA ns1.my-site.com. hostmaster.my-site.com. (
200211152 ; serial#
3600 ; refresh, seconds
3600 ; retry, seconds
3600 ; expire, seconds
3600 ) ; minimum, seconds
;
NS www ; Inet Address of nameserver
my-site.com. MX 10 mail ; Primary Mail Exchanger
localhost A 127.0.0.1
bigboy A 97.158.253.26
mail CNAME bigboy
ns1 CNAME bigboy
www CNAME bigboy
Notice that in this example:
o Server ns1.my-site.com is the name server for my-site.com. In corporate environments there may be a separate name server for this purpose. Primary name servers are more commonly called ns1 and secondary name servers ns2.
o The minimum TTL value ($TTL) is three days, therefore remote DNS caching servers will store learned DNS information from your zone for three days before flushing it out of their caches.
o The MX record for my-site.com points to the server named mail.my-site.com.
o ns1 and mail are actually CNAMEs or aliases for the Web server www. So here you have an example of the name server, mail server, and Web server being the same machine. If they were all different machines, then you’d have an A record entry for each.
www A 97.158.253.26
mail A 97.158.253.134
ns A 97.158.253.125
It is a required practice to increment your serial number whenever you edit your zone file. When DNS is setup in a redundant configuration, the slave DNS servers periodically poll the master server for updated zone file information, and use the serial number to determine whether the data on the master has been updated. Failing to increment the serial number, even though the contents of the zone file have been modified, could cause your slaves to have outdated information.
Sample Reverse Zone File
Now you need to make sure that you can do a host query on all your home network’s PCs and get their correct IP addresses. This is very important if you are running a mail server on your network, because sendmail typically relays mail only from hosts whose IP addresses resolve correctly in DNS. NFS, which is used in network-based file access, also requires valid reverse lookup capabilities.
This is an example of a zone file for the 192.168.1.x network. All the entries in the first column refer to the last octet of the IP address for the network, so the IP address 192.168.1.100 points to the name bigboy.my-site.com.
Notice how the main difference between forward and reverse zone files is that the reverse zone file only has PTR and NS records. Also the PTR records cannot have CNAME aliases.
; Filename: 192-168-1.zone
; Zone file for 192.168.1.x
;
$TTL 3D
@ IN SOA http://www.my-site.com. hostmaster.my-site.com. (
200303301 ; serial number
8H ; refresh, seconds
2H ; retry, seconds
4W ; expire, seconds
1D ) ; minimum, seconds
;
NS www ; Nameserver Address
;
100 PTR bigboy.my-site.com.
103 PTR smallfry.my-site.com.
102 PTR ochorios.my-site.com.
105 PTR reggae.my-site.com.
32 PTR dhcp-192-168-1-32.my-site.com.
33 PTR dhcp-192-168-1-33.my-site.com.
34 PTR dhcp-192-168-1-34.my-site.com.
35 PTR dhcp-192-168-1-35.my-site.com.
36 PTR dhcp-192-168-1-36.my-site.com.
I included entries for addresses 192.168.1.32 to 192.168.1.36, which are the addresses the DHCP server issues. SMTP mail relay wouldn’t work for PCs that get their IP addresses via DHCP if these lines weren’t included.
You may also want to create a reverse zone file for the public NAT IP addresses for your home network. Unfortunately, ISPs won’t usually delegate this ability for anyone with less than a Class C block of 256 IP addresses. Most home DSL sites wouldn’t qualify.
What You Need To Know About NAT And DNS
The previous examples assume that the queries will be coming from the Internet with the zone files returning information related to the external 97.158.253.26 address of the Web server.
What do the PCs on your home network need to see? They need to see DNS references to the real IP address of the Web server, 192.168.1.100, because NAT won’t work properly if a PC on your home network attempts to connect to the external 97.158.253.26 NAT IP address of your Web server.
Don’t worry. BIND has a way around these called views. The views feature allows you to force BIND to use predefined zone files for queries from certain subnets. This means it’s possible to use one set of zone files for queries from the Internet and another set for queries from your home network.
Here’s a summary of how it’s done:
1. Place your zone statements in the /etc/named.conf file in one of two views sections. The first section is called internal and lists the zone files to be used by your internal network. The second view called external lists the zone files to used for Internet users.
For example; you could have a reference to a zone file called my-site.zone for lookups related to the 97.158.253.X network which Internet users would see. This /etc/named.conf entry would be inserted in the external section. You could also have a file called my-site-home.zone for lookups by home users on the 192.168.1.0 network. This entry would be inserted in the internal section. Creating the my-site-home.zone file is fairly easy: Copy it from the my-site.zone file and replace all references to 97.158.253.X with references to 192.168.1.X.
2. You must also tell the DNS server which addresses you feel are internal and external. To do this, you must first define the internal and external networks with access control lists (ACLs) and then refer to these lists within their respective view section with the match-clients statement. Some built-in ACLs can save you time:
> localhost: Refers to the DNS server itself
> localnets: Refers to all the networks to which the DNS server is directly connected
> any: which is self explanatory.
Note: You must place your localhost, 0.0.127.in-addr.arpa and “.” zone statements in the internal views section. Remember to increment your serial numbers!
Here is a sample configuration snippet for the /etc/named.conf file I use for my home network. All the statements below were inserted after the options and controls sections in the file.
// ACL statement
acl “trusted-subnet” { 192.168.17.0/24; };
view “internal” { // What the home network will see
match-clients { localnets; localhost; “trusted-subnet”; };
zone “.” IN {
type hint;
file “named.ca”;
};
zone “localhost” IN {
type master;
file “localhost.zone”;
allow-update { none; };
};
zone “0.0.127.in-addr.arpa” IN {
type master;
file “named.local”;
allow-update { none; };
};
// IPv6 Support
zone “0.0.0.0.0.0.0.0.0.0.0.0.0.0.0.0.0.0.0.0.0.0.0.0.0.0.0.0.0.0.0.ip6.arpa” IN {
type master;
file “named.ip6.local”;
allow-update { none; };
};
// Prevents lookups for broadcast addresses ending in “.255”
zone “255.in-addr.arpa” IN {
type master;
file “named.broadcast”;
allow-update { none; };
};
// Prevents lookups for network addresses ending in “.0”
zone “0.in-addr.arpa” IN {
type master;
file “named.zero”;
allow-update { none; };
};
zone “1.168.192.in-addr.arpa” IN {
type master;
file “192-168-1.zone”;
allow-update { none; };
};
zone “my-site.com” {
type master;
notify no;
file “my-site-home.zone”;
allow-query { any; };
};
zone “another-site.com” {
type master;
notify no;
file “another-site-home.zone”;
allow-query { any; };
};
};
view “external” { // What the Internet will see
match-clients { any; };
recursion no;
zone “my-site.com” {
type master;
notify no;
file “my-site.zone”;
allow-query { any; };
};
zone “another-site.com” {
type master;
notify no;
file “another-site.zone”;
allow-query { any; };
};
};
In this example I included an ACL for network 192.168.17.0 /24 called trusted-subnet to help clarify the use of ACLs in more complex environments. Once the ACL was defined, I then inserted a reference to the trusted-subnet in the match-clients statement in the internal view. So in this case the local network (192.168.1.0 /24), the other trusted network (192.168.17.0), and localhost get DNS data from the zone files in the internal view. Remember, this is purely an example. The example home network doesn’t need to have the ACL statement at all as the built in ACLs localnets and localhost are sufficient. The network won’t need the trusted-subnet section in the match-clients line either.
Loading Your New Configuration Files
To load your new configuration files, first make sure your file permissions and ownership are okay in the /var/named directory.
[root@bigboy tmp]# cd /var/named
[root@bigboy named]# ll
total 6
-rw-r–r– 1 named named 195 Jul 3 2001 localhost.zone
-rw-r–r– 1 named named 2769 Jul 3 2001 named.ca
-rw-r–r– 1 named named 433 Jul 3 2001 named.local
-rw-r–r– 1 root root 763 Oct 2 16:23 my-site.zone
[root@bigboy named]# chown named *
[root@bigboy named]# chgrp named *
[root@bigboy named]# ll
total 6
-rw-r–r– 1 named named 195 Jul 3 2001 localhost.zone
-rw-r–r– 1 named named 2769 Jul 3 2001 named.ca
-rw-r–r– 1 named named 433 Jul 3 2001 named.local
-rw-r–r– 1 named named 763 Oct 2 16:23 my-site.zone
[root@bigboy named]#
The configuration files above will not be loaded until you issue the proper command to restart the named process that controls DNS, but be sure to increment your configuration file serial number before doing this.
[root@bigboy tmp]# service named restart
Take a look at the end of your /var/log/messages file to make sure there are no errors.
Make Sure Your /etc/hosts File Is Correctly Updated
Linux Networking, explains how to correctly configure your /etc/hosts file. Some programs, such as sendmail, require a correctly configured /etc/hosts file even though DNS is correctly configured.
Configuration of ftp server
How To Download And Install VSFTPD:
Most RedHat and Fedora Linux software products are available in the RPM format. Downloading and installing RPMs isn’t hard. If you need a refresher, Chapter 6, on RPMs, covers how to do this in detail. It is best to use the latest version of VSFTPD.
When searching for the file, remember that the VSFTPD RPM’s filename usually starts with the word vsftpd followed by a version number, as in: vsftpd-1.2.1-5.i386.rpm.
How To Get VSFTPD Started:
You can start, stop, or restart VSFTPD after booting by using these commands:
[root@bigboy tmp]# service vsftpd start
[root@bigboy tmp]# service vsftpd stop
[root@bigboy tmp]# service vsftpd restart
To configure VSFTPD to start at boot you can use the chkconfig command.
[root@bigboy tmp]# chkconfig vsftpd on
Note: In RedHat Linux version 8.0 and earlier, VSFTPD operation is controlled by the xinetd process, which is covered in Chapter 16, “TELNET, TFTP, and XINETD.” You can find a full description of how to configure these versions of Linux for VSFTPD in Appendix III, “Fedora Version Differences.”
Testing the Status of VSFTPD:
You can always test whether the VSFTPD process is running by using the netstat -a command which lists all the TCP and UDP ports on which the server is listening for traffic. This example shows the expected output.
[root@bigboy root]# netstat -a | grep ftp
tcp 0 0 *:ftp *:* LISTEN
[root@bigboy root]#
If VSFTPD wasn’t running, there would be no output at all.
The vsftpd.conf File:
VSFTPD only reads the contents of its vsftpd.conf configuration file only when it starts, so you’ll have to restart VSFTPD each time you edit the file in order for the changes to take effect.
This file uses a number of default settings you need to know about.
> VSFTPD runs as an anonymous FTP server. Unless you want any remote user to log into to your default FTP directory using a username of anonymous and a password that’s the same as their email address, I would suggest turning this off. The configuration file’s anonymous_enable directive can be set to no to disable this feature. You’ll also need to simultaneously enable local users to be able to log in by removing the comment symbol (#) before the local_enable instruction.
> VSFTPD allows only anonymous FTP downloads to remote users, not uploads from them. This can be changed by modifying the anon_upload_enable directive shown later.
> VSFTPD doesn’t allow anonymous users to create directories on your FTP server. You can change this by modifying the anon_mkdir_write_enable directive.
> VSFTPD logs FTP access to the /var/log/vsftpd.log log file. You can change this by modifying the xferlog_file directive.
> By default VSFTPD expects files for anonymous FTP to be placed in the /var/ftp directory. You can change this by modifying the anon_root directive. There is always the risk with anonymous FTP that users will discover a way to write files to your anonymous FTP directory. You run the risk of filling up your /var partition if you use the default setting. It is best to make the anonymous FTP directory reside in its own dedicated partition.
The configuration file is fairly straight forward as you can see in the snippet below.
# Allow anonymous FTP?
anonymous_enable=YES
…
# Uncomment this to allow local users to log in.
local_enable=YES
…
# Uncomment this to enable any form of FTP write command.
# (Needed even if you want local users to be able to upload files)
write_enable=YES
…
# Uncomment to allow the anonymous FTP user to upload files. This only
# has an effect if global write enable is activated. Also, you will
# obviously need to create a directory writable by the FTP user.
#anon_upload_enable=YES
…
# Uncomment this if you want the anonymous FTP user to be able to create
# new directories.
#anon_mkdir_write_enable=YES
…
# Activate logging of uploads/downloads.
xferlog_enable=YES
…
# You may override where the log file goes if you like.
# The default is shown# below.
#xferlog_file=/var/log/vsftpd.log
…
# The directory which vsftpd will try to change
# into after an anonymous login. (Default = /var/ftp)
#anon_root=/data/directory
To activate or deactivate a feature, remove or add the # at the beginning of the appropriate line.
Other vsftpd.conf Options
There are many other options you can add to this file:
o Limiting the maximum number of client connections (max_clients)
o Limiting the number of connections by source IP address (max_per_ip)
o The maximum rate of data transfer per anonymous login. (anon_max_rate)
o The maximum rate of data transfer per non-anonymous login. (local_max_rate)
Descriptions on this and more can be found in the vsftpd.conf man pages.
FTP Security Issues:
FTP has a number of security drawbacks, but you can overcome them in some cases. You can restrict an individual Linux user’s access to non-anonymous FTP, and you can change the configuration to not display the FTP server’s software version information, but unfortunately, though very convenient, FTP logins and data transfers are not encrypted.
The /etc/vsftpd.ftpusers File
For added security, you may restrict FTP access to certain users by adding them to the list of users in the /etc/vsftpd.ftpusers file. The VSFTPD package creates this file with a number of entries for privileged users that normally shouldn’t have FTP access. As FTP doesn’t encrypt passwords, thereby increasing the risk of data or passwords being compromised, it is a good idea to let these entries remain and add new entries for additional security.
Anonymous Upload
If you want remote users to write data to your FTP server, then you should create a write-only directory within /var/ftp/pub. This will allow your users to upload but not access other files uploaded by other users. The commands you need are:
[root@bigboy tmp]# mkdir /var/ftp/pub/upload
[root@bigboy tmp]# chmod 722 /var/ftp/pub/upload
FTP Greeting Banner
Change the default greeting banner in the vsftpd.conf file to make it harder for malicious users to determine the type of system you have. The directive in this file is.
ftpd_banner= New Banner Here
Using SCP As Secure Alternative To FTP
One of the disadvantages of FTP is that it does not encrypt your username and password. This could make your user account vulnerable to an unauthorized attack from a person eavesdropping on the network connection. Secure Copy (SCP) and Secure FTP (SFTP) provide encryption and could be considered as an alternative to FTP for trusted users. SCP does not support anonymous services, however, a feature that FTP does support.
Tutorial:
FTP has many uses, one of which is allowing numerous unknown users to download files. You have to be careful, because you run the risk of accidentally allowing unknown persons to upload files to your server. This sort of unintended activity can quickly fill up your hard drive with illegal software, images, and music for the world to download, which in turn can clog your server’s Internet access and drive up your bandwidth charges.
FTP Users with Only Read Access to a Shared Directory
In this example, anonymous FTP is not desired, but a group of trusted users need to have read only access to a directory for downloading files. Here are the steps:
1. Disable anonymous FTP. Comment out the anonymous_enable line in the vsftpd.conf file like this:
# Allow anonymous FTP?
# anonymous_enable=YES
2. Enable individual logins by making sure you have the local_enable line uncommented in the vsftpd.conf file like this:
# Uncomment this to allow local users to log in.
local_enable=YES
3. Start VSFTP.
[root@bigboy tmp]# service vsftpd start
4. Create a user group and shared directory. In this case, use /home/ftp-users and a user group name of ftp-users for the remote users
[root@bigboy tmp]# groupadd ftp-users
[root@bigboy tmp]# mkdir /home/ftp-docs
5. Make the directory accessible to the ftp-users group.
[root@bigboy tmp]# chmod 750 /home/ftp-docs
[root@bigboy tmp]# chown root:ftp-users /home/ftp-docs
6. Add users, and make their default directory /home/ftp-docs
[root@bigboy tmp]# useradd -g ftp-users -d /home/ftp-docs user1
[root@bigboy tmp]# useradd -g ftp-users -d /home/ftp-docs user2
[root@bigboy tmp]# useradd -g ftp-users -d /home/ftp-docs user3
[root@bigboy tmp]# useradd -g ftp-users -d /home/ftp-docs user4
[root@bigboy tmp]# passwd user1
[root@bigboy tmp]# passwd user2
[root@bigboy tmp]# passwd user3
[root@bigboy tmp]# passwd user4
7. Copy files to be downloaded by your users into the /home/ftp-docs directory
8. Change the permissions of the files in the /home/ftp-docs directory for read only access by the group
[root@bigboy tmp]# chown root:ftp-users /home/ftp-docs/*
[root@bigboy tmp]# chmod 740 /home/ftp-docs/*
Users should now be able to log in via FTP to the server using their new usernames and passwords. If you absolutely don’t want any FTP users to be able to write to any directory, then you should set the write_enable line in your vsftpd.conf file to no:
write_enable = NO
Remember, you must restart VSFTPD for the configuration file changes to take effect.
10. Connect to bigboy via FTP
[root@smallfry tmp]# ftp 192.168.1.100 (ip address of bigboy)
you will get a prompt like
ftp>
FTP commands and files:
/etc/ftpaccess : General configuration file: classes of users, access definitions, logging, etc.
Example:
class all real,guest,anonymous *
limit all 10 Any /etc/msgs/msg.dead
readme README* login
readme README* cwd=*
message /welcome.msg login
message .message cwd=*
compress yes all
tar yes all
log commands real
log transfers anonymous,real inbound,outbound
shutdown /etc/shutmsg
email user@hostname
/etc/ftphosts : Individual user host access to allow / deny a given username from an address.
# Example host access file
# Everything after a '#' is treated as comment,
# empty lines are ignored
allow bartm somehost.domain
deny fred otherhost.domain 131.211.32.*
/etc/ftpgroups : It allow us to set up groups of users.
/etc/ftpusers : Users who are not allowed to log in.
/etc/ftpconversions : Allows users to request specific on-the-fly conversions.
-
chroot – Run with a special root directory
-
ftpcount – Show number of concurrent users.
-
ftpshut – close down the ftp servers at a given time
-
ftprestart – Restart previously shutdown ftp servers
-
ftpwho – show current process information for each ftp user
Telnet Server Configuration
To run or enable the telnet service following file need to be edited.
/etc/xinetd.d/telnet
and restart xinetd service.
Create a /etc/nologin file will prevent any remote login via telnet.
If you are in an environment where you work with multiple UNIX computers networked together, you will need to work on different machines from time to time. The telnet command provides you with a facility to login to other computers from your current system without logging out of your current environment. The telnet command is similar to the rlogin command described earlier in this section.
The hostname argument of telnet is optional. If you do not use the host computer name as part of the command, you will be placed at the telnet prompt, usually, telnet>. There are a number of sub-commands available to you when you are at the telnet> prompt. Some of these sub-commands are as follows:
-
exit to close the current connection and return to the telnet> prompt if sub-command open was used to connect to the remote host. If, however, telnet was issued with the host-name argument, the connection is closed and you are returned to where you invoked the telnet command.
-
display to display operating arguments.
-
open to open a connection to a host. The argument can be a host computer name or address. telnet will respond with an error message if you provide an incorrect name or address.
-
quit to exit telnet.
-
set to set operating arguments.
-
status to print status information.
-
toggle to toggle operating arguments (toggle ? for more).
-
? to print help information.
Examples Assume that you work with two networked computers, box1 and box2. If you are currently logged in on box1, you can execute the following command to login into box2:
telnet box2
As a response to this command, box2 will respond with the login screen where you can enter your userid and password for box2 to login. After completing your work on box2, you can come back to box1.
Basic user security:
My Red Hat 7.3 server and wu-ftp server 2.6.2-5 does not support this configuration to prevent shell access and requires a real user shell. i.e. /bin/bash It use to work great in older versions. If it works for you, use it, as it is more secure to deny the user shell access. You can always deny telnet access.
-
Disable remote telnet login access allowing FTP access only:
Change the shell for the user in /etc/passwd from /bin/bash to be /etc/ftponly.
...
user1:x:502:503::/home/user1:/etc/ftponly
...
Create file: /etc/ftponly.
Protection set to -rwxr-xr-x 1 root root
Contents of file:
#!/bin/sh
#
# ftponly shell
#
trap "/bin/echo Sorry; exit 0" 1 2 3 4 5 6 7 10 15
#
Admin=root@your-domain.com
#System=`/usr/ucb/hostname`@`/usr/bin/domainname`
#
/bin/echo
/bin/echo "********************************************************************"
/bin/echo " You are NOT allowed interactive access."
/bin/echo
/bin/echo " User accounts are restricted to ftp and web access."
/bin/echo
/bin/echo " Direct questions concerning this policy to $Admin."
/bin/echo "********************************************************************"
/bin/echo
#
# C'ya
#
exit 0
The last step is to add this to the list of valid shells on the system.
Add the line /etc/ftponly to /etc/shells.
Sample file contents:
/bin/bash
/bin/bash1
/bin/tcsh
/bin/csh
/etc/ftponly
An alternative would be to assign the shell /bin/false which became available in later releases of Red Hat.
Configuring Samba
Samba uses /etc/samba/smb.conf as its configuration file. If you change this configuration file, the changes will not take effect until you restart the Samba daemon with the command service smb restart.
The default configuration file (smb.conf) in Red Hat Linux 8.0 allows users to view their Linux home directories as a Samba share on the Windows machine after they log in using the same username and password. It also shares any printers configured for the Red Hat Linux system as Samba shared printers. In other words, you can attach a printer to your Red Hat Linux system and print to it from the Windows machines on your network.
To specify the Windows workgroup and description string, edit the following lines in your smb.conf file:
workgroup = WORKGROUPNAME server string = BRIEF COMMENT ABOUT SERVER |
Replace WORKGROUPNAME with the name of the Windows workgroup to which this machine should belong. The BRIEF COMMENT ABOUT SERVER is optional and will be the Windows comment about the Samba system.
To create a Samba share directory on your Linux system, add the following section to your smb.conf file (after modifying it to reflect your needs and your system):
[sharename] comment = Insert a comment here path = /home/share/ valid users = tfox carole public = no writable = yes printable = no create mask = 0765 |
The above example allows the users tfox and carole to read and write to the directory /home/share, on the Samba server, from a Samba client.
Samba Passwords
In Red Hat Linux 8.0 encrypted passwords are enabled by default because it is more secure. If encrypted passwords are not used, plain text passwords are used, which can be intercepted by someone using a network packet sniffer. It is recommended that encrypted passwords be used.
The Microsoft SMB Protocol originally used plaintext passwords. However, Windows 2000 and Windows NT 4.0 with Service Pack 3 or higher require encrypted Samba passwords. To use Samba between a Red Hat Linux system and a system with Windows 2000 or Windows NT 4.0 Service Pack 3 or higher, you can either edit your Windows registry to use plaintext passwords or configure Samba on your Linux system to use encrypted passwords. If you choose to modify your registry, you must do so for all your Windows NT or 2000 machines — this is risky and may cause further conflicts.
To configure Samba on your Red Hat Linux system to use encrypted passwords, follow these steps:
1. Create a separate password file for Samba. To create one based on your existing /etc/passwd file, at a shell prompt, type the following command:
cat /etc/passwd | mksmbpasswd.sh > /etc/samba/smbpasswd |
2. If the system uses NIS, type the following command:
ypcat passwd | mksmbpasswd.sh > /etc/samba/smbpasswd |
3. The mksmbpasswd.sh script is installed in your /usr/bin directory with the samba package.
4. Change the permissions of the Samba password file so that only root has read and write permissions:
chmod 600 /etc/samba/smbpasswd |
5. The script does not copy user passwords to the new file. To set each Samba user’s password, use the command (replace username with each user’s username):
smbpasswd username |
6. A Samba user account will not be active until a Samba password is set for it.
7. Encrypted passwords must be enabled in the Samba configuration file. In the file smb.conf, verify that the following lines are not commented out:
encrypt password = yes smb passwd file = /etc/samba/smbpasswd |
8. Make sure the smb service is started by typing the command service smb restart at a shell prompt.
9. If you want the smb service to start automatically, use ntsysv, chkconfig, or Services Configuration Tool to enable it at runtime.
Connecting to a Samba Share
To connect to a Linux Samba share from a Microsoft Windows machine, use Network Neighborhood or Windows Explorer.
To connect to a Samba share from a Linux system, from a shell prompt, type the following command:
smbclient //hostname/sharename -U username |
You will need to replace hostname with the hostname or IP address of the Samba server you want to connect to, sharename with the name of the shared directory you want to browse, and username with the Samba username for the system. Enter the correct password or press [Enter] if no password is required for the user.
If you see the smb:> prompt, you have successfully logged in. Once you are logged in, type help for a list of commands. If you wish to browse the contents of your home directory, replace sharename with your username. If the -U switch is not used, the username of the current user is passed to the Samba server.
To exit smbclient, type exit at the smb:> prompt.
Linux Firewalls using iptables
Network security is a primary consideration in any decision to host a website as the threats are becoming more widespread and persistent every day. One means of providing additional protection is to invest in a firewall. Though prices are always falling, in some cases you may be able to create a comparable unit using the Linux iptables package on an existing server for little or no additional expenditure.
This chapter shows how to convert a Linux server into:
* A firewall while simultaneously being your home website’s mail, web and DNS server.
* A router that will use NAT and port forwarding to both protect your home network and have another web server on your home network while sharing the public IP address of your firewall.
Originally, the most popular firewall/NAT package running on Linux was ipchains, but it had a number of shortcomings. To rectify this, the Netfilter organization decided to create a new product called iptables, giving it such improvements as:
> Better integration with the Linux kernel with the capability of loading iptables-specific kernel modules designed for improved speed and reliability.
> Stateful packet inspection. This means that the firewall keeps track of each connection passing through it and in certain cases will view the contents of data flows in an attempt to anticipate the next action of certain protocols. This is an important feature in the support of active FTP and DNS, as well as many other network services.
> Filtering packets based on a MAC address and the values of the flags in the TCP header. This is helpful in preventing attacks using malformed packets and in restricting access from locally attached servers to other networks in spite of their IP addresses.
> System logging that provides the option of adjusting the level of detail of the reporting.
> Better network address translation.
> Support for transparent integration with such Web proxy programs as Squid.
> A rate limiting feature that helps iptables block some types of denial of service (DoS) attacks..
Considered a faster and more secure alternative to ipchains, iptables has become the default firewall package installed under Red Hat and Fedora Linux.
Download And Install The Iptables Package
Before you begin, you need to make sure that the iptables software RPM is installed. When searching for the RPMs, remember that the filename usually starts with the software package name by a version number, as in iptables-1.2.9-1.0.i386.rpm.
You can start, stop, and restart iptables after booting by using the commands:
[root@bigboy tmp]# service iptables start
[root@bigboy tmp]# service iptables stop
[root@bigboy tmp]# service iptables restart
To get iptables configured to start at boot, use the chkconfig command:.
[root@bigboy tmp]# chkconfig iptables on
Determining The Status of iptables
You can determine whether iptables is running or not via the service iptables status command. Fedora Core will give a simple status message. For example
[root@bigboy tmp]# service iptables status
Firewall is stopped.
All packets inspected by iptables pass through a sequence of built-in tables (queues) for processing. Each of these queues is dedicated to a particular type of packet activity and is controlled by an associated packet transformation/filtering chain.
There are three tables in total. The first is the mangle table which is responsible for the alteration of quality of service bits in the TCP header. This is hardly used in a home or SOHO environment.
The second table is the filter queue which is responsible for packet filtering. It has three built-in chains in which you can place your firewall policy rules. These are the:
> Forward chain: Filters packets to servers protected by the firewall.
> Input chain: Filters packets destined for the firewall.
> Output chain: Filters packets originating from the firewall.
The third table is the nat queue which is responsible for network address translation. It has two built-in chains; these are:
> Pre-routing chain: NATs packets when the destination address of the packet needs to be changed.
> Post-routing chain: NATs packets when the source address of the packet needs to be changed
Table 14-1 Processing For Packets Routed By The Firewall
| Queue Type | Queue Function | Packet Transformation chain in Queue | Chain Function |
| Filter | Packet filtering | FORWARD | Filters packets to servers accessible by another NIC on the firewall. |
| INPUT | Filters packets destined to the firewall. | ||
| OUTPUT | Filters packets originating from the firewall | ||
| Nat | Network Address Translation | PREROUTING | Address translation occurs before routing. Facilitates the transformation of the destination IP address to be compatible with the firewall’s routing table. Used with NAT of the destination IP address, also known as destination NAT or DNAT. |
| POSTROUTING | Address translation occurs after routing. This implies that there was no need to modify the destination IP address of the packet as in pre-routing. Used with NAT of the source IP address using either one-to-one or many-to-one NAT. This is known as source NAT, or SNAT | ||
| OUTPUT | Network addresses translation for packets generated by the firewall. (Rarely used in SOHO environments) | ||
| Mangle | TCP header modification | PREROUTING POSTROUTING OUTPUT INPUT FORWARD | Modification of the TCP packet quality of service bits before routing occurs
(Rarely used in SOHO environments) |
You need to specify the table and the chain for each firewall rule you create. There is an exception: Most rules are related to filtering, so iptables assumes that any chain that’s defined without an associated table will be a part of the filter table. The filter table is therefore the default.
To help make this clearer, take a look at the way packets are handled by iptables. In Figure 14.1 a TCP packet from the Internet arrives at the firewall’s interface on Network A to create a data connection.
The packet is first examined by your rules in the mangle table’s PREROUTING chain, if any. It is then inspected by the rules in the nat table’s PREROUTING chain to see whether the packet requires DNAT. It is then routed.
If the packet is destined for a protected network, then it is filtered by the rules in the FORWARD chain of the filter table and, if necessary, the packet undergoes SNAT before arriving at Network B. When the destination server decides to reply, the packet undergoes the same sequence of steps.
If the packet is destined for the firewall itself, then it is filtered by the rules in the INPUT chain of the filter table before being processed by the intended application on the firewall. At some point, the firewall needs to reply. This reply is inspected by your rules in the OUTPUT chain of the mangle table, if any. The rules in the OUTPUT chain of the nat table determine whether address translation is required and the rules in the OUTPUT chain of the filter table are then inspected before the packet is routed back to the Internet.
Figure 14-1 Iptables Packet Flow Diagram

It is now time to discuss the ways in which you add rules to these chains.
Each firewall rule inspects each IP packet and then tries to identify it as the target of some sort of operation. Once a target is identified, the packet needs to jump over to it for further processing. Table 14.2 lists the built-in targets that iptables uses.
Table 14-2 Descriptions Of The Most Commonly Used Targets
| Target | Description | Most common options |
| ACCEPT | iptables stops further processing.
The packet is handed over to the end application or the operating system for processing |
N/A |
| DROP | iptables stops further processing.
The packet is blocked |
N/A |
| LOG | The packet information is sent to the syslog daemon for logging. iptables continues processing with the next rule in the table. As you can’t log and drop at the same time, it is common to have two similar rules in sequence. The first will log the packet, the second will drop it. | –log-prefix “string”
Tells iptables to prefix all log messages with a user defined string. Frequently used to tell why the logged packet was dropped |
| REJECT | Works like the DROP target, but will also return an error message to the host sending the packet that the packet was blocked | –reject-with qualifier
The qualifier tells what type of reject message is returned. Qualifiers include: ** |
| DNAT | Used to do destination network address translation. ie. Rewriting the destination IP address of the packet | –to-destination ipaddress
Tells iptables what the destination IP address should be |
| SNAT | Used to do source network address translation rewriting the source IP address of the packet.
The source IP address is user defined |
–to-source <address>[-<address>][:<port>-<port>]
Specifies the source IP address and ports to be used by SNAT. |
| MASQUERADE | Used to do Source Network Address Translation.
By default the source IP address is the same as that used by the firewall’s interface |
[–to-ports <port>[-<port>]]
Specifies the range of source ports to which the original source port can be mapped. |
** icmp-port-unreachable (default), icmp-net-unreachable, icmp-host-unreachable, icmp-proto-unreachable
icmp-net-prohibited, icmp-host-prohibited, tcp-reset, echo-reply.
Important Iptables Command Switch Operations
Each line of an iptables script not only has a jump, but they also have a number of command line options that are used to append rules to chains that match your defined packet characteristics, such the source IP address and TCP port. There are also options that can be used to just clear a chain so you can start all over again. Tables 14.2 through 14.6 list the most common options.
Table 14-2 General Iptables Match Criteria
| Iptables command
Switch |
Description |
| -t <table> | If you don’t specify a table, then the filter table is assumed. As discussed before, the possible built-in tables include: filter, nat, mangle |
| -j <target> | Jump to the specified target chain when the packet matches the current rule |
| -A | Append rule to end of a chain |
| -F | Flush. Deletes all the rules in the selected table |
| -p <protocol-type> | Match protocol. Types include, icmp, tcp, udp, and all |
| -s <ip-address> | Match source IP address |
| -d <ip-address> | Match destination IP address |
| -i <interface-name> | Match “input” interface on which the packet enters. |
| -o <interface-name> | Match “output” interface on which the packet exits |
In this command switches example
iptables -A INPUT -s 0/0 -i eth0 -d 192.168.1.1 -p TCP -j ACCEPT
iptables is being configured to allow the firewall to accept TCP packets coming in on interface eth0 from any IP address destined for the firewall’s IP address of 192.168.1.1. The 0/0 representation of an IP address means any.
Table 14-4 Common TCP and UDP Match Criteria
| Switch | Description |
| -p tcp –sport <port> | TCP source port, Can be a single value or a range in the format:
start-port-number:end-port-number |
| -p tcp –dport <port> | TCP destination port, Can be a single value or a range in the format:
starting-port:ending-port |
| -p tcp –syn | Used to identify a new TCP connection request
! –syn means, not a new connection request |
| -p udp –sport <port> | UDP source port, Can be a single value or a range in the format:
starting-port:ending-port |
| -p udp –dport <port> | UDP destination port, Can be a single value or a range in the format:
starting-port:ending-port |
In this example:
iptables -A FORWARD -s 0/0 -i eth0 -d 192.168.1.58 -o eth1 -p TCP
–sport 1024:65535 –dport 80 -j ACCEPT
iptables is being configured to allow the firewall to accept TCP packets for routing when they enter on interface eth0 from any IP address and are destined for an IP address of 192.168.1.58 that is reachable via interface eth1. The source port is in the range 1024 to 65535 and the destination port is port 80 (www/http).
Table 14-5 Common ICMP (Ping) Match Criteria
| Matches used with
—icmp-type |
Description |
| –icmp-type <type> | The most commonly used types are echo-reply and echo-request |
In this example
iptables -A OUTPUT -p icmp –icmp-type echo-request -j ACCEPT
iptables -A INPUT -p icmp –icmp-type echo-reply -j ACCEPT
iptables is being configured to allow the firewall to send ICMP echo-requests (pings) and in turn, accept the expected ICMP echo-replies.
Consider another example
iptables -A INPUT -p icmp –icmp-type echo-request
-m limit –limit 1/s -i eth0 -j ACCEPT
The limit feature in iptables specifies the maximum average number of matches to allow per second. You can specify time intervals in the format /second, /minute, /hour, or /day, or you can use abbreviations so that 3/second is the same as 3/s.
In this example, ICMP echo requests are restricted to no more than one per second. When tuned correctly, this feature allows you to filter unusually high volumes of traffic that characterize denial of service (DOS) attacks and Internet worms.
iptables -A INPUT -p tcp –syn -m limit –limit 5/s -i eth0 -j ACCEPT
You can expand on the limit feature of iptables to reduce your vulnerability to certain types of denial of service attack. Here a defense for SYN flood attacks was created by limiting the acceptance of TCP segments with the SYN bit set to no more than five per second.
Table 14-6 Common Extended Match Criteria
| Switch | Description |
| -m multiport –sport <port, port> | A variety of TCP/UDP source ports separated by commas. Unlike when -m isn’t used, they do not have to be within a range. |
| -m multiport –dport <port, port> | A variety of TCP/UDP destination ports separated by commas. Unlike when -m isn’t used, they do not have to be within a range. |
| -m multiport –ports <port, port> | A variety of TCP/UDP ports separated by commas. Source and destination ports are assumed to be the same and they do not have to be within a range. |
| -m –state <state> | The most frequently tested states are:
ESTABLISHED: The packet is part of a connection that has seen packets in both directions NEW: The packet is the start of a new connection RELATED: The packet is starting a new secondary connection. This is a common feature of such protocols such as an FTP data transfer, or an ICMP error. INVALID: The packet couldn’t be identified. Could be due to insufficient system resources, or ICMP errors that don’t match an existing data flow. |
This is an expansion on the previous example:
iptables -A FORWARD -s 0/0 -i eth0 -d 192.168.1.58 -o eth1 -p TCP
–sport 1024:65535 -m multiport –dport 80,443 -j ACCEPT
iptables -A FORWARD -d 0/0 -o eth0 -s 192.168.1.58 -i eth1 -p TCP
-m state –state ESTABLISHED -j ACCEPT
Here iptables is being configured to allow the firewall to accept TCP packets to be routed when they enter on interface eth0 from any IP address destined for IP address of 192.168.1.58 that is reachable via interface eth1. The source port is in the range 1024 to 65535 and the destination ports are port 80 (www/http) and 443 (https). The return packets from 192.168.1.58 are allowed to be accepted too. Instead of stating the source and destination ports, you can simply allow packets related to established connections using the -m state and –state ESTABLISHED options.
Using User Defined Chains
As you may remember, you can configure iptables to have user-defined chains. This feature is frequently used to help streamline the processing of packets. For example, instead of using a single, built-in chain for all protocols, you can use the chain to determine the protocol type for the packet and then hand off the actual final processing to a user-defined, protocol-specific chain in the filter table. In other words, you can replace a long chain with a stubby main chain pointing to multiple stubby chains, thereby shortening the total length of all chains the packet has to pass through. For example
iptables -A INPUT -i eth0 -d 206.229.110.2 -j fast-input-queue
iptables -A OUTPUT -o eth0 -s 206.229.110.2 -j fast-output-queue
iptables -A fast-input-queue -p icmp -j icmp-queue-in
iptables -A fast-output-queue -p icmp -j icmp-queue-out
iptables -A icmp-queue-out -p icmp –icmp-type echo-request
-m state –state NEW -j ACCEPT
iptables -A icmp-queue-in -p icmp –icmp-type echo-reply -j ACCEPT
Here six queues help assist in improving processing speed. Table 14.7 summarizes the function of each.
Table 14.7 Custom Queues Example Listing
| Chain | Description |
| INPUT | The regular built-in INPUT chain in iptables |
| OUTPUT | The regular built-in OUTPUT chain in iptables |
| fast-input-queue | Input chain dedicated to identifying specific protocols and shunting the packets to protocol specific chains. |
| fast-output-queue | Output chain dedicated to identifying specific protocols and shunting the packets to protocol specific chains. |
| icmp-queue-out | Output queue dedicated to ICMP |
| icmp-queue-in | Input queue dedicated to ICMP |
The service iptables save command permanently saves the iptables configuration in the /etc/sysconfig/iptables file. When the system reboots, the iptables-restore program reads the configuration and makes it the active configuration.
The format of the /etc/sysconfig/iptables file is slightly different from that of the scripts shown in this chapter. The initialization of built-in chains is automatic and the string “iptables” is omitted from the rule statements.
Here is a sample /etc/sysconfig/iptables configuration that allows ICMP, IPSec (ESP and AH packets), already established connections, and inbound SSH.
[root@bigboy tmp]# cat /etc/sysconfig/iptables
# Generated by iptables-save v1.2.9 on Mon Nov 8 11:00:07 2004
*filter
:INPUT ACCEPT [0:0]
:FORWARD ACCEPT [0:0]
:OUTPUT ACCEPT [144:12748]
:RH-Firewall-1-INPUT – [0:0]
-A INPUT -j RH-Firewall-1-INPUT
-A FORWARD -j RH-Firewall-1-INPUT
-A RH-Firewall-1-INPUT -i lo -j ACCEPT
-A RH-Firewall-1-INPUT -p icmp -m icmp –icmp-type 255 -j ACCEPT
-A RH-Firewall-1-INPUT -p esp -j ACCEPT
-A RH-Firewall-1-INPUT -p ah -j ACCEPT
-A RH-Firewall-1-INPUT -m state –state RELATED,ESTABLISHED -j ACCEPT
-A RH-Firewall-1-INPUT -p tcp -m state –state NEW -m tcp –dport 22 -j ACCEPT
-A RH-Firewall-1-INPUT -j REJECT –reject-with icmp-host-prohibited
COMMIT
# Completed on Mon Nov 8 11:00:07 2004
[root@bigboy tmp]#
It is never a good idea to edit this script directly because it is always overwritten by the save command and it doesn’t save any comments at all, which can also make it extremely difficult to follow. For these reasons, you’re better off writing and applying a customized script and then using the service iptables save command to make the changes permanent.
Fedora comes with a program called lokkit that you can use to generate a very rudimentary firewall rule set. It prompts for the level of security and then gives you the option of doing simple customizations. It is a good place for beginners to start on a test system so that they can see a general rule structure.
Like the service iptables save command, lokkit saves the firewall rules in a new /etc/sysconfig/iptables file for use on the next reboot.
Once you have become familiar with the iptables syntax, it’s best to write scripts that you can comment and then save it to /etc/sysconfig/iptables. It makes them much more manageable and readable.
Sometimes the script you created to generate iptables rules may get corrupted or lost, or you might inherit a new system from an administer and cannot find the original script used to protect it. In these situations, you can use the iptables-save and iptables-restore commands to assist you with the continued management of the server.
Unlike the service iptables save command, which actually saves a permanent copy of the firewall’s active configuration in the /etc/sysconfig/iptables file, iptables-save displays the active configuration to the screen in /etc/sysconfig/iptables format. If you redirect the iptables-save screen output to a file with the > symbol, then you can edit the output and reload the updated rules when they meet your new criteria with the iptables-restore command.
This example exports the iptables-save output to a text file named firewall-config.
[root@bigboy tmp]# iptables-save > firewall-config
[root@bigboy tmp]# cat firewall-config
# Generated by iptables-save v1.2.9 on Mon Nov 8 11:00:07 2004
*filter
:INPUT ACCEPT [0:0]
:FORWARD ACCEPT [0:0]
:OUTPUT ACCEPT [144:12748]
:RH-Firewall-1-INPUT – [0:0]
-A INPUT -j RH-Firewall-1-INPUT
-A FORWARD -j RH-Firewall-1-INPUT
-A RH-Firewall-1-INPUT -i lo -j ACCEPT
-A RH-Firewall-1-INPUT -p icmp -m icmp –icmp-type 255 -j ACCEPT
-A RH-Firewall-1-INPUT -p esp -j ACCEPT
-A RH-Firewall-1-INPUT -p ah -j ACCEPT
-A RH-Firewall-1-INPUT -m state –state RELATED,ESTABLISHED -j ACCEPT
-A RH-Firewall-1-INPUT -p tcp -m state –state NEW -m tcp –dport 22 -j ACCEPT
-A RH-Firewall-1-INPUT -j REJECT –reject-with icmp-host-prohibited
COMMIT
# Completed on Mon Nov 8 11:00:07 2004
[root@bigboy tmp]#
After editing the firewall-config file with the commands you need, you can reload it into the active firewall rule set with the iptables-restore command.
[root@bigboy tmp]# iptables-restore < firewall-config
Finally, you should permanently save the active configuration so that it will be loaded automatically when the system reboots:
[root@bigboy tmp]# service iptables save
If desired, you can eventually convert this firewall-config file into a regular iptables script so that it becomes more easily recognizable and manageable.
The iptables application requires you to load certain kernel modules to activate some of its functions. Whenever any type of NAT is required, the iptable_nat module needs to be loaded. The ip_conntrack_ftp module needs to be added for FTP support and should always be loaded with the ip_conntrack module which tracks TCP connection states. As most scripts probably will keep track of connection states, the ip_conntrack module will be needed in any case. The ip_nat_ftp module also needs to be loaded for FTP servers behind a NAT firewall.
Unfortunately, the /etc/sysconfig/iptables file doesn’t support the loading of modules, so you’ll have to add the statements to your /etc/rc.local file which is run at the end of every reboot.
The script samples in this chapter include these statements only as a reminder to place them in the /etc/rc.local file
# File: /etc/rc.local
# Module to track the state of connections
modprobe ip_conntrack
# Load the iptables active FTP module, requires ip_conntrack
modprobe ip_conntrack_ftp
# Load iptables NAT module when required
modprobe iptable_nat
# Module required for active an FTP server using NAT
modprobe ip_nat_ftp
This section provides some sample scripts you can use to get iptables working for you. Pay special attention to the logging example at the end.
The basic initialization script snippet should also be included in all your scripts to ensure the correct initialization of your chains should you decide to restart your script after startup. This chapter also includes other snippets that will help you get basic functionality. It should be a good guide to get you started.
Note: Once you feel more confident, you can use Appendix II “Codes, Scripts, and Configurations,” to find detailed scripts. The appendix shows you how to allow your firewall to:
> Be used as a Linux Web, mail and DNS server
> Be the NAT router for your home network
> Prevent various types of attacks using corrupted TCP, UDP and ICMP packets.
> Provide outbound passive FTP access from the firewall
There are also simpler code snippets in the Appendix II for Inbound and outbound FTP connections to and from your firewall
Basic Operating System Defense
You can do several things before employing your firewall script to improve the resilience of your firewall to attack. For example, the Linux operating system has a number of built-in protection mechanisms that you should activate by modifying the system kernel parameters in the /proc filesystem via the /etc/sysctl.conf file. Using of /etc/sysctl.conf to modify kernel parameters is explained in more detail in Appendix I, “Miscellaneous Linux Topics.”
Here is a sample configuration:
# File: /etc/sysctl.conf
#—————————————————————
# Disable routing triangulation. Respond to queries out
# the same interface, not another. Helps to maintain state
# Also protects against IP spoofing
#—————————————————————
net/ipv4/conf/all/rp_filter = 1
#—————————————————————
# Enable logging of packets with malformed IP addresses
#—————————————————————
net/ipv4/conf/all/log_martians = 1
#—————————————————————
# Disable redirects
#—————————————————————
net/ipv4/conf/all/send_redirects = 0
#—————————————————————
# Disable source routed packets
#—————————————————————
net/ipv4/conf/all/accept_source_route = 0
#—————————————————————
# Disable acceptance of ICMP redirects
#—————————————————————
net/ipv4/conf/all/accept_redirects = 0
#—————————————————————
# Turn on protection from Denial of Service (DOS) attacks
#—————————————————————
net/ipv4/tcp_syncookies = 1
#—————————————————————
# Disable responding to ping broadcasts
#—————————————————————
net/ipv4/icmp_echo_ignore_broadcasts = 1
#—————————————————————
# Enable IP routing. Required if your firewall is protecting a
# network, NAT included
#—————————————————————
net/ipv4/ip_forward = 1
This configuration will become active after the next reboot, but changes won’t become active in the current boot session until you run the sysctl -p command.
[root@bigboy tmp]# sysctl -p
…
net.ipv4.conf.all.rp_filter = 1
net.ipv4.conf.all.log_martians = 1
net.ipv4.conf.all.send_redirects = 0
net.ipv4.conf.all.accept_source_route = 0
net.ipv4.conf.all.accept_redirects = 0
net.ipv4.tcp_syncookies = 1
net.ipv4.icmp_echo_ignore_broadcasts = 1
[root@bigboy tmp]#
It is a good policy, in any iptables script you write, to initialize your chain and table settings with known values. The filter table’s INPUT, FORWARD, and OUTPUT chains should drop packets by default for the best security. It is not good policy, however, to make your nat and mangle tables drop packets by default. These tables are queried before the filter table, and if all packets that don’t match the nat and mangle table rules are dropped, then they will not reach the INPUT, FORWARD, and OUTPUT chains for processing.
Additional ALLOW rules should be added to the end of this script snippet.
#—————————————————————
# Load modules for FTP connection tracking and NAT – You may need
# them later
#
# Note: It is best to use the /etc/rc.local example in this
# chapter. This value will not be retained in the
# /etc/sysconfig/iptables file. Included only as a reminder.
#—————————————————————
modprobe ip_conntrack
modprobe ip_nat_ftp
modprobe ip_conntrack_ftp
modprobe iptable_nat
#—————————————————————
# Initialize all the chains by removing all the rules
# tied to them
#—————————————————————
iptables –flush
iptables -t nat –flush
iptables -t mangle –flush
#—————————————————————
# Now that the chains have been initialized, the user defined
# chains should be deleted. We’ll recreate them in the next step
#—————————————————————
iptables –delete-chain
iptables -t nat –delete-chain
iptables -t mangle –delete-chain
#—————————————————————
# If a packet doesn’t match one of the built in chains, then
# The policy should be to drop it
#—————————————————————
iptables –policy INPUT -j DROP
iptables –policy OUTPUT -j DROP
iptables –policy FORWARD -j DROP
iptables -t nat –policy POSTROUTING ACCEPT
iptables -t nat –policy PREROUTING ACCEPT
#—————————————————————
# The loopback interface should accept all traffic
# Necessary for X-Windows and other socket based services
#—————————————————————
iptables -A INPUT -i lo -j ACCEPT
iptables -A OUTPUT -o lo -j ACCEPT
You may also want to add some more advanced initialization steps to your script, including checks for Internet traffic from RFC1918 private addresses. The sample script snippet below outlines how to do this. More complex initializations would include checks for attacks using invalid TCP flags and directed broadcasts which are beyond the scope of this book.
The script also uses multiple user-defined chains to make the script shorter and faster as the chains can be repeatedly accessed. This removes the need to repeat the same statements over and over again.
You can take even more precautions to further protect your network. The complete firewall script in Appendix II “Codes, Scripts, and Configurations,” outlines most of them.
#=#=#=#=#=#=#=#=#=#=#=#=#=#=#=#=#=#=#=#=#=#=#=#=#=#=#=#=#=#=#=#=
#
# Define networks: NOTE!! You may want to put these “EXTERNAL”
# definitions at the top of your script.
#
#=#=#=#=#=#=#=#=#=#=#=#=#=#=#=#=#=#=#=#=#=#=#=#=#=#=#=#=#=#=#=#=
EXTERNAL_INT=”eth0″ # External Internet interface
EXTERNAL_IP=”97.158.253.25″ # Internet Interface IP address
#—————————————————————
# Initialize our user-defined chains
#—————————————————————
iptables -N valid-src
iptables -N valid-dst
#—————————————————————
# Verify valid source and destination addresses for all packets
#—————————————————————
iptables -A INPUT -i $EXTERNAL_INT -j valid-src
iptables -A FORWARD -i $EXTERNAL_INT -j valid-src
iptables -A OUTPUT -o $EXTERNAL_INT -j valid-dst
iptables -A FORWARD -o $EXTERNAL_INT -j valid-dst
#=#=#=#=#=#=#=#=#=#=#=#=#=#=#=#=#=#=#=#=#=#=#=#=#=#=#=#=#=#=#=#
#
# Source and Destination Address Sanity Checks
#
# Drop packets from networks covered in RFC 1918 (private nets)
# Drop packets from external interface IP
#
#=#=#=#=#=#=#=#=#=#=#=#=#=#=#=#=#=#=#=#=#=#=#=#=#=#=#=#=#=#=#=#
iptables -A valid-src -s $10.0.0.0/8 -j DROP
iptables -A valid-src -s $172.16.0.0/12 -j DROP
iptables -A valid-src -s $192.168.0.0/16 -j DROP
iptables -A valid-src -s $224.0.0.0/4 -j DROP
iptables -A valid-src -s $240.0.0.0/5 -j DROP
iptables -A valid-src -s $127.0.0.0/8 -j DROP
iptables -A valid-src -s 0.0.0.0/8 -j DROP
iptables -A valid-src -d 255.255.255.255 -j DROP
iptables -A valid-src -s 169.254.0.0/16 -j DROP
iptables -A valid-src -s $EXTERNAL_IP -j DROP
iptables -A valid-dst -d $224.0.0.0/4 -j DROP
Allowing DNS Access To Your Firewall
You’ll almost certainly want your firewall to make DNS queries to the Internet. This is not because it is required for the basic functionality of the firewall, but because of Fedora Linux’s yum RPM updater which will help to keep the server up to date with the latest security patches. The following statements will apply not only for firewalls acting as DNS clients but also for firewalls working in a caching or regular DNS server role.
#—————————————————————
# Allow outbound DNS queries from the FW and the replies too
#
# – Interface eth0 is the internet interface
#
# Zone transfers use TCP and not UDP. Most home networks
# / websites using a single DNS server won’t require TCP statements
#
#—————————————————————
iptables -A OUTPUT -p udp -o eth0 –dport 53 –sport 1024:65535
-j ACCEPT
iptables -A INPUT -p udp -i eth0 –sport 53 –dport 1024:65535
-j ACCEPT
Allowing WWW And SSH Access To Your Firewall
This sample snippet is for a firewall that doubles as a web server that is managed remotely by its system administrator via secure shell (SSH) sessions. Inbound packets destined for ports 80 and 22 are allowed thereby making the first steps in establishing a connection. It isn’t necessary to specify these ports for the return leg as outbound packets for all established connections are allowed. Connections initiated by persons logged into the Web server will be denied as outbound NEW connection packets aren’t allowed.
#—————————————————————
# Allow previously established connections
# – Interface eth0 is the internet interface
#—————————————————————
iptables -A OUTPUT -o eth0 -m state –state ESTABLISHED,RELATED
-j ACCEPT
#—————————————————————
# Allow port 80 (www) and 22 (SSH) connections to the firewall
#—————————————————————
iptables -A INPUT -p tcp -i eth0 –dport 22 –sport 1024:65535
-m state –state NEW -j ACCEPT
iptables -A INPUT -p tcp -i eth0 –dport 80 –sport 1024:65535
-m state –state NEW -j ACCEPT
Allowing Your Firewall To Access The Internet
This iptables script enables a user on the firewall to use a Web browser to surf the Internet. HTTP traffic uses TCP port 80, and HTTPS uses port 443.
Note: HTTPS (secure HTTP) is used for credit card transactions frequently, as well as by RedHat Linux servers running up2date. FTP and HTTP are frequently used with yum.
#—————————————————————
# Allow port 80 (www) and 443 (https) connections from the firewall
#—————————————————————
iptables -A OUTPUT -j ACCEPT -m state –state NEW
-o eth0 -p tcp -m multiport –dport 80,443 -m multiport
–sport 1024:65535
#—————————————————————
# Allow previously established connections
# – Interface eth0 is the internet interface
#—————————————————————
iptables -A INPUT -j ACCEPT -m state –state ESTABLISHED,RELATED
-i eth0 -p tcp
If you want all TCP traffic originating from the firewall to be accepted, then remove the line:
-m multiport –dport 80,443 –sport 1024:65535
Allow Your Home Network To Access The Firewall
In this example, eth1 is directly connected to a home network using IP addresses from the 192.168.1.0 network. All traffic between this network and the firewall is simplistically assumed to be trusted and allowed.
Further rules will be needed for the interface connected to the Internet to allow only specific ports, types of connections and possibly even remote servers to have access to your firewall and home network.
#—————————————————————
# Allow all bidirectional traffic from your firewall to the
# protected network
# – Interface eth1 is the private network interface
#—————————————————————
iptables -A INPUT -j ACCEPT -p all -s 192.168.1.0/24 -i eth1
iptables -A OUTPUT -j ACCEPT -p all -d 192.168.1.0/24 -o eth1
Masquerading (Many to One NAT)
As explained in Chapter 2, “Introduction to Networking,” masquerading is another name for what many call many to one NAT. In other words, traffic from all devices on one or more protected networks will appear as if it originated from a single IP address on the Internet side of the firewall.
Note: The masquerade IP address always defaults to the IP address of the firewall’s main interface. The advantage of this is that you never have to specify the NAT IP address. This makes it much easier to configure iptables NAT with DHCP.
You can configure many to one NAT to an IP alias, using the POSTROUTING and not the MASQUERADE statement. An example of this can be seen in the static NAT section that follows.
Keep in mind that iptables requires the iptables_nat module to be loaded with the modprobe command for the masquerade feature to work. Masquerading also depends on the Linux operating system being configured to support routing between the internet and private network interfaces of the firewall. This is done by enabling IP forwarding or routing by giving the file /proc/sys/net/ipv4/ip_forward the value 1 as opposed to the default disabled value of 0.
Once masquerading has been achieved using the POSTROUTING chain of the nat table, you will have to configure iptables to allow packets to flow between the two interfaces. To do this, use the FORWARD chain of the filter table. More specifically, packets related to NEW and ESTABLISHED connections will be allowed outbound to the Internet, but only packets related to ESTABLISHED connections will be allowed inbound. This helps to protect the home network from anyone trying to initiate connections from the Internet:
#—————————————————————
# Load the NAT module
#
# Note: It is best to use the /etc/rc.local example in this
# chapter. This value will not be retained in the
# /etc/sysconfig/iptables file. Included only as a reminder.
#—————————————————————
modprobe iptable_nat
#—————————————————————
# Enable routing by modifying the ip_forward /proc filesystem file
#
# Note: It is best to use the /etc/sysctl.conf example in this
# chapter. This value will not be retained in the
# /etc/sysconfig/iptables file. Included only as a reminder.
#—————————————————————
echo 1 > /proc/sys/net/ipv4/ip_forward
#—————————————————————
# Allow masquerading
# – Interface eth0 is the internet interface
# – Interface eth1 is the private network interface
#—————————————————————
iptables -A POSTROUTING -t nat -o eth0 -s 192.168.1.0/24 -d 0/0
-j MASQUERADE
#—————————————————————
# Prior to masquerading, the packets are routed via the filter
# table’s FORWARD chain.
# Allowed outbound: New, established and related connections
# Allowed inbound : Established and related connections
#—————————————————————
iptables -A FORWARD -t filter -o eth0 -m state
–state NEW,ESTABLISHED,RELATED -j ACCEPT
iptables -A FORWARD -t filter -i eth0 -m state
–state ESTABLISHED,RELATED -j ACCEPT
Note: If you configure your firewall to do masquerading, then if should be the used as the default gateway for all your servers on the network.
Port Forwarding Type NAT (DHCP DSL)
In many cases home users may get a single DHCP public IP address from their ISPs. If a Linux firewall is also your interface to the Internet and you want to host a Web site on one of the NAT protected home servers, then you will have to use port forwarding. Here the combination of the firewall’s single IP address, the remote server’s IP address, and the source/destination port of the traffic can be used to uniquely identify a traffic flow. All traffic that matches a particular combination of these factors may then be forwarded to a single server on the private network.
Port forwarding is handled by the PREROUTING chain of the nat table. As in masquerading, the iptables_nat module has to be loaded and routing has to be enabled for port forwarding to work. Routing too must be allowed in iptables with the FORWARD chain, this includes all NEW inbound connections from the Internet matching the port forwarding port plus all future packets related to the ESTABLISHED connection in both directions:
#—————————————————————
# Load the NAT module
# Note: It is best to use the /etc/rc.local example in this
# chapter. This value will not be retained in the
# /etc/sysconfig/iptables file. Included only as a reminder.
#—————————————————————
modprobe iptable_nat
#—————————————————————
# Get the IP address of the Internet interface eth0 (linux only)
#
# You’ll have to use a different expression to get the IP address
# for other operating systems which have a different ifconfig output
# or enter the IP address manually in the PREROUTING statement
#
# This is best when your firewall gets its IP address using DHCP.
# The external IP address could just be hard coded (“typed in
# normally”)
#—————————————————————
external_int=”eth0″
external_ip=”`ifconfig $external_int | grep ‘inet addr’ |
awk ‘{print $2}’ | sed -e ‘s/.*://’`”
#—————————————————————
# Enable routing by modifying the ip_forward /proc filesystem file
#
# Note: It is best to use the /etc/sysctl.conf example in this
# chapter. This value will not be retained in the
# /etc/sysconfig/iptables file. Included only as a reminder.
#—————————————————————
echo 1 > /proc/sys/net/ipv4/ip_forward
#—————————————————————
# Allow port forwarding for traffic destined to port 80 of the
# firewall’s IP address to be forwarded to port 8080 on server
# 192.168.1.200
#
# – Interface eth0 is the internet interface
# – Interface eth1 is the private network interface
#—————————————————————
iptables -t nat -A PREROUTING -p tcp -i eth0 -d $external_ip
–dport 80 –sport 1024:65535 -j DNAT –to 192.168.1.200:8080
#—————————————————————
# After DNAT, the packets are routed via the filter table’s
# FORWARD chain.
# Connections on port 80 to the target machine on the private
# network must be allowed.
#—————————————————————
iptables -A FORWARD -p tcp -i eth0 -o eth1 -d 192.168.1.200
–dport 8080 –sport 1024:65535 -m state –state NEW -j ACCEPT
iptables -A FORWARD -t filter -o eth0 -m state
–state NEW,ESTABLISHED,RELATED -j ACCEPT
iptables -A FORWARD -t filter -i eth0 -m state
–state ESTABLISHED,RELATED -j ACCEPT
In this example, all traffic to a particular public IP address, not just to a particular port, is translated to a single server on the protected subnet. Because the firewall has more than one IP address, I can’t recommend MASQUERADE; it will force masquerading as the IP address of the primary interface and not as any of the alias IP addresses the firewall may have. Instead, use SNAT to specify the alias IP address to be used for connections initiated by all other servers in the protected network.
Note: Although the nat table NATs all traffic to the target servers (192.168.1.100 to 102), only connections on ports 80,443 and 22 are allowed through by the FORWARD chain. Also notice how you have to specify a separate -m multiport option whenever you need to match multiple non-sequential ports for both source and destination.
In this example the firewall:
o Uses one to one NAT to make the server 192.168.1.100 on your home network appear on the Internet as IP addresses 97.158.253.26.
o Creates a many to one NAT for the 192.168.1.0 home network in which all the servers appear on the Internet as IP address 97.158.253.29. This is different from masquerading
You will have to create alias IP addresses for each of these Internet IPs for one to one NAT to work.
#—————————————————————
# Load the NAT module
#
# Note: It is best to use the /etc/rc.local example in this
# chapter. This value will not be retained in the
# /etc/sysconfig/iptables file. Included only as a reminder.
#—————————————————————
modprobe iptable_nat
#—————————————————————
# Enable routing by modifying the ip_forward /proc filesystem file
#
# Note: It is best to use the /etc/sysctl.conf example in this
# chapter. This value will not be retained in the
# /etc/sysconfig/iptables file. Included only as a reminder.
#—————————————————————
echo 1 > /proc/sys/net/ipv4/ip_forward
#—————————————————————
# NAT ALL traffic:
###########
# REMEMBER to create aliases for all the internet IP addresses below
###########
#
# TO: FROM: MAP TO SERVER:
# 97.158.253.26 Anywhere 192.168.1.100 (1:1 NAT – Inbound)
# Anywhere 192.168.1.100 97.158.253.26 (1:1 NAT – Outbound)
# Anywhere 192.168.1.0/24 97.158.253.29 (FW IP)
#
# SNAT is used to NAT all other outbound connections initiated
# from the protected network to appear to come from
# IP address 97.158.253.29
#
# POSTROUTING:
# NATs source IP addresses. Frequently used to NAT connections from
# your home network to the Internet
#
# PREROUTING:
# NATs destination IP addresses. Frequently used to NAT
# connections from the Internet to your home network
#
# – Interface eth0 is the internet interface
# – Interface eth1 is the private network interface
#—————————————————————
# PREROUTING statements for 1:1 NAT
# (Connections originating from the Internet)
iptables -t nat -A PREROUTING -d 97.158.253.26 -i eth0
-j DNAT –to-destination 192.168.1.100
# POSTROUTING statements for 1:1 NAT
# (Connections originating from the home network servers)
iptables -t nat -A POSTROUTING -s 192.168.1.100 -o eth0
-j SNAT –to-source 97.158.253.26
# POSTROUTING statements for Many:1 NAT
# (Connections originating from the entire home network)
iptables -t nat -A POSTROUTING -s 192.168.1.0/24
-j SNAT -o eth1 –to-source 97.158.253.29
# Allow forwarding to each of the servers configured for 1:1 NAT
# (For connections originating from the Internet. Notice how you
# use the real IP addresses here)
iptables -A FORWARD -p tcp -i eth0 -o eth1 -d 192.168.1.100
-m multiport –dport 80,443,22
-m state –state NEW -j ACCEPT
# Allow forwarding for all New and Established SNAT connections
# originating on the home network AND already established
# DNAT connections
iptables -A FORWARD -t filter -o eth0 -m state
–state NEW,ESTABLISHED,RELATED -j ACCEPT
# Allow forwarding for all 1:1 NAT connections originating on
# the Internet that have already passed through the NEW forwarding
# statements above
iptables -A FORWARD -t filter -i eth0 -m state
–state ESTABLISHED,RELATED -j ACCEPT
A number of tools are at your disposal for troubleshooting iptables firewall scripts. One of the best methods is to log all dropped packets to the /var/log/messages file.
You track packets passing through the iptables list of rules using the LOG target. You should be aware that the LOG target:
o Logs all traffic that matches the iptables rule in which it is located.
o Automatically writes an entry to the /var/log/messages file and then executes the next rule.
If you want to log only unwanted traffic, therefore, you have to add a matching rule with a DROP target immediately after the LOG rule. If you don’t, you’ll find yourself logging both desired and unwanted traffic with no way of discerning between the two, because by default iptables doesn’t state why the packet was logged in its log message.
This example logs a summary of failed packets to the file /var/log/messages. You can use the contents of this file to determine which TCP/UDP ports you need to open to provide access to specific traffic that is currently stopped.
#—————————————————————
# Log and drop all other packets to file /var/log/messages
# Without this we could be crawling around in the dark
#—————————————————————
iptables -A OUTPUT -j LOG
iptables -A INPUT -j LOG
iptables -A FORWARD -j LOG
iptables -A OUTPUT -j DROP
iptables -A INPUT -j DROP
iptables -A FORWARD -j DROP
Here are some examples of the output of this file:
o Firewall denies replies to DNS queries (UDP port 53) destined to server 192.168.1.102 on the home network.
Feb 23 20:33:50 bigboy kernel: IN=wlan0 OUT= MAC=00:06:25:09:69:80:00:a0:c5:e1:3e:88:08:00 SRC=192.42.93.30 DST=192.168.1.102 LEN=220 TOS=0x00 PREC=0x00 TTL=54 ID=30485 PROTO=UDP SPT=53 DPT=32820 LEN=200
o Firewall denies Windows NetBIOS traffic (UDP port 138)
Feb 23 20:43:08 bigboy kernel: IN=wlan0 OUT= MAC=ff:ff:ff:ff:ff:ff:00:06:25:09:6a:b5:08:00 SRC=192.168.1.100 DST=192.168.1.255 LEN=241 TOS=0x00 PREC=0x00 TTL=64 ID=0 DF PROTO=UDP SPT=138 DPT=138 LEN=221
o Firewall denies Network Time Protocol (NTP UDP port 123)
Feb 23 20:58:48 bigboy kernel: IN= OUT=wlan0 SRC=192.168.1.102 DST=207.200.81.113 LEN=76 TOS=0x10 PREC=0x00 TTL=64 ID=0 DF PROTO=UDP SPT=123 DPT=123 LEN=56
The traffic in all these examples isn’t destined for the firewall; Therefore, you should check your INPUT, OUTPUT, FORWARD, and NAT related statements. If the firewall’s IP address is involved, then you should focus on the INPUT and OUTPUT statements
If nothing shows up in the logs, then follow the steps in Chapter 4, “Simple Network Troubleshooting,” to determine whether the data is reaching your firewall at all and, if it is not, the location on your network that could be causing the problem.
As a general rule, you won’t be able to access the public NAT IP addresses from servers on your home network. Basic NAT testing requires you to ask a friend to try to connect to your home network from the Internet.
You can then use the logging output in /var/log/messages to make sure that the translations are occurring correctly and iptables isn’t dropping the packets after translation occurs
The iptables startup script expects to find the /etc/sysconfig/iptables before it starts. If none exists, then symptoms include the firewall status always being stopped and the /etc/init.d/iptables script running without the typical [OK] or [FAILED] messages.
If you have just installed iptables and have never applied a policy, then you will face this problem. Unfortunately, running the service iptables save command before restarting won’t help either. You have to create this file.
[root@bigboy tmp]# service iptables start
[root@bigboy tmp]#
[root@bigboy tmp]# touch /etc/sysconfig/iptables
[root@bigboy tmp]# chmod 600 /etc/sysconfig/iptables
[root@bigboy tmp]# service iptables start
Applying iptables firewall rules: [ OK ]
[root@bigboy tmp]#
Backup and Recovery Process in Linux
System Backup & Recovery Method : Log files for system and applications; Backup schedules and methods (manual and automated)
Log Files
Log files are files that contain messages about the system, including the kernel, services, and applications running on it. There are different log files for different information. For example, there is a default system log file, a log file just for security messages, and a log file for cron tasks.
Log files can be very useful when trying to troubleshoot a problem with the system such as trying to load a kernel driver or when looking for unauthorized log in attempts to the system. This chapter discusses where to find log files, how to view log files, and what to look for in log files.
Some log files are controlled by a daemon called syslogd. A list of log messages maintained by syslogd can be found in the /etc/syslog.conf configuration file.
Locating Log Files
Most log files are located in the /var/log directory. Some applications such as httpd and samba have a directory within /var/log for their log files.
Notice the multiple files in the log file directory with numbers after them. These are created when the log files are rotated. Log files are rotated so their file sizes do not become too large. The logrotate package contains a cron task that automatically rotates log files according to the /etc/logrotate.conf configuration file and the configuration files in the /etc/logrotate.d directory. By default, it is configured to rotate every week and keep four weeks worth of previous log files.
Viewing Log Files
Most log files are in plain text format. You can view them with any text editor such as Vi or Emacs. Some log files are readable by all users on the system; however, root priviledges are required to read most log files.
To view system log files in an interactive, real-time application, use the Log Viewer. To start the application, go to the Main Menu Button (on the Panel) => System Tools => System Logs, or type the command redhat-logviewer at a shell prompt.

System log files:
/var/log/messages - system messages
/secure - Logging by PAM of network access attemts
/dmesg - Log of system boot. Also see command dmesg
/boot.log - Log of system init process
/xferlog.1 - File transfer log
/lastlog - Requires the use of the lastlog command to examine contents
/maillog - log fromm sendmail daemon
Note: The lastlog command prints time stamp of the last login of system users. (Interprets file: /var/log/lastlog)
logrotate – Rotate log files:
Many system and server application programs such as Apache, generate log files. If left unchecked they would grow large enough to burden the system and application. The logrotate program will periodically backup the log file by renameing it. The program will also allow the system administrator to set the limit for the number of logs or their size. There is also the option to compress the backed up files.
Configuration file: /etc/logrotate.conf
Directory for logrotate configuration scripts: /etc/logrotate.d/
Example logrotate configuration script: /etc/logrotate.d/process-name
/var/log/process-name.log {
rotate 12 monthly errors root@localhost missingok postrotate /usr/bin/killall -HUP process-name 2> /dev/null || true endscript } |
The configuration file lists the log file to be rotated, the process kill command to momentarily shut down and restart the process, and some configuration parameters listed in the logrotate man page.
Linux is a stable and reliable environment. But any computing system can have unforeseen events, such as hardware failures. Having a reliable backup of critical configuration information and data is part of any responsible administration plan. There is a wide variety of approaches to doing backups in Linux. Techniques range from very simple script-driven methods to elaborate commercial software. Backups can be done to remote network devices, tape drives, and other removable media. Backups can be file-based or drive-image based. There are many options available and you can mix and match your techniques to design the perfect backup plan for your circumstances.
What’s your strategy?
There are many different approaches to backing up a system. For some perspectives on this, you may want to read the article "Introduction to Backing Up and Restoring Data" listed in the Resources section at the end of this article.
What you back up depends a lot on your reason for backing up. Are you trying to recover from critical failures, such as hard drive problems? Are you archiving so that old files can be recovered if needed? Do you plan to start with a cold system and restore, or a preloaded standby system?
What to back up?
The file-based nature of Linux is a great advantage when backing up and restoring the system. In a Windows system, the registry is very system specific. Configurations and software installations are not simply a matter of dropping files on a system. Therefore, restoring a system requires software that can deal with these idiosyncrasies. In Linux, the story is different. Configuration files are text based and, except for when they deal directly with hardware, are largely system independent. The modern approach to hardware drivers is to have them available as modules that are dynamically loaded, so kernels are becoming more system independent. Rather than a backup having to deal with the intricacies of how the operating system is installed on your system and hardware, Linux backups are about packaging and unpackaging files.
In general, there are some directories that you want to back up:
-
/etc
contains all of your core configuration files. This includes your network configuration, system name, firewall rules, users, groups, and other global system items.
-
/var
contains information used by your systems daemons (services) including DNS configurations, DHCP leases, mail spool files, HTTP server files, db2 instance configuration, and others.
-
/home
contains the default user home directories for all of your users. This includes their personal settings, downloaded files, and other information your users don’t want to lose.
-
/root
is the home directory for the root user.
-
/opt
is where a lot of non-system software will be installed. IBM software goes in here. OpenOffice, JDKs, and other software is also installed here by default.
There are directories that you should consider not backing up.
-
/proc
should never be backed up. It is not a real-file system, but rather a virtualized view of the running kernel and environment. It includes files such as /proc/kcore, which is a virtual view of the entire running memory. Backing these up only wastes resources.
-
/dev
contains the file representations of your hardware devices. If you are planning to restore to a blank system, then you can back up /dev. However, if you are planning to restore to an installed Linux base, then backing up /dev will not be necessary.
The other directories contain system files and installed packages. In a server environment, much of this information is not customized. Most customization occurs in the /etc and /home directories. But for completeness, you may wish to back them up.
In a production environment where I wanted to be assured that no data would be lost, I would back up the entire system, except for the /proc directory. If I were mostly worried about users and configuration, I would back up only the /etc, /var, /home, and /root directories.
Backup tools
As mentioned before, Linux backups are largely about packaging and unpackaging files. This allows you to use existing system utilities and scripting to perform your backups rather than having to purchase a commercial software package. In many cases, this type of backup will be adequate, and it provides a great deal of control for the administrator. The backup script can be automated using the cron command, which controls scheduled events in Linux.
tar
tar is a classic UNIX command that has been ported into Linux. tar is short for tape archive, and was originally designed for packaging files onto tape. You have probably already encountered tar files if you have downloaded any source code for Linux. It is a file-based command that essentially serially stacks the files end to end.
Entire directory trees can be packaged with tar, which makes it especially suited to backups. Archives can be restored in their entirety, or files and directories can be expanded individually. Backups can go to file-based devices or tape devices. Files can be redirected upon restoration to replace to a different directory (or system) from where they were originally saved. tar is file system-independent. It can be used on ext2, ext3, jfs, Reiser, and other file systems.
Using tar is very much like using a file utility, such as PKZip. You point it toward a destination, which is a file or a device, and then name the files that you want to package. You can compress archives on the fly with standard compression types, or specify an external compression program of your choice. To compress or uncompress files through bzip2, use tar -z.
To back up the entire file system using tar to a SCSI tape drive, excluding the /proc directory:
tar -cpf /dev/st0 / --exclude=/proc
In the above example, the -c switch indicates that the archive is being created. The -p switch indicates that we want to preserve the file permissions, critical for a good backup. The -f switch points to the filename for the archive. In this case, we are using the raw tape device, /dev/st0. The / indicates what we want to back up. Since we wanted the entire file system, we specified the root. tar automatically recurses when pointed to a directory (ending in a /). Finally, we exclude the /proc directory, since it doesn’t contain anything we need to save. If the backup will not fit on a single tape, we will add the -M switch (not shown), for multi-volume.
To restore a file or files, the tar command is used with the extract switch (-x):
tar -xpf /dev/st0 -C /
The -f switch again points to our file, and -p indicates that we want to restore archived permissions. The -x switch indicates an extraction of the archive. The -C / indicates that we want the restore to occur from /. tar normally restores to the directory from which the command is run. The -C switch makes our current directory irrelevant.
The two other tar commands that you will probably use often are the -t and -d switches. The -t switch lists the contents of an archive. The -d switch compares the contents of the archive to current files on a system.
For ease of operation and editing, you can put the files and directories that you want to archive in a text file, which you reference with the -T switch. These can be combined with other directories listed on the command line. The following line backs up all the files and directories listed in MyFiles, the /root directory, and all of the iso files in the /tmp directory:
tar -cpf /dev/st0 -T MyFiles /root /tmp/*.iso
The file list is simply a text file with the list of files or directories. Here’s an example:
/etc
/var
/home
/usr/local
/opt
Please note that the tar -T (or files-from) command cannot accept wildcards. Files must be listed explicitly. The example above shows one way to reference files separately. You could also execute a script to search the system and then build a list. Here is an example of such a script:
#!/bin/sh
cat MyFiles > TempList
find /usr/share -iname *.png >> TempList
find /tmp -iname *.iso >> TempList
tar -cpzMf /dev/st0 -T TempList
The above script first copies all of our existing file list from MyFiles to TempList. Then it executes a couple of find commands to search the file system for files that match a pattern and to append them to the TempList. The first search is for all files in the /usr/share directory tree that end in .png. The second search is for all files in the /tmp directory tree that end in .iso. Once the list is built, then tar is run to create a new archive on the file device /dev/st0 (the first SCSI tape drive), which is compressed using the gzip format and retains all of the file permissions. The archive will span Multiple volumes. The file names to be archived will be Taken from the file TempList.
Scripting can also be used to perform much more elaborate actions such as incremental backups. An excellent script is listed by Gerhard Mourani in his book Securing and Optimizing Linux, which you will find listed in the Resources section at the end of this article.
Scripts can also be written to restore files, though restoration is often done manually. As mentioned above, the -x switch for extract replaces the -c switch. Entire archives can be restored, or individual files or directories can be specified. Wildcards are okay to reference files in the archive. You can also use switches to dump and restore.
dump and restore
dump can perform functions similar to tar. However, dump tends to look at file systems rather than individual files. Quoting from the dump man file: "dump examines files on an ext2 filesystem and determines which files need to be backed up. These files are copied to the given disk, tape, or other storage medium for safe keeping…. A dump that is larger than the output medium is broken into multiple volumes. On most media, the size is determined by writing until an end-of-media indication is returned."
The companion program to dump is restore, which is used to restore files from a dump image.
The restore command performs the inverse function of dump. A full backup of a file system may be restored and subsequent incremental backups layered on top of it. Single files and directory subtrees may be restored from full or partial backups.
Both dump and restore can be run across the network, so you can back up or restore from remote devices. dump and restore work with tape drives and file devices providing a wide range of options. However, both are limited to the ext2 and ext3 file systems. If you are working with JFS, Reiser, or other file systems, you will need to use a different utility, such as tar.
Backing up with dump
Running a backup with dump is fairly straightforward. The following command does a full backup of Linux with all ext2 and ext3 file systems to a SCSI tape device:
dump 0f /dev/nst0 /boot
dump 0f /dev/nst0 /
In this example, our system has two file systems. One for /boot and another for / — a common configuration. They must be referenced individually when a backup is executed. The /dev/nst0 refers to the first SCSI tape, but in a non-rewind mode. This ensures that the volumes are put back-to-back on the tape.
An interesting feature of dump is its built-in incremental backup functionality. In the example above, the 0 indicates a level 0, or base-level, backup. This is the full system backup that you would do periodically to capture the entire system. On subsequent backups you can use other numbers (1-9) in place of the 0 to change the level of the backup. A level 1 backup would save all of the files that had changed since the level 0 backup was done. Level 2 would backup everything that had changed from level 1 and so on. The same function can be done with tar, using scripting, but it requires the script creator to have a mechanism to determine when the last backup was done. dump has its own mechanism, writing an update file (/etc/dumpupdates) when it performs a backup. The update file is reset whenever a level 0 backup is run. Subsequent levels leave their mark until another level 0 is done. If you are doing a tape-based backup, dump will automatically track multiple volumes.
Restoring with restore
To restore information saved with dump, the restore command is used. Like tar, dump has the ability to list (-t) and compare archives to current files (-C). Where you must be careful with dump is in restoring data. There are two very different approaches, and you must use the correct one to have predictable results.
Rebuild (-r)
Remember that dump is designed with file systems in mind more than individual files. Therefore, there are two different styles of restoring files. To rebuild a file system, use the -r switch. Rebuild is designed to work on an empty file system and restore it back to the saved state. Before running rebuild, you should have created, formatted, and mounted the file system. You should not run rebuild on a file system that contains files.
Here is an example of doing a full rebuild from the dump that we executed above.
restore -rf /dev/nst0
The above command needs to be run for each file system being restored.
This process could be repeated to add the incremental backups if required.
Extract (-x)
If you need to work with individual files, rather than full file systems, you must use the -x switch to extract them. For example, to extract only the /etc directory from our tape backup, use the following command:
restore -xf /dev/nst0 /etc
Interactive restore (-i)
One more feature that restore provides is an interactive mode. Using the command:
restore -if /dev/nst0
will place you in an interactive shell, showing the items contained in the archive. Typing "help" will give you a list of commands. You can then browse and select the items you wish to be extracted. Bear in mind that any files that you extract will go into your current directory.
dump vs. tar
Both dump and tar have their followings. Both have advantages and disadvantages. If you are running anything but an ext2 or ext3 file system, then dump is not available to you. However, if this is not the case, dump can be run with a minimum of scripting, and has interactive modes available to assist with restoration.
I tend to use tar, because I am fond of scripting for that extra level of control. There are also multi-platform tools for working with .tar files.
Other tools
Virtually any program that can copy files can be used to perform some sort of backup in Linux. There are references to people using cpio and dd for backups. cpio is another packaging utility along the lines of tar. It is much less common. dd is a file system copy utility that makes binary copies of file systems. dd might be used to make an image of a hard drive, similar to using a product like Symantec’s Ghost. However, dd is not file based, so you can only restore data to an identical hard drive partition.
Commercial backup products
There are several commercial backup products available for Linux. Commercial products generally provide a convenient interface and reporting system, whereas with tools such as dump and tar, you have to roll your own. The commercial offerings are broad and offer a range of features. The biggest benefit you will gain from using a commercial package is a pre-built strategy for handling backups that you can just put to work. Commercial developers have already made many of the mistakes that you are about to, and the cost of their wisdom is cheap compared to the loss of your precious data.
Tivoli Storage Manager
Probably the best commercial backup and storage management utility available now for Linux is the Tivoli Storage Manager. Tivoli Storage Manager Server runs on several platforms, including Linux, and the client runs on many more platforms.
Essentially a Storage Manager Server is configured with the devices appropriate to back up the environment. Any system that is to participate in the backups loads a client that communicates with the server. Backups can be scheduled, performed manually from the Tivoli Storage Manager client interface, or performed remotely using a Web-based interface.
The policy-based nature of TSM means that central rules can be defined for backup behavior without having to constantly adjust a file list. Additionally, IBM Tivoli Storage Resource Manager can identify, evaluate, control, and predict the utilization of enterprise storage assets, and can detect potential problems and automatically apply self-healing adjustments. See the Tivoli Web site (see the link in the Resources section) for more details.
Figure 1. Tivoli Storage Manager menu

Backups and restores are then handled through the remote device.
Using rsync to make a backup
The rsync utility is a very well-known piece of GPL’d software, written originally by Andrew Tridgell and Paul Mackerras. If you have a common Linux or UNIX variant, then you probably already have it installed; if not, you can download the source code from rsync.samba.org. Rsync’s specialty is efficiently synchronizing file trees across a network, but it works fine on a single machine too.
Basics
Suppose you have a directory called source, and you want to back it up into the directory destination. To accomplish that, you’d use:
rsync -a source/ destination/
(Note: I usually also add the -v (verbose) flag too so that rsync tells me what it’s doing). This command is equivalent to:
cp -a source/. destination/
except that it’s much more efficient if there are only a few differences.
Just to whet your appetite, here’s a way to do the same thing as in the example above, but with destination on a remote machine, over a secure shell:
rsync -a -e ssh source/ username@remotemachine.com:/path/to/destination/
Trailing Slashes Do Matter…Sometimes
This isn’t really an article about rsync, but I would like to take a momentary detour to clarify one potentially confusing detail about its use. You may be accustomed to commands that don’t care about trailing slashes. For example, if a and b are two directories, then cp -a a b is equivalent to cp -a a/ b/. However, rsync does care about the trailing slash, but only on the source argument. For example, let a and b be two directories, with the file foo initially inside directory a. Then this command:
rsync -a a b
produces b/a/foo, whereas this command:
rsync -a a/ b
produces b/foo. The presence or absence of a trailing slash on the destination argument (b, in this case) has no effect.
Using the --delete flag
If a file was originally in both source/ and destination/ (from an earlier rsync, for example), and you delete it from source/, you probably want it to be deleted from destination/ on the next rsync. However, the default behavior is to leave the copy at destination/ in place. Assuming you want rsync to delete any file from destination/ that is not in source/, you’ll need to use the --delete flag:
rsync -a --delete source/ destination/
Be lazy: use cron
One of the toughest obstacles to a good backup strategy is human nature; if there’s any work involved, there’s a good chance backups won’t happen. (Witness, for example, how rarely my roommate’s home PC was backed up before I created this system). Fortunately, there’s a way to harness human laziness: make cron do the work.
To run the rsync-with-backup command from the previous section every morning at 4:20 AM, for example, edit the root cron table: (as root)
crontab -e
Then add the following line:
20 4 * * * rsync -a --delete source/ destination/
Finally, save the file and exit. The backup will happen every morning at precisely 4:20 AM, and root will receive the output by email. Don’t copy that example verbatim, though; you should use full path names (such as /usr/bin/rsync and /home/source/) to remove any ambiguity.
Incremental backups with rsync
Since making a full copy of a large filesystem can be a time-consuming and expensive process, it is common to make full backups only once a week or once a month, and store only changes on the other days. These are called "incremental" backups, and are supported by the venerable old dump and tar utilities, along with many others.
However, you don’t have to use tape as your backup medium; it is both possible and vastly more efficient to perform incremental backups with rsync.
The most common way to do this is by using the rsync -b --backup-dir= combination. I have seen examples of that usage here, but I won’t discuss it further, because there is a better way. If you’re not familiar with hard links, though, you should first start with the following review.
Review of hard links
We usually think of a file’s name as being the file itself, but really the name is a hard link. A given file can have more than one hard link to itself–for example, a directory has at least two hard links: the directory name and . (for when you’re inside it). It also has one hard link from each of its sub-directories (the .. file inside each one). If you have the stat utility installed on your machine, you can find out how many hard links a file has (along with a bunch of other information) with the command:
stat filename
Hard links aren’t just for directories–you can create more than one link to a regular file too. For example, if you have the file a, you can make a link called b:
ln a b
Now, a and b are two names for the same file, as you can verify by seeing that they reside at the same inode (the inode number will be different on your machine):
ls -i a
232177 a
ls -i b
232177 b
So ln a b is roughly equivalent to cp a b, but there are several important differences:
1. The contents of the file are only stored once, so you don’t use twice the space.
2. If you change a, you’re changing b, and vice-versa.
3. If you change the permissions or ownership of a, you’re changing those of b as well, and vice-versa.
4. If you overwrite a by copying a third file on top of it, you will also overwrite b, unless you tell cp to unlink before overwriting. You do this by running cp with the --remove-destination flag. Notice that rsync always unlinks before overwriting!!. Note, added 2002.Apr.10: the previous statement applies to changes in the file contents only, not permissions or ownership.
But this raises an interesting question. What happens if you rm one of the links? The answer is that rm is a bit of a misnomer; it doesn’t really remove a file, it just removes that one link to it. A file’s contents aren’t truly removed until the number of links to it reaches zero. In a moment, we’re going to make use of that fact, but first, here’s a word about cp.
Using cp -al
In the previous section, it was mentioned that hard-linking a file is similar to copying it. It should come as no surprise, then, that the standard GNU coreutils cp command comes with a -l flag that causes it to create (hard) links instead of copies (it doesn’t hard-link directories, though, which is good; you might want to think about why that is). Another handy switch for the cp command is -a (archive), which causes it to recurse through directories and preserve file owners, timestamps, and access permissions.
Together, the combination cp -al makes what appears to be a full copy of a directory tree, but is really just an illusion that takes almost no space. If we restrict operations on the copy to adding or removing (unlinking) files–i.e., never changing one in place–then the illusion of a full copy is complete. To the end-user, the only differences are that the illusion-copy takes almost no disk space and almost no time to generate.
2002.05.15: Portability tip: If you don’t have GNU cp installed (if you’re using a different flavor of *nix, for example), you can use find and cpio instead. Simply replace cp -al a b with cd a && find . -print | cpio -dpl ../b. Thanks to Brage Førland for that tip.
Putting it all together
We can combine rsync and cp -al to create what appear to be multiple full backups of a filesystem without taking multiple disks’ worth of space. Here’s how, in a nutshell:
rm -rf backup.3
mv backup.2 backup.3
mv backup.1 backup.2
cp -al backup.0 backup.1
rsync -a --delete source_directory/ backup.0/
If the above commands are run once every day, then backup.0, backup.1, backup.2, and backup.3 will appear to each be a full backup of source_directory/ as it appeared today, yesterday, two days ago, and three days ago, respectively–complete, except that permissions and ownerships in old snapshots will get their most recent values (thanks to J.W. Schultz for pointing this out). In reality, the extra storage will be equal to the current size of source_directory/ plus the total size of the changes over the last three days–exactly the same space that a full plus daily incremental backup with dump or tar would have taken.
Update (2003.04.23): As of rsync-2.5.6, the --link-dest flag is now standard. Instead of the separate cp -al and rsync lines above, you may now write:
mv backup.0 backup.1
rsync -a --delete --link-dest=../backup.1 source_directory/ backup.0/
This method is preferred, since it preserves original permissions and ownerships in the backup. However, be sure to test it–as of this writing some users are still having trouble getting --link-dest to work properly. Make sure you use version 2.5.7 or later.
Update (2003.05.02): John Pelan writes in to suggest recycling the oldest snapshot instead of recursively removing and then re-creating it. This should make the process go faster, especially if your file tree is very large:
mv backup.3 backup.tmp
mv backup.2 backup.3
mv backup.1 backup.2
mv backup.0 backup.1
mv backup.tmp backup.0
cp -al backup.1/. backup.0
rsync -a --delete source_directory/ backup.0/
2003.06.02: OOPS! Rsync’s link-dest option does not play well with J. Pelan’s suggestion–the approach I previously had written above will result in unnecessarily large storage, because old files in backup.0 will get replaced and not linked. Please only use Dr. Pelan’s directory recycling if you use the separate cp -al step; if you plan to use --link-dest, start with backup.0 empty and pristine. Apologies to anyone I’ve misled on this issue. Thanks to Kevin Everets for pointing out the discrepancy to me, and to J.W. Schultz for clarifying --link-dest‘s behavior. Also note that I haven’t fully tested the approach written above; if you have, please let me know. Until then, caveat emptor!
I’m used to dump or tar! This seems backward!
The dump and tar utilities were originally designed to write to tape media, which can only access files in a certain order. If you’re used to their style of incremental backup, rsync might seem backward. I hope that the following example will help make the differences clearer.
Suppose that on a particular system, backups were done on Monday night, Tuesday night, and Wednesday night, and now it’s Thursday.
With dump or tar, the Monday backup is the big ("full") one. It contains everything in the filesystem being backed up. The Tuesday and Wednesday "incremental" backups would be much smaller, since they would contain only changes since the previous day. At some point (presumably next Monday), the administrator would plan to make another full dump.
With rsync, in contrast, the Wednesday backup is the big one. Indeed, the "full" backup is always the most recent one. The Tuesday directory would contain data only for those files that changed between Tuesday and Wednesday; the Monday directory would contain data for only those files that changed between Monday and Tuesday.
A little reasoning should convince you that the rsync way is much better for network-based backups, since it’s only necessary to do a full backup once, instead of once per week. Thereafter, only the changes need to be copied. Unfortunately, you can’t rsync to a tape, and that’s probably why the dump and tar incremental backup models are still so popular. But in your author’s opinion, these should never be used for network-based backups now that rsync is available.
Isolating the backup from the rest of the system
If you take the simple route and keep your backups in another directory on the same filesystem, then there’s a very good chance that whatever damaged your data will also damage your backups. In this section, we identify a few simple ways to decrease your risk by keeping the backup data separate.
The easy (bad) way
In the previous section, we treated /destination/ as if it were just another directory on the same filesystem. Let’s call that the easy (bad) approach. It works, but it has several serious limitations:
· If your filesystem becomes corrupted, your backups will be corrupted too.
· If you suffer a hardware failure, such as a hard disk crash, it might be very difficult to reconstruct the backups.
· Since backups preserve permissions, your users–and any programs or viruses that they run–will be able to delete files from the backup. That is bad. Backups should be read-only.
· If you run out of free space, the backup process (which runs as root) might crash the system and make it difficult to recover.
· The easy (bad) approach offers no protection if the root account is compromised.
Fortunately, there are several easy ways to make your backup more robust.
Keep it on a separate partition
If your backup directory is on a separate partition, then any corruption in the main filesystem will not normally affect the backup. If the backup process runs out of disk space, it will fail, but it won’t take the rest of the system down too. More importantly, keeping your backups on a separate partition means you can keep them mounted read-only; we’ll discuss that in more detail in the next chapter.
Keep that partition on a separate disk
If your backup partition is on a separate hard disk, then you’re also protected from hardware failure. That’s very important, since hard disks always fail eventually, and often take your data with them. An entire industry has formed to service the needs of those whose broken hard disks contained important data that was not properly backed up.
Important: Notice, however, that in the event of hardware failure you’ll still lose any changes made since the last backup. For home or small office users, where backups are made daily or even hourly as described in this document, that’s probably fine, but in situations where any data loss at all would be a serious problem (such as where financial transactions are concerned), a RAID system might be more appropriate.
RAID is well-supported under Linux, and the methods described in this document can also be used to create rotating snapshots of a RAID system.
Keep that disk on a separate machine
If you have a spare machine, even a very low-end one, you can turn it into a dedicated backup server. Make it standalone, and keep it in a physically separate place–another room or even another building. Disable every single remote service on the backup server, and connect it only to a dedicated network interface on the source machine.
On the source machine, export the directories that you want to back up via read-only NFS to the dedicated interface. The backup server can mount the exported network directories and run the snapshot routines discussed in this article as if they were local. If you opt for this approach, you’ll only be remotely vulnerable if:
1. a remote root hole is discovered in read-only NFS, and
2. the source machine has already been compromised.
I’d consider this "pretty good" protection, but if you’re (wisely) paranoid, or your job is on the line, build two backup servers. Then you can make sure that at least one of them is always offline.
If you’re using a remote backup server and can’t get a dedicated line to it (especially if the information has to cross somewhere insecure, like the public internet), you should probably skip the NFS approach and use rsync -e ssh instead.
It has been pointed out to me that rsync operates far more efficiently in server mode than it does over NFS, so if the connection between your source and backup server becomes a bottleneck, you should consider configuring the backup machine as an rsync server instead of using NFS. On the downside, this approach is slightly less transparent to users than NFS–snapshots would not appear to be mounted as a system directory, unless NFS is used in that direction, which is certainly another option (I haven’t tried it yet though). Thanks to Martin Pool, a lead developer of rsync, for making me aware of this issue.
Here’s another example of the utility of this approach–one that I use. If you have a bunch of windows desktops in a lab or office, an easy way to keep them all backed up is to share the relevant files, read-only, and mount them all from a dedicated backup server using SAMBA. The backup job can treat the SAMBA-mounted shares just like regular local directories.
Making the backup as read-only as possible
In the previous section, we discussed ways to keep your backup data physically separate from the data they’re backing up. In this section, we discuss the other side of that coin–preventing user processes from modifying backups once they’re made.
We want to avoid leaving the snapshot backup directory mounted read-write in a public place. Unfortunately, keeping it mounted read-only the whole time won’t work either–the backup process itself needs write access. The ideal situation would be for the backups to be mounted read-only in a public place, but at the same time, read-write in a private directory accessible only by root, such as /root/snapshot.
There are a number of possible approaches to the challenge presented by mounting the backups read-only. After some amount of thought, I found a solution which allows root to write the backups to the directory but only gives the users read permissions. I’ll first explain the other ideas I had and why they were less satisfactory.
It’s tempting to keep your backup partition mounted read-only as /snapshot most of the time, but unmount that and remount it read-write as /root/snapshot during the brief periods while snapshots are being made. Don’t give in to temptation!.
Bad: mount/umount
A filesystem cannot be unmounted if it’s busy–that is, if some process is using it. The offending process need not be owned by root to block an unmount request. So if you plan to umount the read-only copy of the backup and mount it read-write somewhere else, don’t–any user can accidentally (or deliberately) prevent the backup from happening. Besides, even if blocking unmounts were not an issue, this approach would introduce brief intervals during which the backups would seem to vanish, which could be confusing to users.
Better: mount read-only most of the time
A better but still-not-quite-satisfactory choice is to remount the directory read-write in place:
mount -o remount,rw /snapshot
[ run backup process ]
mount -o remount,ro /snapshot
Now any process that happens to be in /snapshot when the backups start will not prevent them from happening. Unfortunately, this approach introduces a new problem–there is a brief window of vulnerability, while the backups are being made, during which a user process could write to the backup directory. Moreover, if any process opens a backup file for writing during that window, it will prevent the backup from being remounted read-only, and the backups will stay vulnerable indefinitely.
Tempting but doesn’t seem to work: the 2.4 kernel’s mount --bind
Starting with the 2.4-series Linux kernels, it has been possible to mount a filesystem simultaneously in two different places. "Aha!" you might think, as I did. "Then surely we can mount the backups read-only in /snapshot, and read-write in /root/snapshot at the same time!"
Alas, no. Say your backups are on the partition /dev/hdb1. If you run the following commands,
mount /dev/hdb1 /root/snapshot
mount --bind -o ro /root/snapshot /snapshot
then (at least as of the 2.4.9 Linux kernel–updated, still present in the 2.4.20 kernel), mount will report /dev/hdb1 as being mounted read-write in /root/snapshot and read-only in /snapshot, just as you requested. Don’t let the system mislead you!
It seems that, at least on my system, read-write vs. read-only is a property of the filesystem, not the mount point. So every time you change the mount status, it will affect the status at every point the filesystem is mounted, even though neither /etc/mtab nor /proc/mounts will indicate the change.
In the example above, the second mount call will cause both of the mounts to become read-only, and the backup process will be unable to run. Scratch this one.
Update: I have it on fairly good authority that this behavior is considered a bug in the Linux kernel, which will be fixed as soon as someone gets around to it. If you are a kernel maintainer and know more about this issue, or are willing to fix it, I’d love to hear from you!
My solution: using NFS on localhost
This is a bit more complicated, but until Linux supports mount --bind with different access permissions in different places, it seems like the best choice. Mount the partition where backups are stored somewhere accessible only by root, such as /root/snapshot. Then export it, read-only, via NFS, but only to the same machine. That’s as simple as adding the following line to /etc/exports:
/root/snapshot 127.0.0.1(secure,ro,no_root_squash)
then start nfs and portmap from /etc/rc.d/init.d/. Finally mount the exported directory, read-only, as /snapshot:
mount -o ro 127.0.0.1:/root/snapshot /snapshot
And verify that it all worked:
mount
...
/dev/hdb1 on /root/snapshot type ext3 (rw)
127.0.0.1:/root/snapshot on /snapshot type nfs (ro,addr=127.0.0.1)
At this point, we’ll have the desired effect: only root will be able to write to the backup (by accessing it through /root/snapshot). Other users will see only the read-only /snapshot directory. For a little extra protection, you could keep mounted read-only in /root/snapshot most of the time, and only remount it read-write while backups are happening.
Damian Menscher pointed out this CERT advisory which specifically recommends against NFS exporting to localhost, though since I’m not clear on why it’s a problem, I’m not sure whether exporting the backups read-only as we do here is also a problem. If you understand the rationale behind this advisory and can shed light on it, would you please contact me? Thanks!
Extensions: hourly, daily, and weekly snapshots
With a little bit of tweaking, we make multiple-level rotating snapshots. On my system, for example, I keep the last four "hourly" snapshots (which are taken every four hours) as well as the last three "daily" snapshots (which are taken at midnight every day). You might also want to keep weekly or even monthly snapshots too, depending upon your needs and your available space.
Keep an extra script for each level
This is probably the easiest way to do it. I keep one script that runs every four hours to make and rotate hourly snapshots, and another script that runs once a day rotate the daily snapshots. There is no need to use rsync for the higher-level snapshots; just cp -al from the appropriate hourly one.
Run it all with cron
To make the automatic snapshots happen, I have added the following lines to root’s crontab file:
0 */4 * * * /usr/local/bin/make_snapshot.sh
0 13 * * * /usr/local/bin/daily_snapshot_rotate.sh
They cause make_snapshot.sh to be run every four hours on the hour and daily_snapshot_rotate.sh to be run every day at 13:00 (that is, 1:00 PM). I have included those scripts in the appendix.
If you tire of receiving an email from the cron process every four hours with the details of what was backed up, you can tell it to send the output of make_snapshot.sh to /dev/null, like so:
0 */4 * * * /usr/local/bin/make_snapshot.sh >/dev/null 2>&1
Understand, though, that this will prevent you from seeing errors if make_snapshot.sh cannot run for some reason, so be careful with it. Creating a third script to check for any unusual behavior in the snapshot periodically seems like a good idea, but I haven’t implemented it yet. Alternatively, it might make sense to log the output of each run, by piping it through tee, for example. mRgOBLIN wrote in to suggest a better (and obvious, in retrospect!) approach, which is to send stdout to /dev/null but keep stderr, like so:
0 */4 * * * /usr/local/bin/make_snapshot.sh >/dev/null
Presto! Now you only get mail when there’s an error. 🙂
Backup Scheduling:
Tar is quite useful for copying directory trees, and is much more powerful than cp. To copy directory /home/myhome/myimportantfiles to /share/myhome/myimportantfiles:
cd /home/myhome/myimportantfiles
tar -cvf - . | tar -C /share/myhome/myimportantfiles/ -xv
To schedule this to happen every day at 1am:
crontab -e
vi will run. If you are unfamiliar with vi, push ‘i’ to insert, and enter:
0 1 * * 0-6 cd /home/myhome/myimportantfiles;tar -cvf - * | tar -C /share/myhome/myimportantfiles/ -xv
push ‘escape’, ‘:’, ‘wq’ (or ‘escape’, ‘ZZ’) to save your crontab entry.
Verify your new job with crontab -l:
$ crontab -l
# DO NOT EDIT THIS FILE - edit the master and reinstall.
# (/tmp/crontab.17295 installed on Thu May 3 07:58:27 2001)
# (Cron version -- $Id: crontab.c,v 2.13 1994/01/17 03:20:37 vixie Exp $)
0 1 * * 0-6 cd /home/myhome/myimportantfiles;tar -cvf - * | tar -C /share/myhome/myimportantfiles/ -xv
If you want to edit the job by hand, the file is located under your username in /var/spool/cron.
Telnet Server Configuration in Linux
Telnet Server Configuration is very easy both in Windows Server and Linux.
To run or enable the telnet service following file need to be edited.
/etc/xinetd.d/telnet
and restart xinetd service.
Create a /etc/nologin file will prevent any remote login via telnet.
If you are in an environment where you work with multiple UNIX computers networked together, you will need to work on different machines from time to time. The telnet command provides you with a facility to login to other computers from your current system without logging out of your current environment. The telnet command is similar to the rlogin command described earlier in this section.
The hostname argument of telnet is optional. If you do not use the host computer name as part of the command, you will be placed at the telnet prompt, usually, telnet>. There are a number of sub-commands available to you when you are at the telnet> prompt. Some of these sub-commands are as follows:
-
exit to close the current connection and return to the telnet> prompt if sub-command open was used to connect to the remote host. If, however, telnet was issued with the host-name argument, the connection is closed and you are returned to where you invoked the telnet command.
-
display to display operating arguments.
-
open to open a connection to a host. The argument can be a host computer name or address. telnet will respond with an error message if you provide an incorrect name or address.
-
quit to exit telnet.
-
set to set operating arguments.
-
status to print status information.
-
toggle to toggle operating arguments (toggle ? for more).
-
? to print help information.
Examples Assume that you work with two networked computers, box1 and box2. If you are currently logged in on box1, you can execute the following command to login into box2:
telnet box2
As a response to this command, box2 will respond with the login screen where you can enter your userid and password for box2 to login. After completing your work on box2, you can come back to box1.
Basic user security:
My Red Hat 7.3 server and wu-ftp server 2.6.2-5 does not support this configuration to prevent shell access and requires a real user shell. i.e. /bin/bash It use to work great in older versions. If it works for you, use it, as it is more secure to deny the user shell access. You can always deny telnet access.
-
Disable remote telnet login access allowing FTP access only:
Change the shell for the user in /etc/passwd from /bin/bash to be /etc/ftponly.
...
user1:x:502:503::/home/user1:/etc/ftponly
...
Create file: /etc/ftponly.
Protection set to -rwxr-xr-x 1 root root
Contents of file:
#!/bin/sh
#
# ftponly shell
#
trap "/bin/echo Sorry; exit 0" 1 2 3 4 5 6 7 10 15
#
Admin=root@your-domain.com
#System=`/usr/ucb/hostname`@`/usr/bin/domainname`
#
/bin/echo
/bin/echo "********************************************************************"
/bin/echo " You are NOT allowed interactive access."
/bin/echo
/bin/echo " User accounts are restricted to ftp and web access."
/bin/echo
/bin/echo " Direct questions concerning this policy to $Admin."
/bin/echo "********************************************************************"
/bin/echo
#
# C'ya
#
exit 0
The last step is to add this to the list of valid shells on the system.
Add the line /etc/ftponly to /etc/shells.
Sample file contents:
/bin/bash
/bin/bash1
/bin/tcsh
/bin/csh
/etc/ftponly
An alternative would be to assign the shell /bin/false which became available in later releases of Red Hat.
